Search
I tried to make a phone case.
I tried to make a phone "wallet" case. I used the inside of my old one (what you press your phone into), cardboard from a an old box and some leftover vinyl flooring. I originally wanted to glue everything but ended up stapling some bits. these pics where hastily made and don't do the thing justice. Let's see how well this holds up (I seldom have it in my pocket so that helps).
A wood bench made from scraped pallets
cross-posted from: https://sh.itjust.works/post/22165919
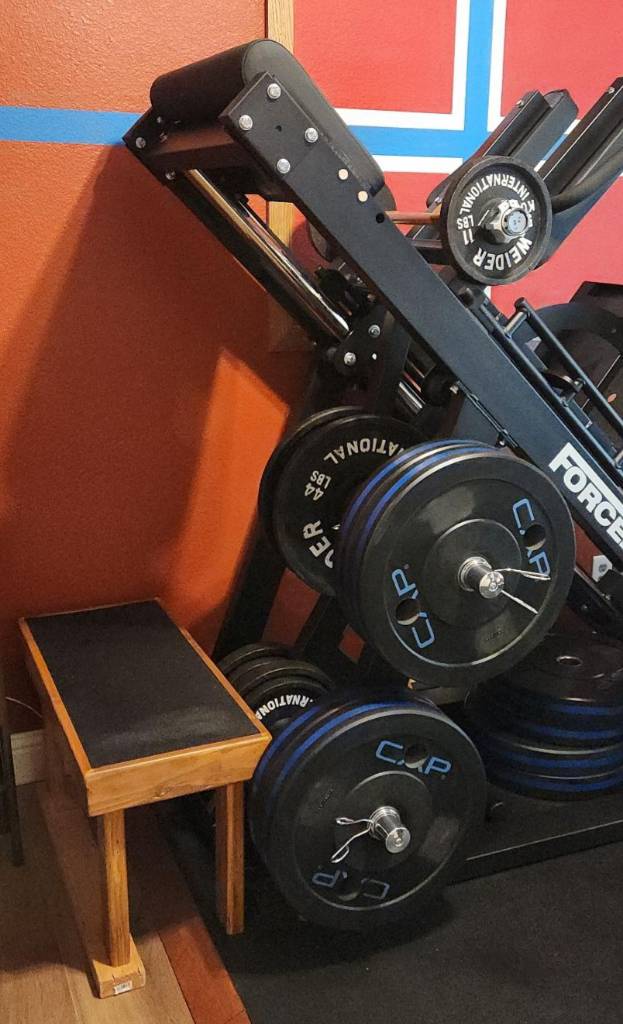
> This entry of mine will not match the customary craftsmanship found in this community, but seeing as this was formerly a pile of miscellaneous, warped scrap 2x4 segments recovered from old pallets, I think I've made a reasonable show of things. > > This bench is for my homegym, designed to be stood upon, which is why there's a rubber mat inlaid on the surface, a leftover of the gym floor. My design criteria called for even the edge of the top surface to support weight, so the main "box" of the bench uses 2x4 segments mitered (badly) together at 45 degrees, held together with wood glue. > > I then routed the inner edge to support a 1/2" plywood sheet, which is screwed into the box. And then the rubber mat is glued down to the sheet, so there are no visible screws. > > Finally, the legs are also 2x4 segments, cut so the bench sits 43 cm (~17 inch) from the floor; this is only coincidentally similar to the IPF weightlifting bench standards. I used screws instead of glue, just in case the legs needed to be shortened later. > > All edges were rounded over with a 1/2" bit, as the bench is expected to be picked up and moved frequently. And everything stained in cherry and clear-coated. > > Some of the annoyances from using scrap included: > * Stripping old paint off. Awful chemicals, awful scrubbing, awful disposal. > * Sanding away twists along the 2x4 segments > * Filling nail holes or arranging them so they don't draw attention > * My lack of experience with clamping and gluing wood that's not dimensionally consistent > > !wood bench beside a leg press > > If I were to do this again, I'd figure out a way to reduce the amount of routing needed for the inner edge, since I essentially removed 0.75 inch by 1.5 inch of material all around the edge. This took forever, and perhaps a CNC machine would have simplified things, in addition to squaring and planing the surfaces before mitering. > >
Making an 80 cm (31.5 inch) dumbbell from a Titan 15-inch adjustable dumbbell
cross-posted from: https://sh.itjust.works/post/20965205
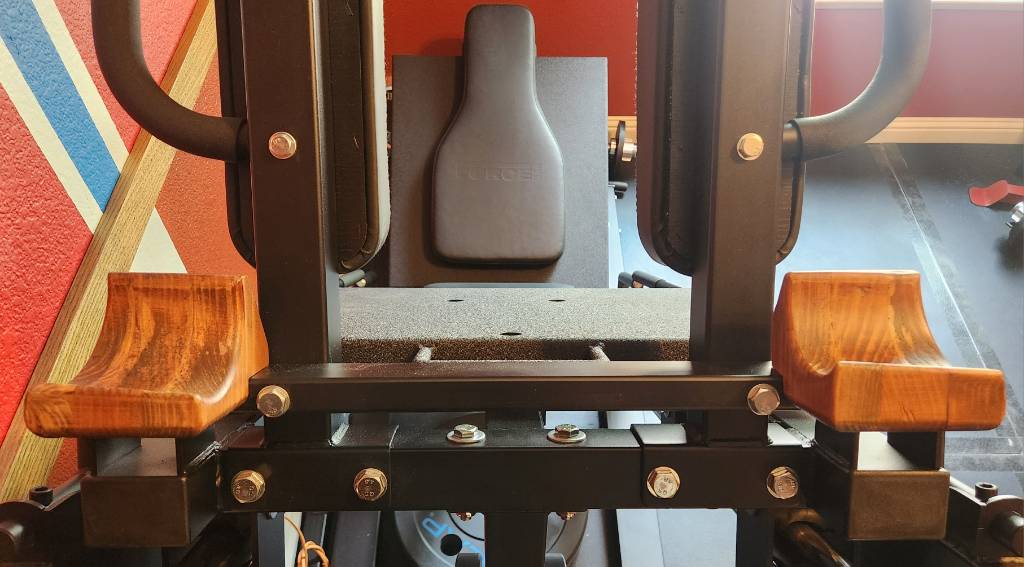
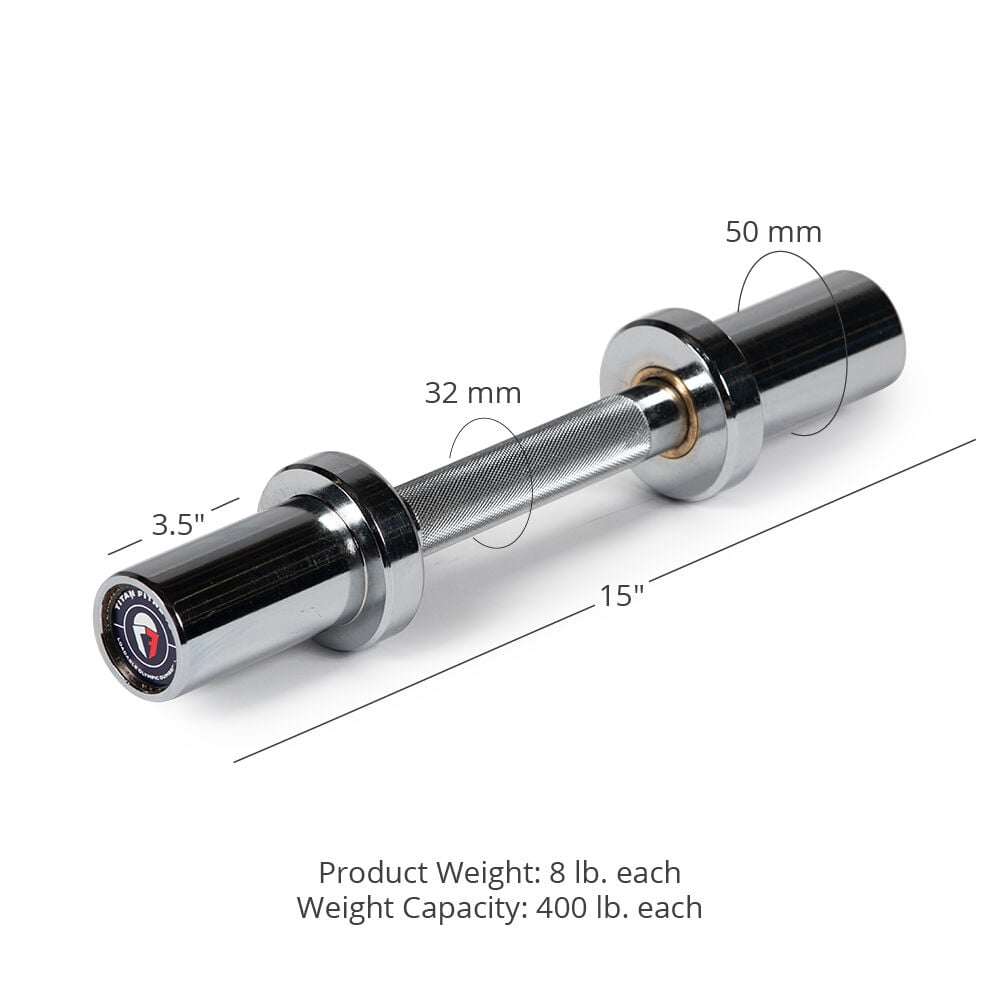
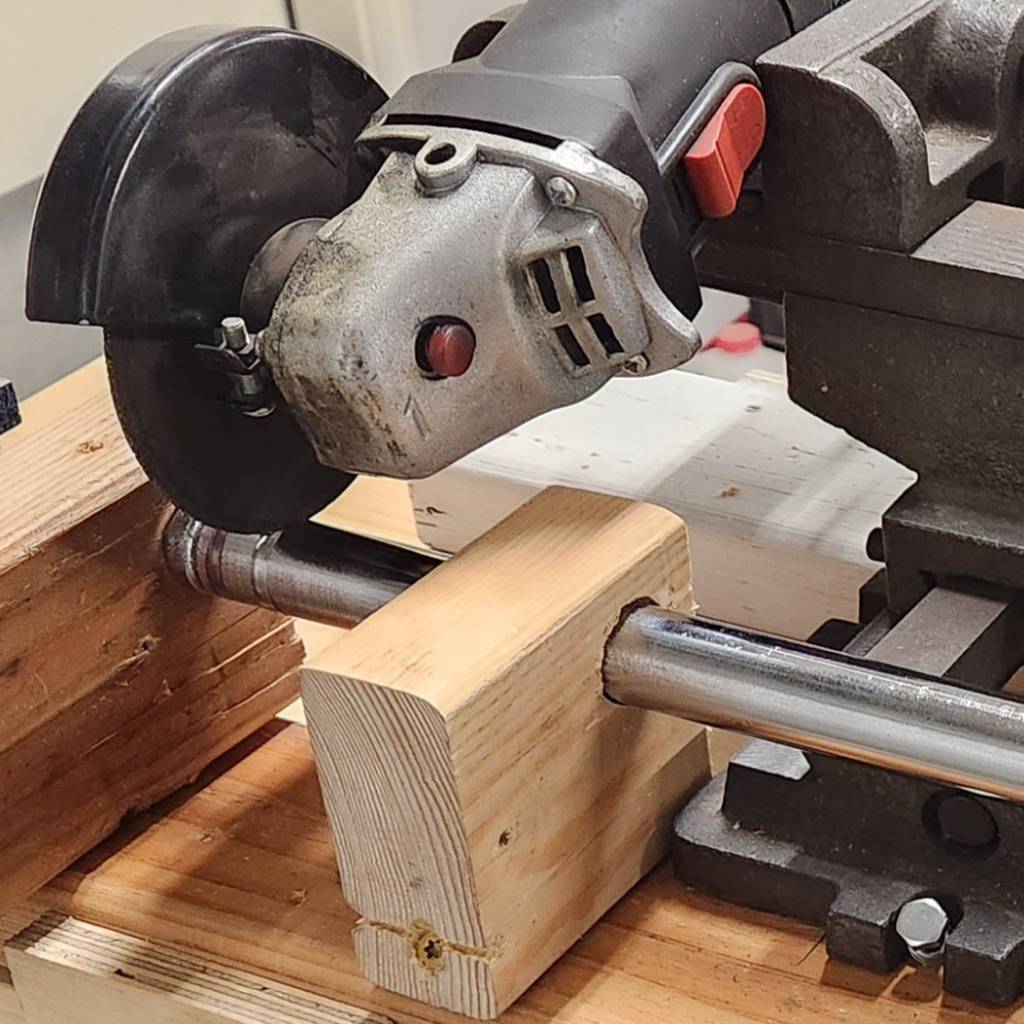
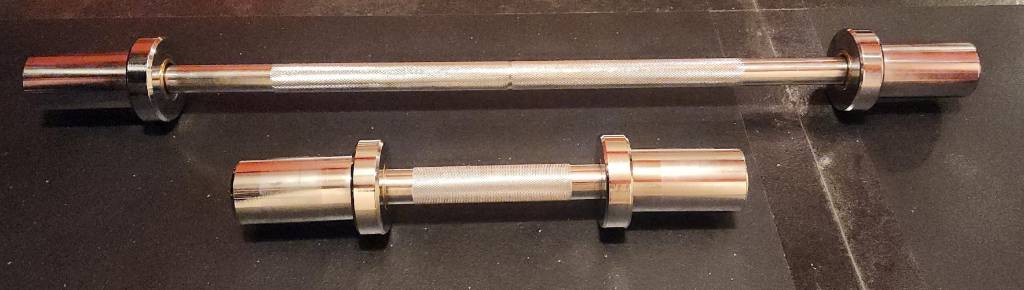
> This is the story of how I turned a 15" Titan adjustable dumbbell to be 80 cm (31.5 inch) long. Why? Because I have a space-constrained home gym but still wanted a leg press, and so I had to remove its original barbell. > > In its place, I built a pair of wood mounts for a normal barbell to rest upon, covered in that earlier post. However, since this machine is wall-adjacent, such a barbell would have to fit inside the width of the leg press, so about 80 cm. But must also be wider than the spacing from outside-edge to outside-edge of the wood mounts, which is 60 cm. > > !wooden mounts where a leg press barbell would be > > Such a short barbell -- or long dumbbell -- does not readily exist commercially, with the narrowest one I've seen being 48 inch barbells, which are still too wide. So I decided to build my own, using my spare Titan dumbbell as the base. > > To start, the Titan dumbbells are excellent in this capacity, as the shaft diameter is 28 mm -- not 32 mm as the website would indicate -- which is a common diameter, if I am to cut short a cheap barbell to replace this dumbbell's shaft. > > In keeping with my preexisting frugality, I purchased a cheap 1-inch barbell, hoping that it adopts the Olympic 28 mm shaft diameter, and not the 29 mm deadlift bar shaft diameter, as the Titan collars have small clearances. Matching neither, I find that this bar is closer to 23 mm, which although will fit into the existing collars, poses its own issues. > > Nevertheless, this 7 ft barbell can conveniently be cut in half to yield two 42 inch segments. And then the included bar stops can be loped off, and then the length further refined to 77 cm, thus hiding the marks from the bar stop within the Titan collars, and also centering the (meh) knurling from the cheap bar. > > But perhaps a picture will be more explanatory. Here, the original collar is dismantled at the top, showing the original shaft with a groove cut into it, about 1/4-inch from the end. Into that groove would fit two half-rings with an inner diameter of 20.4 mm and an outer diameter of 40 mm. In fact, all the parts inside the collar use 40 mm outer diameter, except the spacer cylinder, which is smaller at 37 mm. All of these parts are held captive within the collar using the C-ring and the geometry of the collar itself. > > ! > > To deal with the difference between the collar expecting 28 mm, and the cheap bar's 23 cm, I designed an ABS 3d printed part in FreeCAD to act as a bushing, upon which the original Titan brass bushing will ride upon. This ABS bushing is held captive by way of its center bulge, which fits within the dead space inside the collar. > > ! > > As for how I cut the groove into the end of the new shaft, I still don't own a lathe. So the next best is to mount an angle grinder onto a "cross slide vise" taken from a drill press, with the shaft secured in a wooden jig to only allow axial rotation manually. The vise allows precision control for the cutting wheel's depth, with me pausing frequently to measure how close the groove is to the desired 20.4 mm inner diameter. This is.... not a quick nor precise process. But it definitely works. > > ! > > After reassembling both collars onto the new shaft and lubricating with white lithium, the final result is a long dumbbell (or short barbell) with Titan's 3.5 inch collars on the end, with 63 cm of shaft exposed and 80 cm from end to end. The ABS bushing is remarkably smooth against the brass bushing, after some sanding with 180 grit. The whole dumbbell weights 5.48 kg empty. > > ! > > Here is the comparison with the stock Titan dumbbell. It's pretty amazing how the knurling conveniently lined up. It fits well onto the wood mounts of the leg press. > > !Don't ever talk to me or my son ever again > ! > > But why would I do all this just to add a weirdly long 3.5-inch collar dumbbell to a leg press, when it already can accept weights underneath the carriage? I will answer that in a follow-up post.
20 kg bumper plates, made from 45 lbs bumper plates
cross-posted from: https://sh.itjust.works/post/20133956
> With the exception of the weight stack for my functional trainer and its change plates, I wanted all my subsequent equipment to be metric. To that end, I saw some cheap 45 lbs CAP bumper plates, and figured that I could make them into metric with not too much effort. > > Some rough math prior to purchasing suggested that these plates -- with a width of 68 mm -- could be slimmed down from 20.4 kg (45 lbs) to nearly 20.0 kg, by boring two 2" holes (51 mm). To keep balance, the holes should be on on diametrically opposite ends. And should be neither too close to the edge, nor too close to the center, since the plate still needs to absorb a drop without deforming. That the bored holes are 51 mm is a fantastic happenstance, nearly identical to the center hole for Olympic-spec plates. > > Examining each plate before drilling, I found that the silkscreen letter A in "CAP" is well-centered diametrically, although it doesn't line up with the matching logo on the back side. Also, since these are cheap CAP plates, the initial weight tolerances are pretty poor. 45 lbs should be 20.41 kg (2 sig figs), but my first four plates registered at 20.58, 20.51, 20.64, 20.56. That's nearly an extra half pound! > > To drill the holes perfectly plumb, I did the work on a drill press using a 2-inch hole saw. Because the saw wasn't deep enough to go through the full width in one pass, I started with a 1/4-inch (6 mm) pilot hole straight through the tip of the letter A in "CAP". Then I drilled from both sides with the hole saw until a ~200 gram rubber core fell out. Repeat for the second bore. > > To finish, I took some sandpaper to remove the old "45 lbs" markings, then used my label maker to affix new values. All plates are still high, but ranged from 20.030 kg to 20.105 kg. Not too shabby, I think. > > In a happy coincidence, the position of these bored holes is perfect for one's thumbs when grasping the plate like a steering wheel, making it easier to pick up when laid flat on the floor. I also added a strip of blue electrical tape around the perimeter to make it easy to identify these as 20 kg. > > In the end, I got the cheap metric plates I wanted, and it came with a usability improvement as well. I've not dropped these yet, so time will tell how they hold up.
I made a Game Boy chiptune version of GIRL HELL 1999 by Femtanyl
Chiptunes, yo! The Game Boy can only play four sounds at the same time, so it took some trickery to cram the song into that sound chip.
Update - Crossposted to [email protected] - Leather Milk Carton
Creator: https://www.instagram.com/matzuto/
Is it allowed to post craft made by other people?
Basically title.
I have two left hands, but sometimes I stumbled upon a nice creation from a small artisan on the Internet, and would like to share. Is it allowed?
Second attempt at whittling a wizard
Sometime during the pandemic I bought a basic woodcarving kit on a whim, tried to follow along with Doug Linker's beginner wizard tutorial, but got discouraged and put everything into the closet when my wizard turned out lousy.
Today was such a pretty day that I figured I should try again. Wizard #2 turned out much better.
The first knitted socks I ever truly loved
cross-posted from: https://lemm.ee/post/17097990
> Behold the socks that created my obsession! These were actually the third pair I knitted but the first ones that made me understand why knitted socks are so great. > > The pattern is the classic Hermione's Everyday Socks, and the yarn is a special blend of all kinds of things including silk and bamboo, bought as a souvenir from a shop called Yarnia in Portland during a big US road trip we took in 2015. You can sort of see the different strands in it in this pic here. > > !WIP sock cuff with trailing yarn > > These are my lucky socks. I wore them to job interviews, I wore them the day I got accepted into uni, and I wore them for confidence whenever I was doing something scary. > > Alas, after years of heavy use, one of them has a hole in the ball of the foot and I expect the other one won't be far behind. > > !finger poking through a hole in a knitted sock > > So given that for once I've managed not to overburden myself with Christmas crafting this year, I think my project for the holidays is going to be to learn how to fix these. At least they'll be usable for wearing around the house, and given they're 8 years old that's pretty good going really! > > (Please excuse the wildly different colours from one image to the next, this was a long time ago and I did not know how to camera)
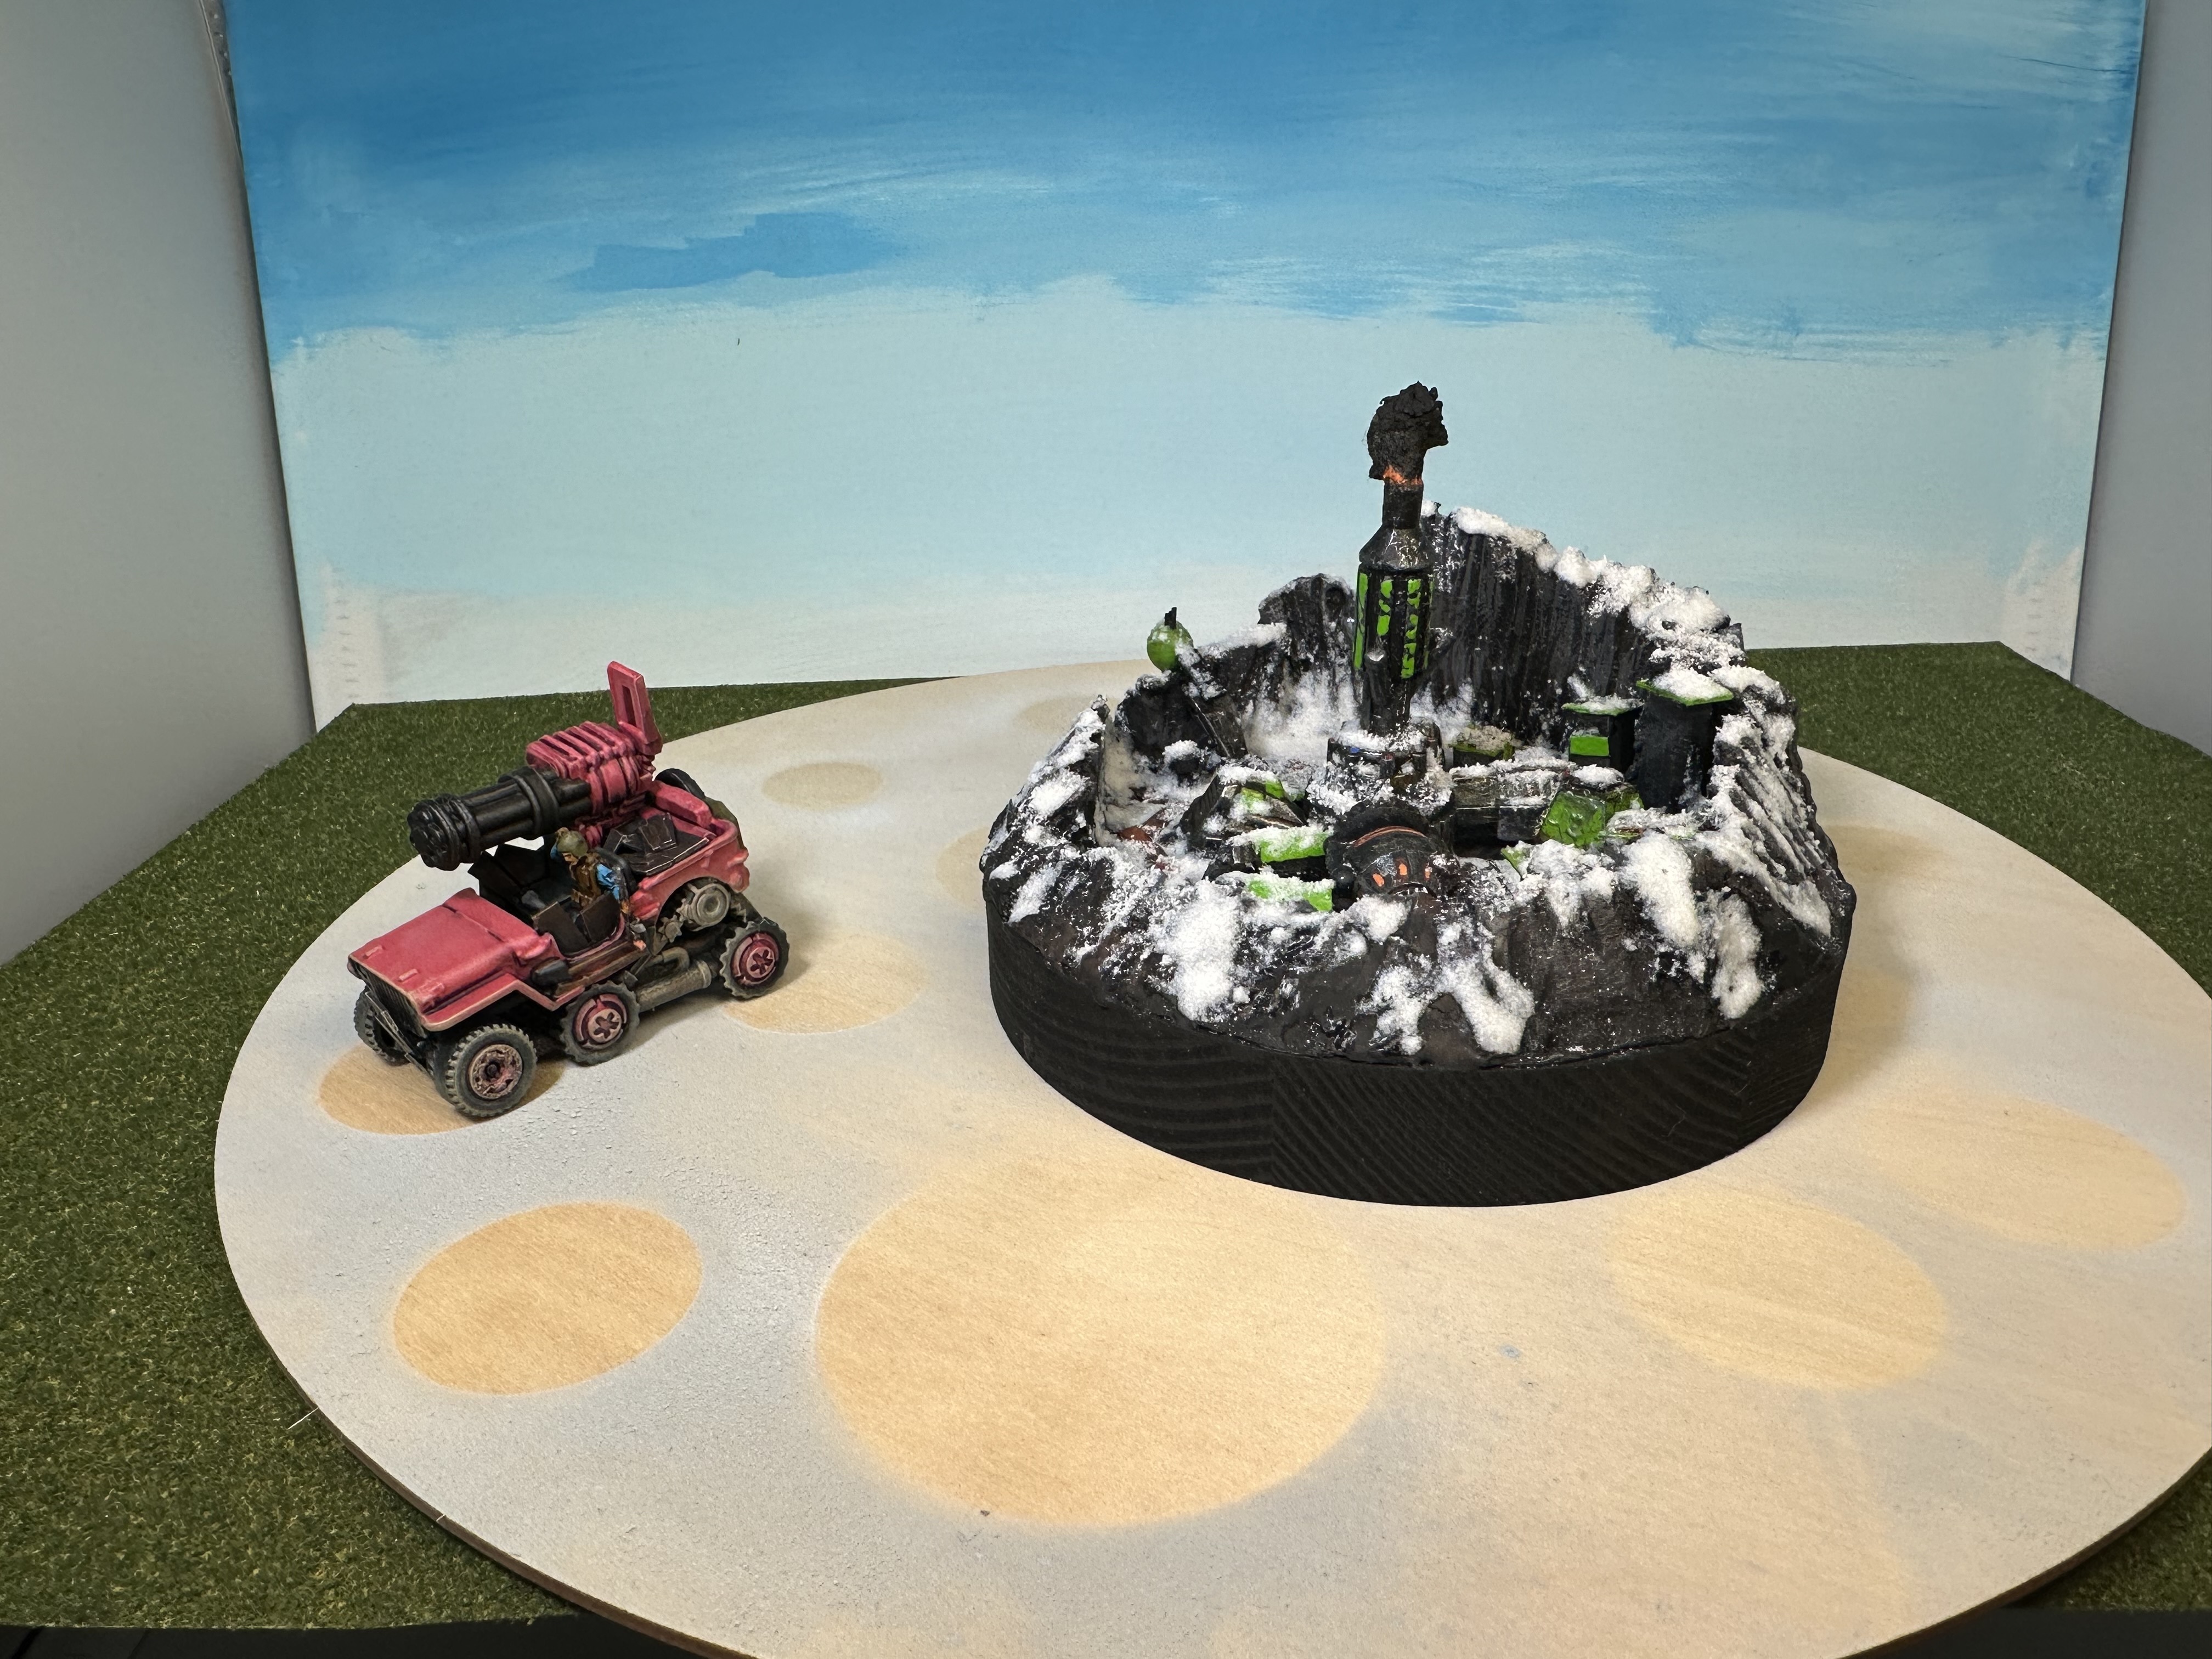
Frostpunk inspired city
I consider this kind of an experimental failure. I was playing with snow effects and trying some new things. They didn't fully work out, but I did get some snow effect practice.
Here’s an album of other angles.
Bookshelf I made
cross-posted from: https://lemmy.one/post/32191
> Here are some more pictures: > > ! > > ! > > ! > > ! > > I originally posted this in the woodworking subreddit. It's my first real woodworking project. Here's the description I included with that post: > > I am happy to report that so far I have not regretted bringing home that radial arm saw a few months ago. I used it to successfully build a small, adjustable bookshelf for my sister's baby shower. > > > > I made it from 3/4" Europly with maple veneer and finished it with Odie's Oil. I glued all the joints with Titebond III. The back is 1/8" hardboard to which I applied a cool looking adhesive backed wallpaper. > > > > I didn't have a dado stack, so I got a little creative with the joints for the legs. I think it worked out because the plys are continuous the same way they are around the mitered corners. > > > > Not sure what my next project will be, but I'm looking forward to doing something soon. My family was really impressed, so this effort felt really rewarding.
cross-posted from: https://lemmy.86thumbs.net/post/127602
> I released an electronic music album with a friend a few days ago. All feedback is welcome! You can also find it on the archive here if you want different audio quality downloads. Hope somebody out there enjoys it!
Made myself some ridiculous socks :)
cross-posted from: https://lemm.ee/post/8160779
> I know I know, everyone's sick of me posting about these socks. But look! They're done! You probably never have to see them ever again (at least until they come up in a fortnightly theme 😆 > > Technically I tried to avoid such different colour pooling from one sock to the other, but as you can see I failed miserably. Don't care at all, they're fabulous, sometimes you just have to let the yarn do its thing! > > Yarn was one-off hand-dyed, and the pattern is apparently discontinued although there's still the Ravelry page, and also @[email protected] found it on the wayback machine when I posted about it previously, thank you for that! > > Pattern is written for DPNs but you can pry my one single circular out of my cold dead hands. > > MOAR PICS! > > ! > > !
KENOBI - The Boonta Eve Redux
I'm a professional film and TV editor. In between jobs, I recut the Kenobi show from a weak 6-hour miniseries to a strong 2-hour movie (including full sound & score remixing via split-audio I managed to get).
If the above link doesn't work, watch here instead!
Password: HELLOTHERE
If Mega is giving you download problems, consider installing jdownloader here. It's a really incredible downloader program that you'll probably wanna keep regardless.
My goal for this redux was to create a tight, entertaining adventure story from the original assets.
Unlike the Patterson cut, or other fan-edits, I did not add any external assets (with one tiny exception that I’m sure you’ll all notice, ha). Adding external assets from other films and shows (or original VFX) tends to break visual unity, and in my opinion is a glaringly obvious addition. The work by other fan-edits is very impressive, but would not fit with the goal of this project.
The Boonta Eve Redux is comprised of the original show itself, but pared-down, shaped, and made strong.
That said, it's important to note that no amount of re-editing can fix fundamental story problems. In my opinion, the entire existence of Kenobi is a rather unfortunate misadventure, driven almost wholly by Disney wanting to push content for content's sake. I feel strongly that having Kenobi and Vader encounter each other between RotS and ANH is, for many reasons, a critical mistake; likewise, having Kenobi and Leia encounter each other is almost as bad.
However, this re-edit addresses some of the most glaring oversights and mistakes of the original show, while highlighting its few true successes. Ultimately, I feel that it's a major improvement.
I'd love to hear your thoughts on the cut. Feel free to share, create torrents, etc.
Thanks for watching!
Almost forgot to actually post my completed (https://artisan.chat/tags/macrame) project from last week, but here we go!
Almost forgot to actually post my completed #macrame project from last week, but here we go!
I am very proud of this for a first attempt, especially considering the kit and instructions weren't great.
Definitely want to do a lot more of this, I suspect most of my friends will be getting macrame'd Christmas gifts this year!
I made this three years ago and it's still making me laugh
cross-posted from: https://lemm.ee/post/1227765
> Throwback post to the Steotchalone 2020 (or however you spell it). I don't normally take part in any time-intensive or team events because frankly I wouldn't be able to keep up, but during the lockdown they ran a version designed for solo participation and I signed up on a total whim. > > Our instructions were to basically pick a palette of six shades with suitable contrast, then await the pattern! > > Thoroughly enjoyed this stitch. It was amazing seeing it come together with so few colours involved, and the texture of the hair and beard is really cool. > > ! > > You can tell I'm proud of it because I basically never FFO anything otherwise. I ironed this and everything! 😄
I've got a Singer 31-15 tabletop I just fixed up and got working but I used a Singer 29k60 to make these
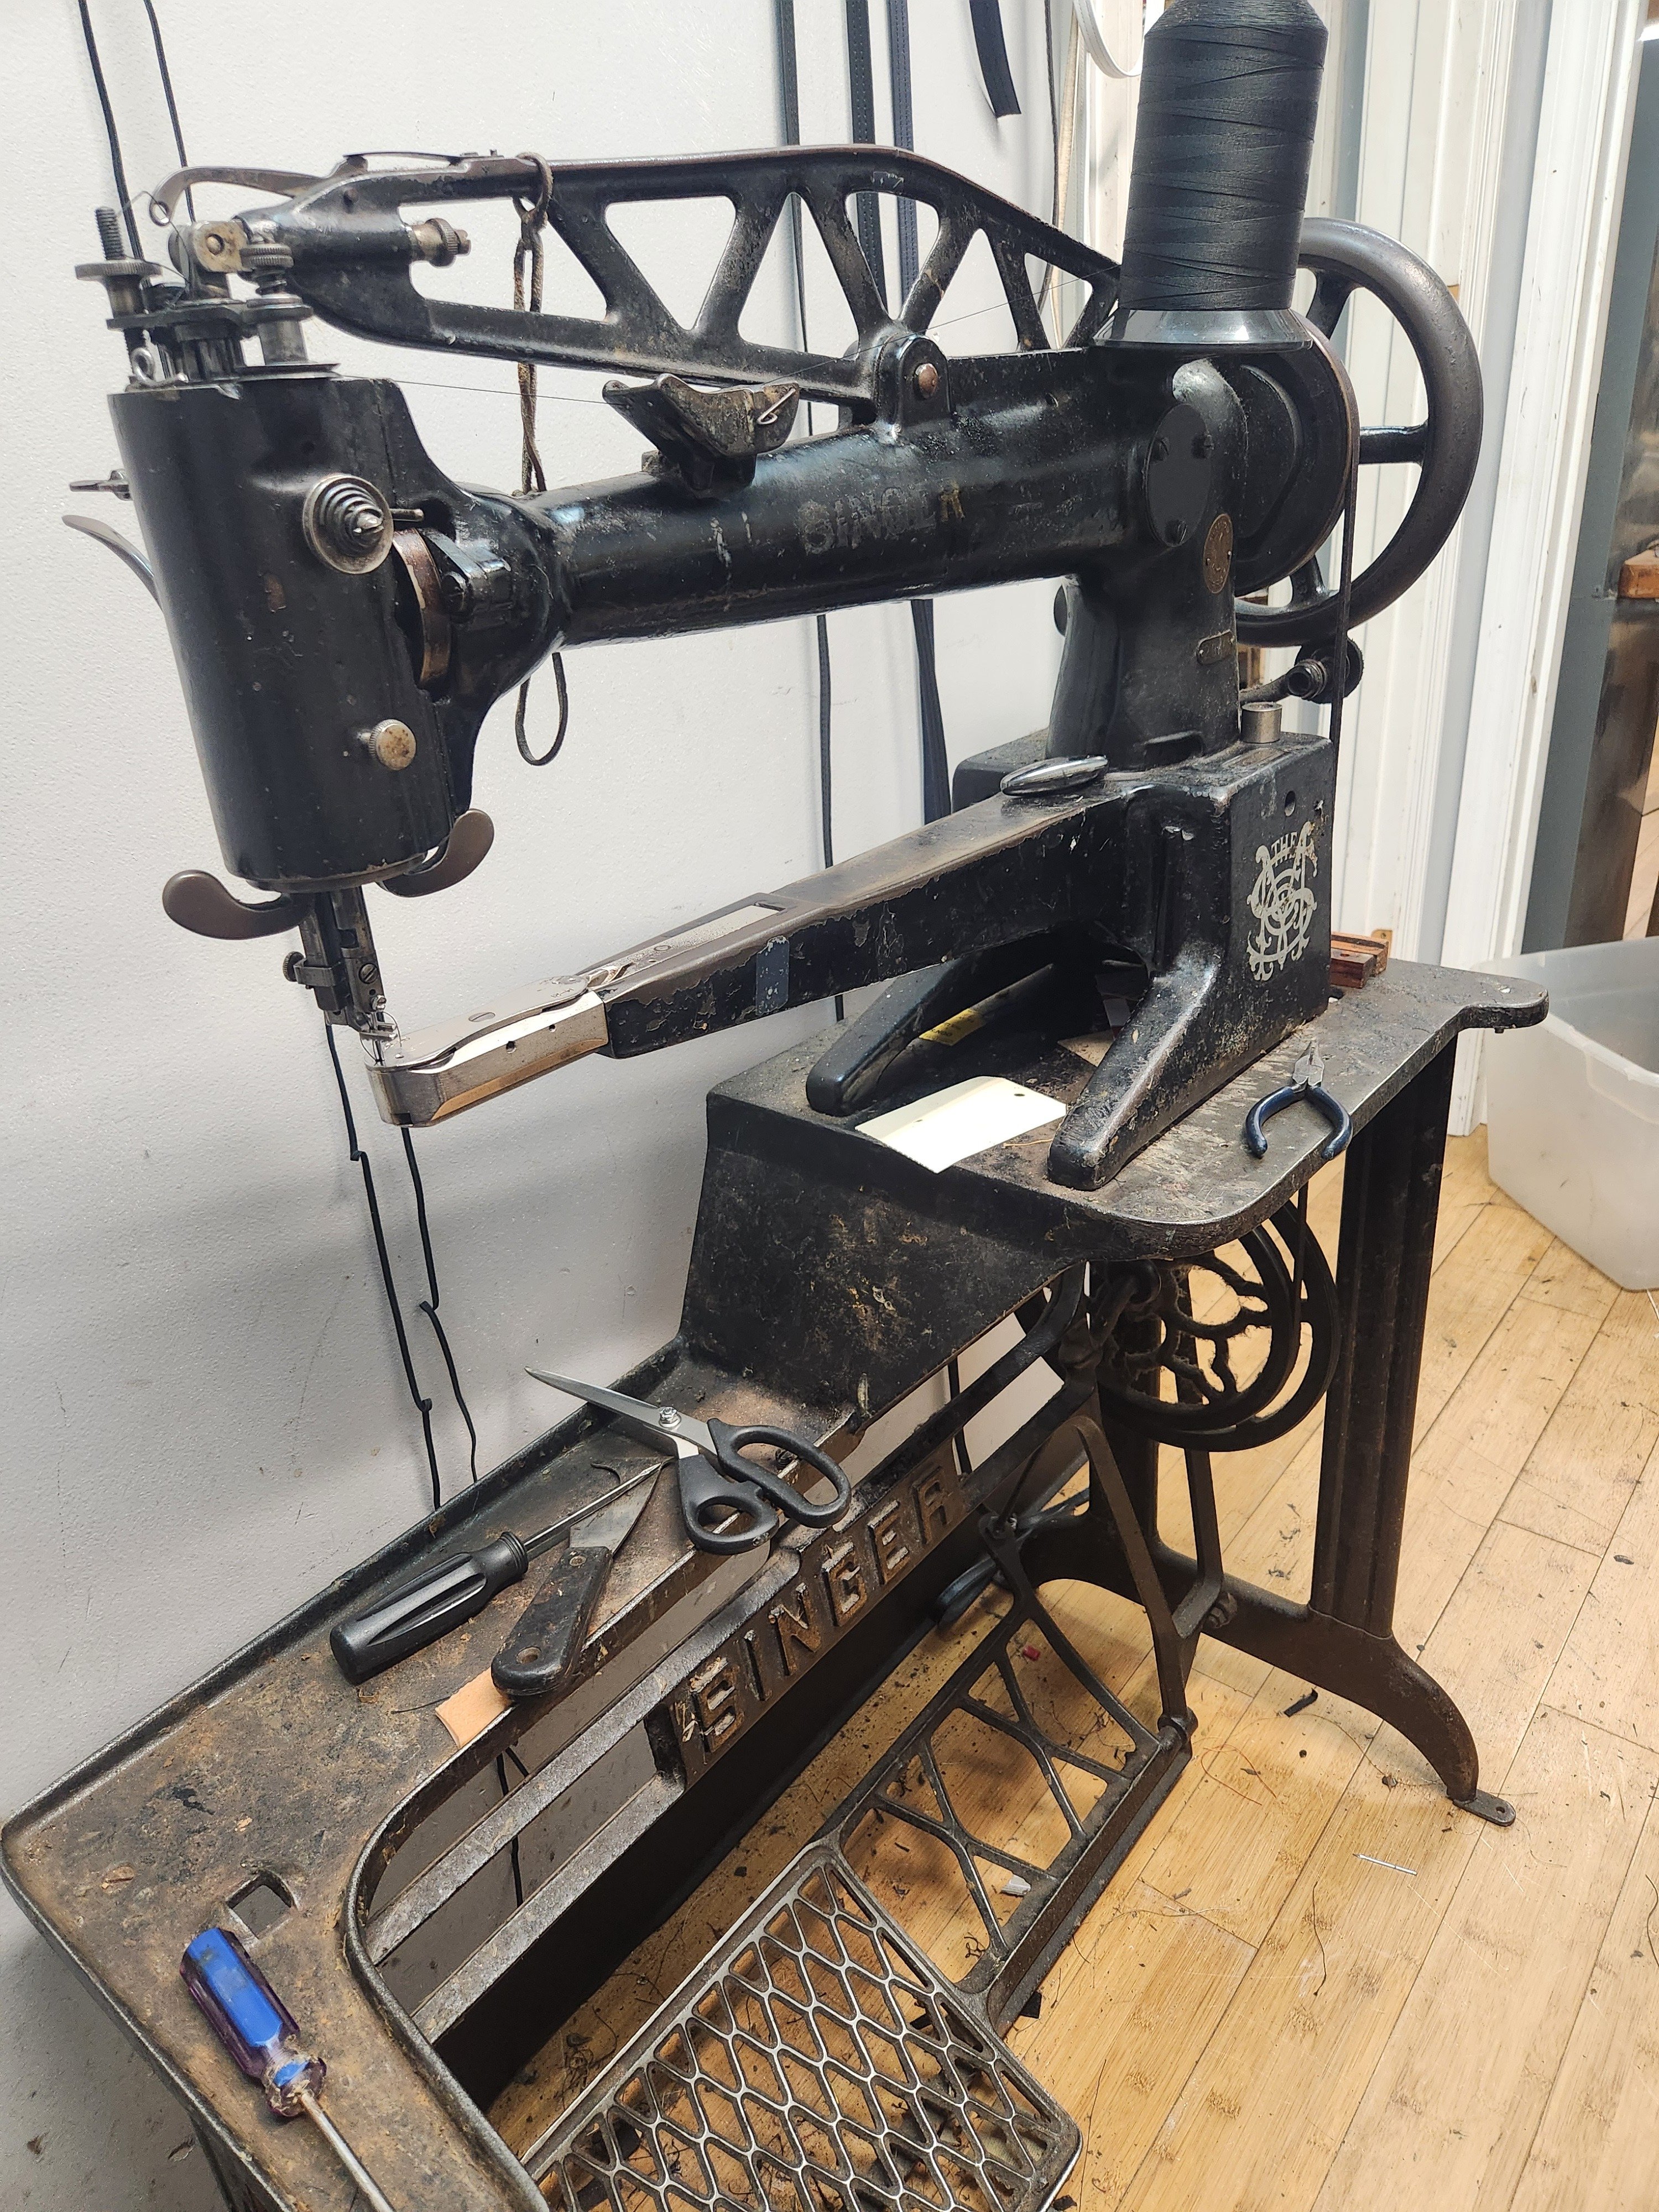
That sounds like it takes some real craftsmanship and a lot of patience.
That actually means a lot to me. I'll admit that impatience is a significant personal flaw of mine. I'm quick to jump down my own throat at a setback. Someone looking at my work and saying "wow that must have taken a lot of patience" wasn't something I was ready to hear.
As for having space for a shop, behold:
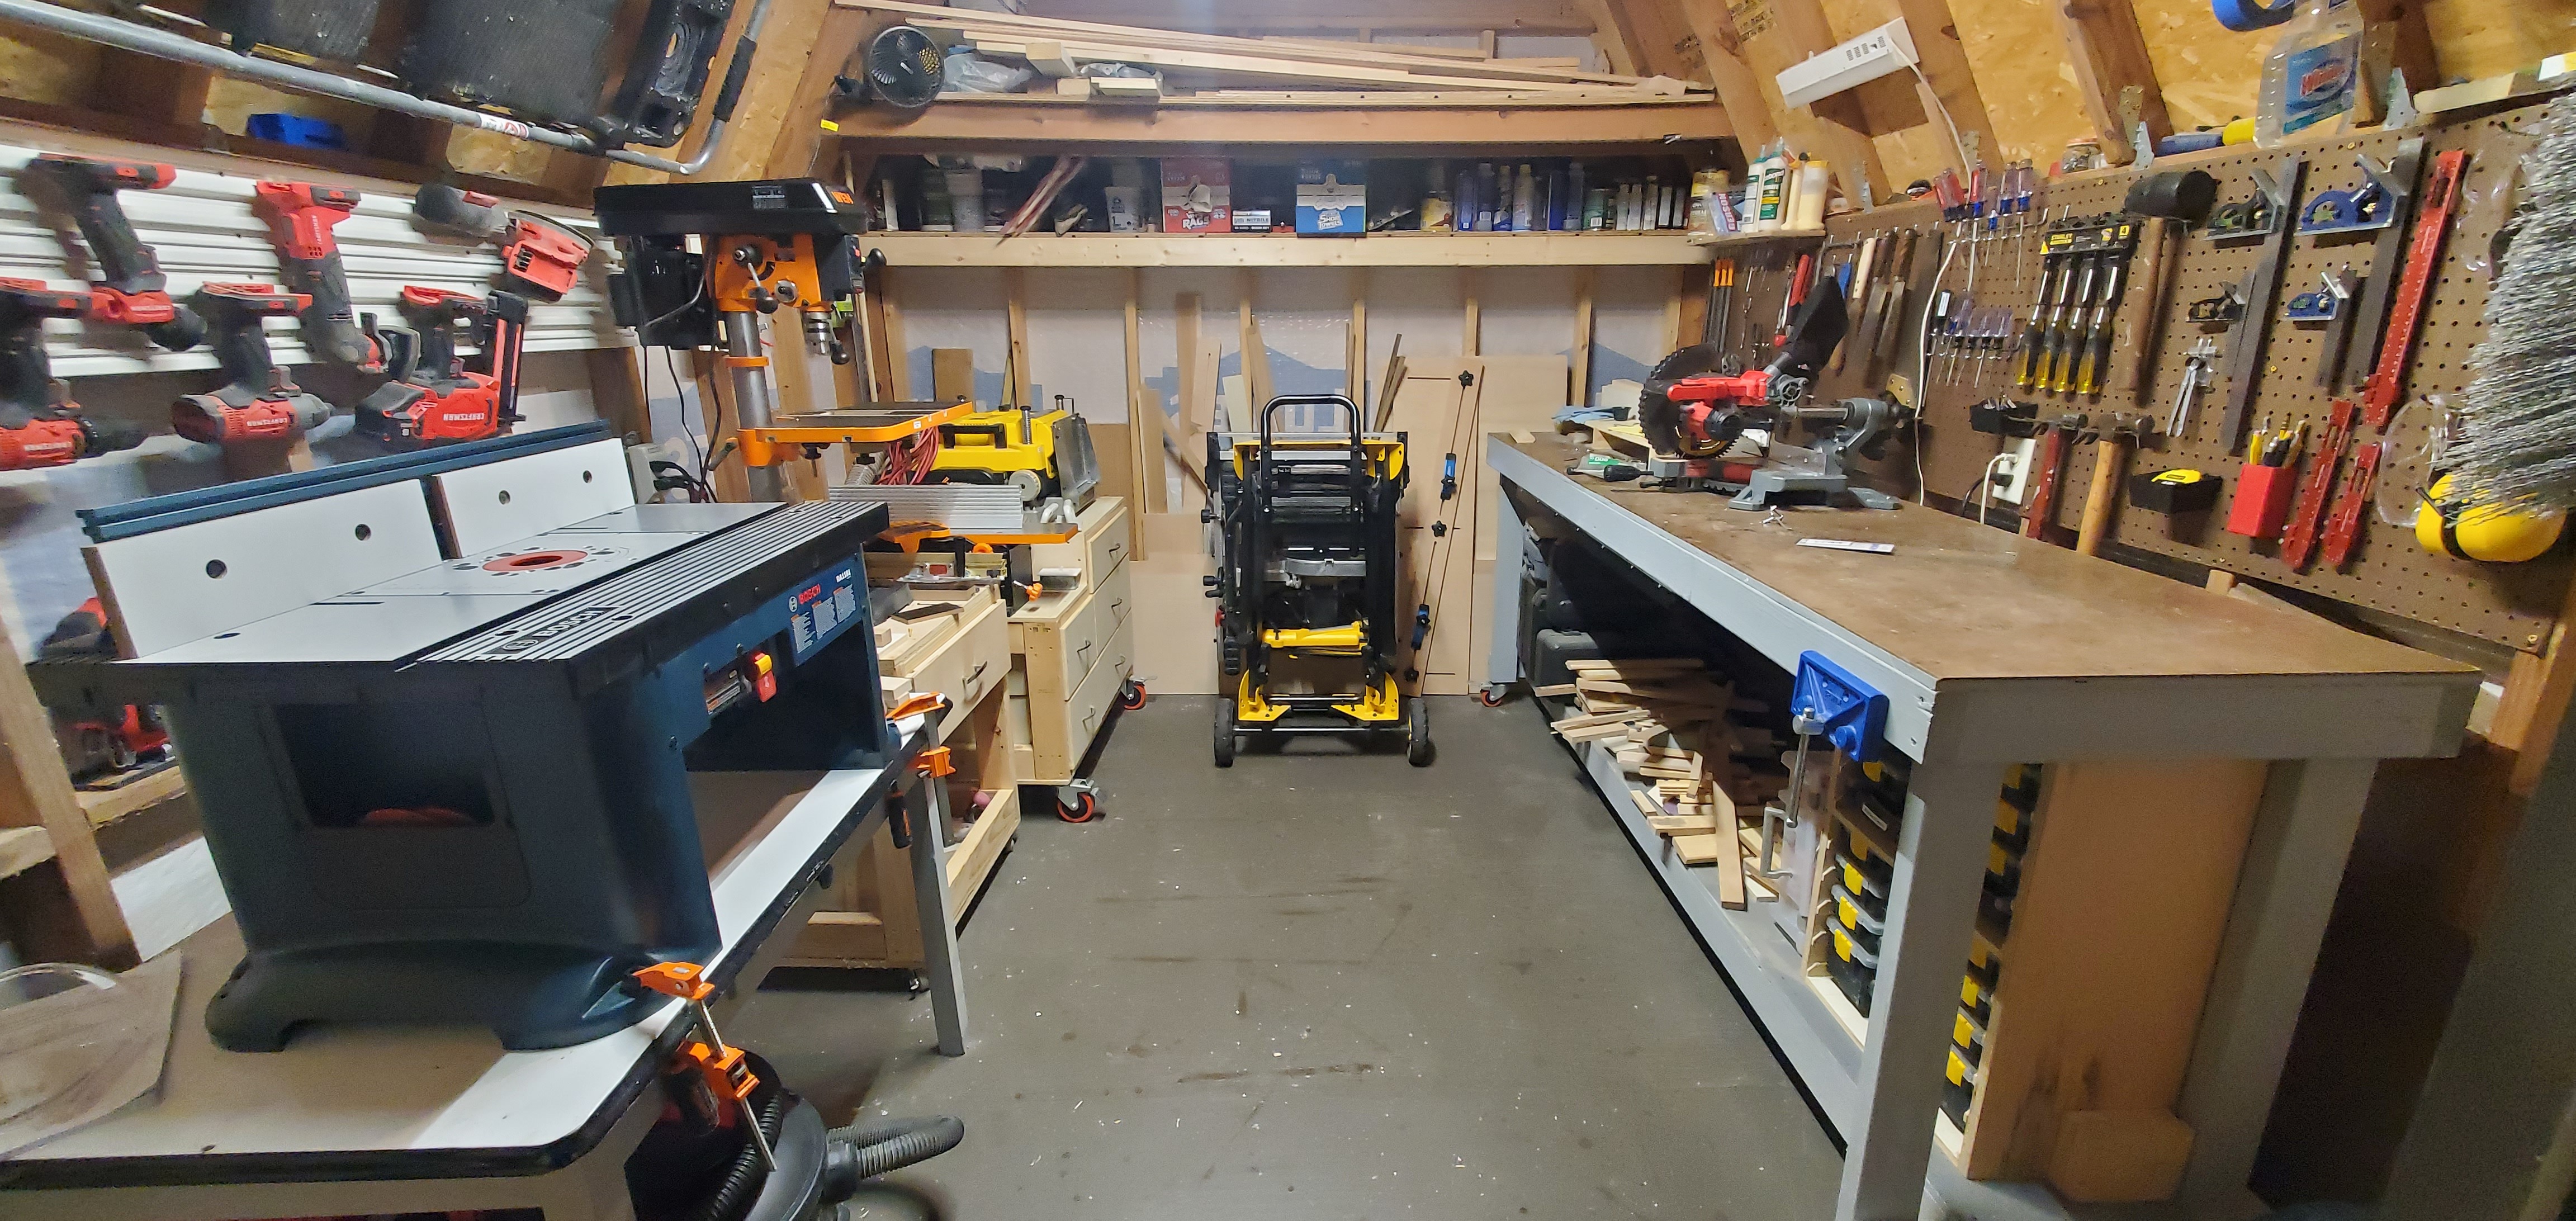
The 10x12 foot garden shed into which I have crammed a nearly complete furniture shop. The table saw and the planer/jointer cart have to go outside to really use them, and I've got absolutely nowhere to put a band saw or a lathe. It would be quite a luxury to have a table saw I don't have to unfold before working. And my little shop is positively cavernous compared to some I've seen. Carve out a little space and pick something out to make.
I think a price can absolutely be affixed to the half afternoon I spent to drill eight of these plates to my satisfaction. And at some point, it'd be easier to buy high-quality metric plates from the start (at double the price).
But what's priceless is turning a daydream into reality, after some rough sketches and not finding anyone else that's done the same. These are also sort-of a talking piece when I show off my homegym during house parties.
Maybe? Specifically, it's from the Disney+ show they made.
Not that Disney is the best messenger, but there's something of value in a superhero show that has very thinly coded episodes about gentrification, rotating door prison systems, and the dangers of social media addiction, among others.
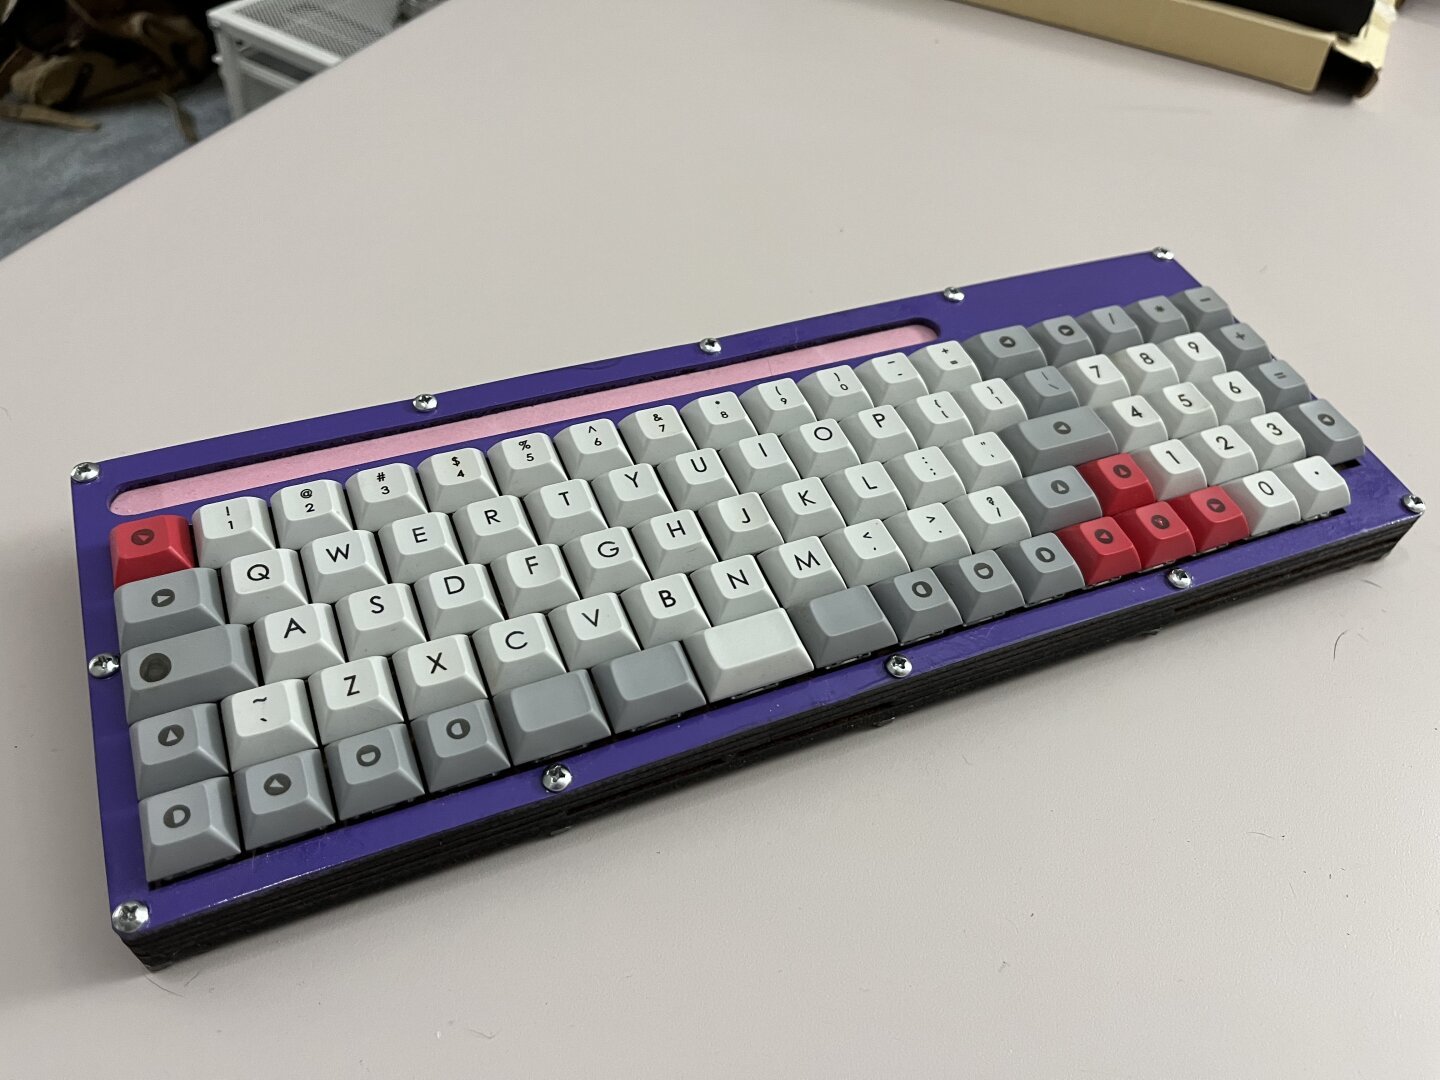
I'm using Cricut Infusible Ink markers. They were pretty much made for this, using heat to dye polyester-based materials, like PBT. I just have a 5w diode laser, and I do it "low and slow," 2% power and 45mm/minute. Black and blue still work best, but the red (pink) and green can be nice too.
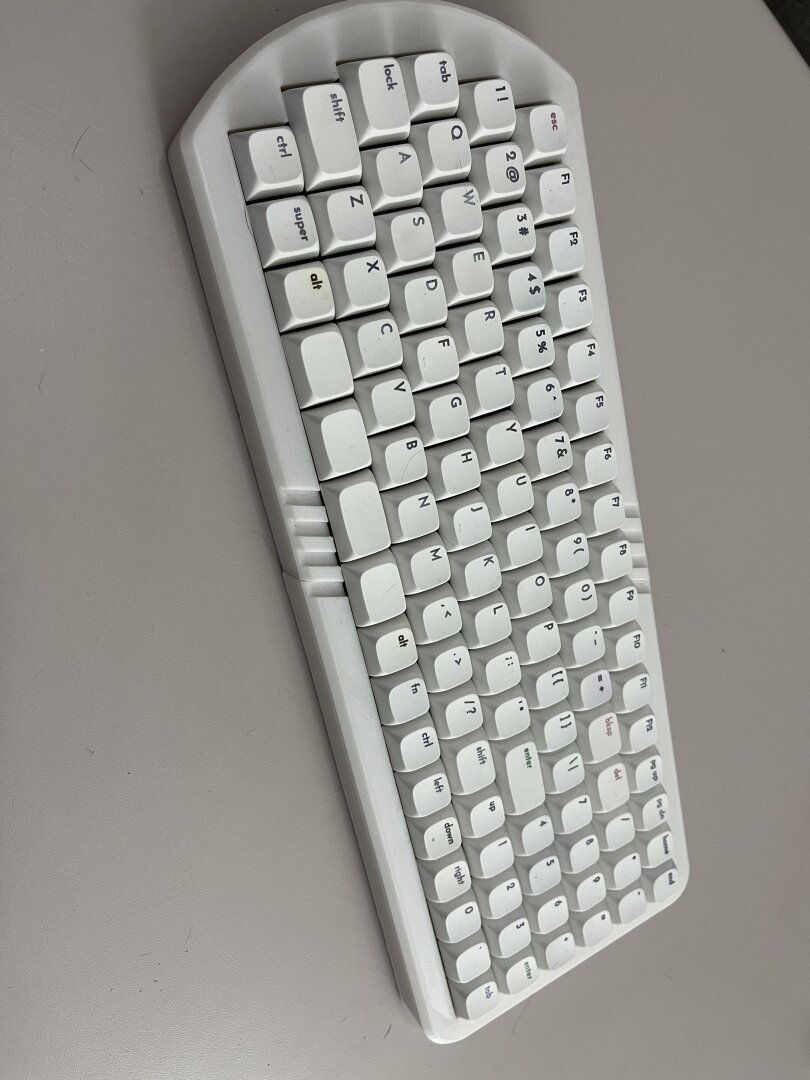
I have done two entire keyboards worth. The gray DSA i did in black are holding up great, but the legends went on wonky because I hadn't refined my workflow. The next batch I did was on this same type of white XDA but while alignment was vastly improved, the ink didn't go on as well. The only thing I did differently with these two was make sure to clean the caps with IPA first.
I liked that. Well done. Really good command of cringe,
spoiler
, with a skillful emotional pivot.


Haha, yeah i love it too. It took a while until other birds than blue tits started using it, i think they were a bit confused by the diagonal sticks. But they came around in the end and it's awesome to see them hopping around on it.
I also have made another feeder, also for small birds although there are some goofy bigger birds who acrobatic enough to get some snacks:

Bit more of a readymade though.
I've seen a few open hardware projects for "dumb" MP3 players over the years. I found this article on the Tangara project and am tempted to build one.
Edit: Scrolled down and saw someone already posted this.
Rockbox does support FLAC, with iPodLinux I'm not so sure (their ancient http site FAQ promises development via MPD, but that's not a given to have actually happened).

I love the runes and vines! I can't see a post about spoons though without thinking of this classic:

Oh this is very cool. Lucky friend!
p.s. apparently it is my lot in life to hang around here letting people know about other related communities, so: [email protected] 😉


I used this tutorial to make it: https://youtu.be/UWubbm0xgLs
