Sources: Aviation Stack Exchange
If a citation is going to point to any of the Stack Exchange Q&A pages, it is extremely important to specifically cite the exact post or answer, since -- not dissimilar to Wikipedia -- the quality, consistency, and biases of Stack Exchange answers is paramount for evaluating the information presented, especially factual data to be fed into an infographic.
I personally am intrigued at these $800 economy, ten-hour flights, as well as a total omission of freight cargo in the underbelly. As presented, this flight has 180 passengers and runs for ten hours. This would suggest it's not a common narrow-body, either the Boeing 737 or an Airbus A320, as even their largest available configurations can't fit 180 people in a 2 class setup, let alone a 3 class setup. It could possibly be the Airbus A321, though.
My point is that if it's a widebody aircraft or the A321, not hauling cargo would be some staggering malfeasance for a commercial revenue airliner. But I can't follow-up on any of these queries, since the sources aren't properly cited.
Absolutely, it is essential to always run the numbers. I was once offered a sizable rebate if I accepted a non-0% car loan, but no rebate if I paid cash or had my own financing. Since their loan had no early-repayment penalty -- and I demanded this in writing -- I accepted their loan and paid it off upon the first statement.
My suspicion is that that sort of offer was to boost the commissions earned by the loan brokers, rather than to move cars. Or maybe both. Who knows.
0% interest offers show up fairly frequently in the USA, often as general-purpose credit cards, or for car or furniture payments, in addition to the many buy-now-pay-later services that allow financing almost anything. However, the motives for offering 0% are slightly different for each of these products.
But answering the question directly, a 0% offer is beneficial if you were already going to make the purchase and would finance it. Cheap credit makes it easy to overspend, since the payments will be "tomorrow's problem". For people who can afford to pay for something in full, it might still be beneficial to finance with 0% just to conserve cash on hand. But the tradeoff is having to service the debt with regular payments; missing one payment can cause the debt to resume at an exorbitant rate. It takes a decent amount of financial discipline to make a 0% offer work in your favor.
Going back to why 0% offers even exist, I'll use furniture and cars as they're the historic examples. Furniture is expensive, whether it's a sectional sofa or a queen-size bed with frame and storage. There's also a sizable markup for furniture, and competition between furniture stores is strong. Thus, to help entice people to buy furniture, sellers will offer 0%, outsourced to a loan company, with the loan subsidized by some of the profit margins.
For cars, the equation is slightly different. Sure, cars are an order of magnitude more expensive, but that also means the opportunity cost for dealers to offer 0% is correspondingly larger. Instead, 0% financing for cars is almost always subsidized by the manufacturer, not the dealers. This is a financial and business strategy that allows a car company to create more sales in a given quarter, if perhaps they need to meet certain year-end targets but are reluctant to reduce their list prices.
0% car loans induce more sales fairly quickly, but will draw on the company coffers in the years to come, because the loan company still wants their cut to be paid by someone. Consumers will usually benefit from these offers, as it's rare for people to buy a new car outright.
It's my opinion that if a car company has to subsidize loans to move their product, that's a tacit admission that their product is wrongly priced or the competition is better. I would take this into consideration, although it wouldn't necessarily carry the day when considering a purchase. After all, car payment interest is not insignificant.
Leg press/hack squat/preacher curl bench
The idea for this strange combination of arm day and leg day came from realizing that my existing leg press and many commercial preacher curl benches both share a 45 degree angle. So in the interest of consolidating floor space, I decided to build a preacher curl bench attachment for my Force USA machine.
Just like with stripping down the machine to fit against a wall, the goal is to build something which is removable, if I wanted to restore the machine back to factory condition. Conveniently, at the top end of the machine, there are three 11/16 inch (17 mm) holes on each side, meant for resistance band pegs. Likewise, between the frame and the chrome running surface is approximately 1.5" (38 mm).
Thus, it made the most sense to cut pieces of 2x4 lumber (actual size: 1.5x3.5 inch) that will sit within the frame, secured by two snug-fitting 5/8 inch (16 mm) wood dowels going through the top-most band peg holes. These side-pieces are held captive by the dowels, although the pieces can still slide inward of the frame, falling away from the peg holes. They're also not really weight-bearing. But they do provide a foundation to build upon.
To form a sturdy and flat base, I then cut some scrap 3/4 inch (19 mm) board that spans the width of the frame, and screwed it down onto the side-pieces using Torx deck screws, notched to avoid protrusions on the frame's top surface. This makes the board weight-bearing, since it rests flat upon the frame; the side-pieces prevent the board from sliding down. And by fixing the width of the side-pieces, the pieces can no longer fall away from the peg holes.
!close up of preacher curl attachment on the leg press
Finally, any preacher curl bench requires a pad. For this, I simply went online and found what existing machines used. Having had a good experience with the parts department at Body Solid for my functional trainer, I looked at their GPCA1 preacher curl station, whose detailed PDF schematics showed a pad that is 600 mm wide, which is perfect for my use!
After $40 + $20 shipping, the pad arrived and I was able to measure the exact distance between its two bottom mounting holes to drill through the board. Once again, Body Solid's documentation described the exact 5/16" wide, 1" long bolts that I would need to mount the pad.
The final result isn't my nicest wood project -- to the point that I just stained it (badly) in black -- but it may have been one of the cheapest so far, using nearly entirely scrap materials except for the pad itself and the bolts. It also wasn't terribly complex and didn't require fairly high precision, unlike the short barbell project.
The whole premise of this attachment is that as an average height American (5 ft 9 inch; 175 cm), my range of motion for the leg press and hack squat simply won't ever push the carriage into the upper part of the frame. So it's free real estate.
!preacher curl pad attached to the top of a 45 degree leg press
But wait: how am I going to use this? The pad is 5.5 ft (167 cm) above the floor. I'd have to be over 7 ft tall (2.2 m) to drape my arms over it. The answer to that will be its own future post.
Agreed. When I was fresh out of university, my first job had me debugging embedded firmware for a device which had both a PowerPC processor as well as an ARM coprocessor. I remember many evenings staring at disassembled instructions in objdump, as well as getting good at endian conversions. This PPC processor was in big-endian and the ARM was little-endian, which is typical for those processor families. We did briefly consider synthesizing one of them to match the other's endianness, but this was deemed to be even more confusing haha
It never ceases to amaze me how prolific PowerPC/PowerISA was (still is?) in the embedded space
I can, yes. Although I've been meaning to add a Velcro strap to the wooden mounts to prevent the bar from rolling too much when the carriage is moving.
Separately, this is also a conveniently-sized barbell that happens to be shoulder width. I might make a second one that's slightly longer, just to use up the spare material I still have.
A quick "rule" is to see how old the word/concept is. "plaintiff" would have existed almost as long as the English legal system came into being, or probably even older to the court of Assizes pre-12th century.
Whereas firefighter as a profession might have only become a word after the establishment of fire departments by insurance companies, which I think might have been a 19th century development.
This entire series by Cathode Ray Dude is a wonderful dive into the world of PC boot sequence, for the folks interested in a touch of embedded architecture. His delivery is also on-point, given the complexity and obscurity of the topics.
From this video alone (41:15):
The way this worked was: they installed Xen hypervisor on your PC, put Hyperspace in a VM and Windows in another. Now, you either know what a VM is -- and I don't need to explain why this is terrifying -- or you don't and I need to make you understand so you never independently invent this.
And (43:59):
This is just a bad idea, ok? Virtualization belongs in data centers. Putting some poor bastard's whole OS in a VM is a prank. It's some Truman Show shit. It's disassembling the coach's car and putting it back together inside the gym. It's not remotely worth the trouble and it probably didn't work.
My prior comment on hydrogen mobility:
Hydrogen for mass- or space-constrained mobility (eg bikes, automobile, aircraft) faces all the known problems with storing it inside inconvenient shapes and contending with the losses from liquification. Real Engineering has a video on this aspect (Nebula and YouTube) when compared to simply using battery-electric storage.
With that out of the way, I'm skeptical as to the benefits touted on the HydroRide website. Specifically, the one about storage:
Hydrogen storage offers extended longevity, surpassing 10 years, ensuring reliability and sustainability over time.
This might be true in static conditions, but hydrogen automobiles have to vent some of the hydrogen while parked, simply to deal with the buildup of hydrogen gas, since even with excellent insulation, the liquid hydrogen will eventually get warm and evaporate into gaseous hydrogen, building up pressure. The fact is that automobiles must withstand broad environmental factors, especially temperature. And we expect bicycles to do the same: how the hydrogen tank would behave in warm climates is unclear.
There's also not that much hydrogen in the tank. The website appears to indicate 20 grams. At 33.6 kWh/kg, the total energy in the tank would be 672 Wh, putting it at par with electric bikes of similar range and speed. Any hydrogen losses would be balanced against battery capacity loss over time.
Overall, as the article states, the target audience of rental operators might still be inclined to go with battery electric bikes rather than hydrogen. Requiring a supply of pure water in addition to electricity at charging locations -- compared to just electricity for battery charging -- is an extra logistical consideration. The "charge" time of 5 hours for 20 grams of hydrogen is also a potential issue.
I am not an expert bike mechanic by any means. With that said, I can't quite visualize how re-truing the whole wheel will address a rotor rubbing issue.
The rotor mounts onto the hub at one of the most durable parts of the assembly, adjacent to the bearings. Generally speaking, the act of truing a wheel is to manipulate the rim so its axis of rotation matches the axis of the hub, where the spokes pull the rim into submission. This process shouldn't affect the rotor, since that would suggest the hub itself is not spinning true; that could indicate an outright defective hub.
Are you able to confirm that the disc rotors are true? If the shop built and delivered the wheel with the rotor attached, presumably they checked both rim and rotor for trueness. But if you installed the rotor yourself, you might need to true the rotor.
If the rotor is true and the whole wheel is true, then that just leaves the brake pads and calipers, which could be misaligned. Although I'm not sure how this would look.
There was a ton of hairbrained theories floating around, but nobody had any definitive explanation.
Well I was new to the company and fresh out of college, so I was tasked with figuring this one out.
This checks out lol
Knowing very little about USB audio processing, but having cut my teeth in college on 8-bit 8051 processors, I knew what kind of functions tended to be slow.
I often wonder if this deep level understanding of embedded software/firmware design is still the norm in university instruction. My suspicion has been that focus moved to making use of ever-increasing SoC performance and capabilities, in the pursuit of making it Just Work(tm) but also proving Wirth's Law in the process via badly optimized code.
This was an excellent read, btw.
To say this is a complex story is an understatement, and the article does a fairly reasonable job at unpacking the details. That said, I'm disappointed they did not include a PDF to the filed claim, since even a cursory analysis of the claims relies heavily on the details therein.
For reference, in California and other states, lawsuits against the state itself, or the counties, cities, agencies, special districts, or anything else that came into existence by the law, must have first filed a claim with the entity being sued. The California Tort Claims Act requires this procedure in order to relieve the state's inherent sovereign immunity and also permit the courts -- which are also an arm of the state -- to have jurisdiction.
Focusing on the relevant facts to the claim, the claimant (the former Pedal Ahead manager) states:
- Pedal Ahead is a non-profit, distinct from Pedal Ahead Plus, a for-profit company
- Pedal Ahead was contracted by San Diego Assoc of Govts (SANDAG) and CA Air Resources Board (CARB) to operate an ebike program
- The claimant was hired in 2022 to work on this ebike program
- The claimant did not receive paychecks after April 2023
Accordingly, the claimant brings back-pay claims against SANDAG (for $40k) and CARB (for $58k), based on the premise that he was working on behalf of those two state entities. Presumably, the claim argues that he was unlawfully terminated for whistleblowing, but the article doesn't specifically say this and we don't have the PDF of the claim itself.
This is... an uphill battle, IMO. Not the whistleblowing part, but the part where he wants money from those two entities. The state action doctrine distinguishes between things done by -- or instructed by -- state employees and representatives, versus things done by private entities and their employees. In a lot of ways, this mirrors the distinction between hiring W-2 employees versus 1099 contractors.
If he were directly on the CARB or SANDAG payroll, this would be a slam dunk. But he ostensibly only had employment with the non profit. This means the scope any state action claim will depend heavily on the text of the contracts with CARB/SANDAG. Generally, the narrower and more specific the contract, the less it would be the state's responsibility to pay up. That said, the contract can't be hiring the nonprofit to do something which CARB or SANDAG normally couldn't do on its own.
As with most things in civil law, it's a careful balance to apportion liability onto the entity which is best positioned to avoid the problem. Would making CARB/SANDAG pay $100k -- and thus letting Pedal Ahead off the hook for $100k -- address the problem of constructively firing someone who noticed malfeasance? That's left as an exercise to the reader.
What often happens in civil litigation is the "shotgun" approach: aim the lawsuit at as many people and entities as possible, especially ones with deep pocket, hoping some will settle. So it's possible the claimant will later file suit against all of Pedal Ahead, its owner personally, every individual mentioned personally, plus SANDAG and CARB.
California allows for joint and several liability of money claims, so if a court/jury finds that CARB or SANDAG were even 1% partially responsible, then 100% of the winnings can be extracted from their deep pockets. This is especially relevant if the entity with the most responsibility -- possibly Pedal Ahead -- is broke or is about to go bankrupt. Joint and several liability prioritizes claimants getting compensated, even though the most responsible party escapes via bankruptcy. Again, civil law is a balance.
What's truly staggering is the degree of corruption alleged, which is only ancillary to the tort claim, but it suggests that there are villains everywhere. No one comes out looking good here, whether its SANDAG and its other scandal, the owner of the nonprofit and his other ventures, the ebike program itself (why have a hard goal of 100 miles per week?), the former San Diego County Supervisor who helped award the contracts and then resigned after a sexual assault scandal, and the state entities for not properly auditing Pedal Ahead and still paying out the contracts.
All the meanwhile, $30 million of the $31 million dedicated for ebikes remains unused, likely to the disappointment of lots of San Diegans who are eager to take up ebikes or participate in a pilot program. That's the real travesty amongst all this.
I'm not aware of any other tire on land that would vary based on being driven or not. Sure, a driven wheel has torque applied to it, but I haven't seen an automobile with an equivalent arrangement. Nor are rail wheels for that matter.
Also, all wheels are braked on a standard bicycle, which would subject them all to the same torque, which should exceed acceleration torque when adjusted properly.
The funny thing is that a few months ago, I bought a wand metal detector at a ham radio swap meet for $20, as a gag. Now you're telling me that it was actually a prudent investment toward my woodworking projects??
Win!
This might be true, although I do it mostly so I can remove the earplugs and rest them around my neck if someone needs to talk to me.
The best PPE are the ones which have the fewest barriers toward using. Even the minor annoyance of having to set down untethered earplugs is best avoided, if it acts as a subconscious disincentive towards using PPE. Good safety policy adapts and accommodates this aspect of human behavior.
In a home workshop, there is no OSHA, so I'm fully responsible for my own safety protocols.
The electric gremlins and the electronic gremlins have a nasty habit of striking once and then crawling back to their lair to strike another day lol. It makes debugging problems much harder if the problem "went away" on its own.
But in any case, your description of a wet outlet box could be consistent with an intermittent fault. If your outlet was oriented sideways with the neutral (larger pin) facing down, it would only take maybe 1/4 inch of water trapped inside the box to short the neutral screw to the grounded case.
It's also worth noting that GFCI receptacles don't last forever. The nicer ones trip themselves off for the last time when they fail their own internal self-test, never to power back on again. The cheaper ones might become oversensitive with age, tripping for really tiny, harmless current diversions. But 8 or 9 out of ten times -- I'm spit-balling -- recurring trips are due to a real issue in the circuit, rather than GFCI.
Old equipment with motors, such as a fridge, are good candidates for leaking small currents to ground. But it's usually maybe 2 mA or something small. You'd need other appliances that are also leaking small amounts to reach the 6 mA to trip the GFCI.
All in all, since you observed tripping with no appliances plugged in, and I assume all the wiring is readily visible and you've already inspected it for any physical damage, that leaves the outdoor receptacle as the most probable cause.
You might consider looking at how the outdoor outlet box would drain water if it did accumulate inside. Most of those boxes are meant to be water tight, but that also means if water enters, it has no way to exit.
I'm left wondering why the tread direction of a tire would differ if it's on the front vs rear wheel of a bicycle. They're still rotating the same direction, right?
I'm nowhere even remotely comparable to a proper furniture maker, but I can tell you some pitfalls to avoid.
Don't cut wood without eyes, ears, and face protection. The dust, noise, or fumes will get you one day or another, if without protection. I prefer earmuffs over earplugs, but if earplugs then use the ones which tether both ends together. For a face mask, I like low-profile half-masks like this one: https://www.kleintools.com/catalog/respirators/p100-half-mask-respirator-sm
Resist the urge to dive into woodworking by starting with reclaimed wood. For example, pallets are a cheap/free source of material, but it's a hodge-podge of different varieties, all riddled with nail holes, dents, and brown stains from rusty fasteners.
That's not to say it can't be done, but it certainly aggravates the process if you're just starting. I once came across a section of 2x4 recovered from a pallet, thinking that it would cut just like the pine I was used to. Instead, it wrecked two drill bits and burned a circular saw blade as well as itself. I later mailed a sample of it to the USDA Wood Identification Public Service, who informed me that it was Acer (Hard Maple). Up until then, I didn't even know that maple came in both varieties.
It seems hard maple is tougher than nails drill bits. I'm still learning.
[USA] CVS: free 8x10 prints. Use code FREE108 . Exp 19 June
This is different than the promo from two days ago.
When uploading photos using the desktop website, make sure to select Full Resolution in the Upload Preferences.
From your detailed description, it sounds as though one of the downstream outlets outside the house has a fault between neutral and ground. Follow the white wire which was reading 101.8, and that should get you closer to where the fault is. It might be anything such as: the receptacle got wet, a nail went through the NM-B cable, or something of that nature.
Separately, the white wire that reads 0.7 is fairly normal for a wire segment that should be dead. So no cause for alarm there.
Now to explain how I reached these conclusions. Firstly, a GFCI operates by detecting any difference in current between the live and neutral wire, downstream of the GFCI. If this difference exceeds ~6 mA, then the GFCI will trip.
Secondly, North American grounding systems will bond the ground rod and the neutral wire at only one point, at the service entrance where the main disconnect switch is located. Nowhere else should ground and neutral be bonded except here. In the IEC nomenclature, this is called a TN-C grounding system.
Thirdly, if a circuit has daisy-chained outlets, then any current drawn by upstream outlets will induce a small voltage onto the neutral wire, detectable at downstream outlets, compared to the ground wire and ground rod.
Let me explain a bit clearer: suppose a circuit has outlets A, B, and C, where C is the farthest from the breaker box. Plugging in a space heater into outlet A will cause current to flow to the space heater and back to the breaker. Because current is flowing on both the live and neutral wires, and because house wiring has a small, non-zero resistance, Ohm's law dictates that there must be a voltage difference across the wire, however small. That is, if the breaker box would measure the live wire at 120.0v and the neutral wire at 0.0v, then the voltage at outlet A might measure 119.4v and 0.6v, respectively, when the space heater is powered.
Because outlets A, B, and C are in parallel, we would also see this hypothetical 0.6v at outlets B and C as well, measuring between neutral and ground. This is normally not a problem.... except if outlet B is a GFCI and outlet C has a neutral-to-ground fault.
In this new scenario, the voltage induced on the neutral by outlet A will cause current to flow through outlet C's neutral-to-ground fault. After all, that 0.6v would prefer to flow to the ground wire, which remained at 0.0v (since the ground wire didn't have current until now).
The amount of current through the fault could be sizable, and almost certainly above 6 mA. This current flows through outlet B's neutral but not its live wire. Accordingly, the outlet B GFCI detects the difference and trips off.
This situation is only possible precisely when: a) there is current on the neutral wire somewhere, and b) there is a neutral-to-ground fault. The fault may be new, or perhaps you haven't used this circuit in a while.
In any case, the course of action is to identify which of the downstream 14 gauge cables leads to the fault. Since you measured 101.8 v through one cable's neutral, that is probably the direction of the fault, since the fault means you're measuring from live to ground, which should be somewhere in the ballpark of 120v.
The usual course of action to diagnose GFCI issues is to slowly reattach downsteam circuits until the GFCI starts tripping again. That gets you closer to the true issue that's causing the GFCI to trip.
Good luck and stay safe!
At this point, the bill has already passed the Senate and the Assembly, so it'll soon head to the governor's desk, as is the norm around June of even-numbered years.
If you are a California constituent who cares about bicycle and ebike legislation, I would encourage you to sign up for Calbike's email updates on impending legislation of great significance to bicycling in this state. This bill is fairly minor, but who's to say something more momentous won't come next year?
Likewise, if your region has its own bicycle advocacy group (eg San Francisco Bicycle Coalition, Sacramento Area Bicycle Advocates, BikeSD), get updates from them too.
Today's ebikes have only been legalized since 2016, so what is advocated for now will set the tone for decades to come.
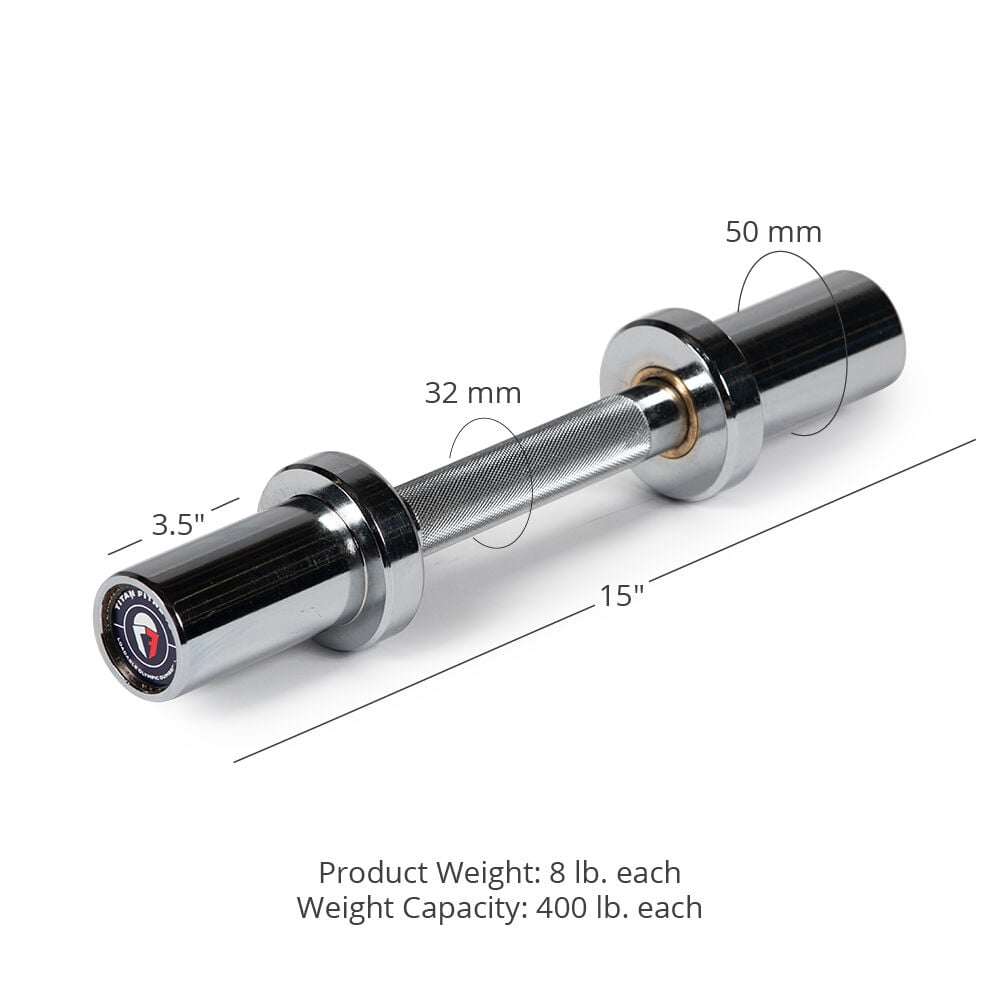
Making an 80 cm (31.5 inch) dumbbell from a Titan 15-inch adjustable dumbbell
cross-posted from: https://sh.itjust.works/post/20965205
> This is the story of how I turned a 15" Titan adjustable dumbbell to be 80 cm (31.5 inch) long. Why? Because I have a space-constrained home gym but still wanted a leg press, and so I had to remove its original barbell. > > In its place, I built a pair of wood mounts for a normal barbell to rest upon, covered in that earlier post. However, since this machine is wall-adjacent, such a barbell would have to fit inside the width of the leg press, so about 80 cm. But must also be wider than the spacing from outside-edge to outside-edge of the wood mounts, which is 60 cm. > > !wooden mounts where a leg press barbell would be > > Such a short barbell -- or long dumbbell -- does not readily exist commercially, with the narrowest one I've seen being 48 inch barbells, which are still too wide. So I decided to build my own, using my spare Titan dumbbell as the base. > > To start, the Titan dumbbells are excellent in this capacity, as the shaft diameter is 28 mm -- not 32 mm as the website would indicate -- which is a common diameter, if I am to cut short a cheap barbell to replace this dumbbell's shaft. > > In keeping with my preexisting frugality, I purchased a cheap 1-inch barbell, hoping that it adopts the Olympic 28 mm shaft diameter, and not the 29 mm deadlift bar shaft diameter, as the Titan collars have small clearances. Matching neither, I find that this bar is closer to 23 mm, which although will fit into the existing collars, poses its own issues. > > Nevertheless, this 7 ft barbell can conveniently be cut in half to yield two 42 inch segments. And then the included bar stops can be loped off, and then the length further refined to 77 cm, thus hiding the marks from the bar stop within the Titan collars, and also centering the (meh) knurling from the cheap bar. > > But perhaps a picture will be more explanatory. Here, the original collar is dismantled at the top, showing the original shaft with a groove cut into it, about 1/4-inch from the end. Into that groove would fit two half-rings with an inner diameter of 20.4 mm and an outer diameter of 40 mm. In fact, all the parts inside the collar use 40 mm outer diameter, except the spacer cylinder, which is smaller at 37 mm. All of these parts are held captive within the collar using the C-ring and the geometry of the collar itself. > > ! > > To deal with the difference between the collar expecting 28 mm, and the cheap bar's 23 cm, I designed an ABS 3d printed part in FreeCAD to act as a bushing, upon which the original Titan brass bushing will ride upon. This ABS bushing is held captive by way of its center bulge, which fits within the dead space inside the collar. > > ! > > As for how I cut the groove into the end of the new shaft, I still don't own a lathe. So the next best is to mount an angle grinder onto a "cross slide vise" taken from a drill press, with the shaft secured in a wooden jig to only allow axial rotation manually. The vise allows precision control for the cutting wheel's depth, with me pausing frequently to measure how close the groove is to the desired 20.4 mm inner diameter. This is.... not a quick nor precise process. But it definitely works. > > ! > > After reassembling both collars onto the new shaft and lubricating with white lithium, the final result is a long dumbbell (or short barbell) with Titan's 3.5 inch collars on the end, with 63 cm of shaft exposed and 80 cm from end to end. The ABS bushing is remarkably smooth against the brass bushing, after some sanding with 180 grit. The whole dumbbell weights 5.48 kg empty. > > ! > > Here is the comparison with the stock Titan dumbbell. It's pretty amazing how the knurling conveniently lined up. It fits well onto the wood mounts of the leg press. > > !Don't ever talk to me or my son ever again > ! > > But why would I do all this just to add a weirdly long 3.5-inch collar dumbbell to a leg press, when it already can accept weights underneath the carriage? I will answer that in a follow-up post.
Making an 80 cm (31.5 inch) dumbbell from a Titan 15-inch adjustable dumbbell
This is the story of how I turned a 15" Titan adjustable dumbbell to be 80 cm (31.5 inch) long. Why? Because I have a space-constrained home gym but still wanted a leg press, and so I had to remove its original barbell.
In its place, I built a pair of wood mounts for a normal barbell to rest upon, covered in that earlier post. However, since this machine is wall-adjacent, such a barbell would have to fit inside the width of the leg press, so about 80 cm. But must also be wider than the spacing from outside-edge to outside-edge of the wood mounts, which is 60 cm.
!wooden mounts where a leg press barbell would be
Such a short barbell -- or long dumbbell -- does not readily exist commercially, with the narrowest one I've seen being 48 inch barbells, which are still too wide. So I decided to build my own, using my spare Titan dumbbell as the base.
To start, the Titan dumbbells are excellent in this capacity, as the shaft diameter is 28 mm -- not 32 mm as the website would indicate -- which is a common diameter, if I am to cut short a cheap barbell to replace this dumbbell's shaft.
In keeping with my preexisting frugality, I purchased a cheap 1-inch barbell, hoping that it adopts the Olympic 28 mm shaft diameter, and not the 29 mm deadlift bar shaft diameter, as the Titan collars have small clearances. Matching neither, I find that this bar is closer to 23 mm, which although will fit into the existing collars, poses its own issues.
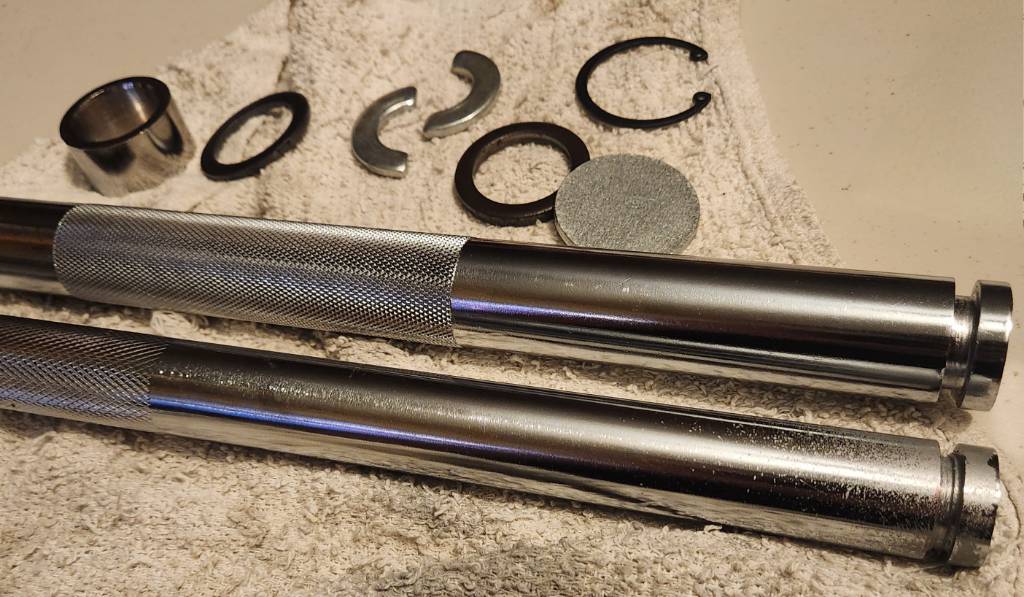
Nevertheless, this 7 ft barbell can conveniently be cut in half to yield two 42 inch segments. And then the included bar stops can be loped off, and then the length further refined to 77 cm, thus hiding the marks from the bar stop within the Titan collars, and also centering the (meh) knurling from the cheap bar.
But perhaps a picture will be more explanatory. Here, the original collar is dismantled at the top, showing the original shaft with a groove cut into it, about 1/4-inch from the end. Into that groove would fit two half-rings with an inner diameter of 20.4 mm and an outer diameter of 40 mm. In fact, all the parts inside the collar use 40 mm outer diameter, except the spacer cylinder, which is smaller at 37 mm. All of these parts are held captive within the collar using the C-ring and the geometry of the collar itself.
To deal with the difference between the collar expecting 28 mm, and the cheap bar's 23 cm, I designed an ABS 3d printed part in FreeCAD to act as a bushing, upon which the original Titan brass bushing will ride upon. This ABS bushing is held captive by way of its center bulge, which fits within the dead space inside the collar.
As for how I cut the groove into the end of the new shaft, I still don't own a lathe. So the next best is to mount an angle grinder onto a "cross slide vise" taken from a drill press, with the shaft secured in a wooden jig to only allow axial rotation manually. The vise allows precision control for the cutting wheel's depth, with me pausing frequently to measure how close the groove is to the desired 20.4 mm inner diameter. This is.... not a quick nor precise process. But it definitely works.
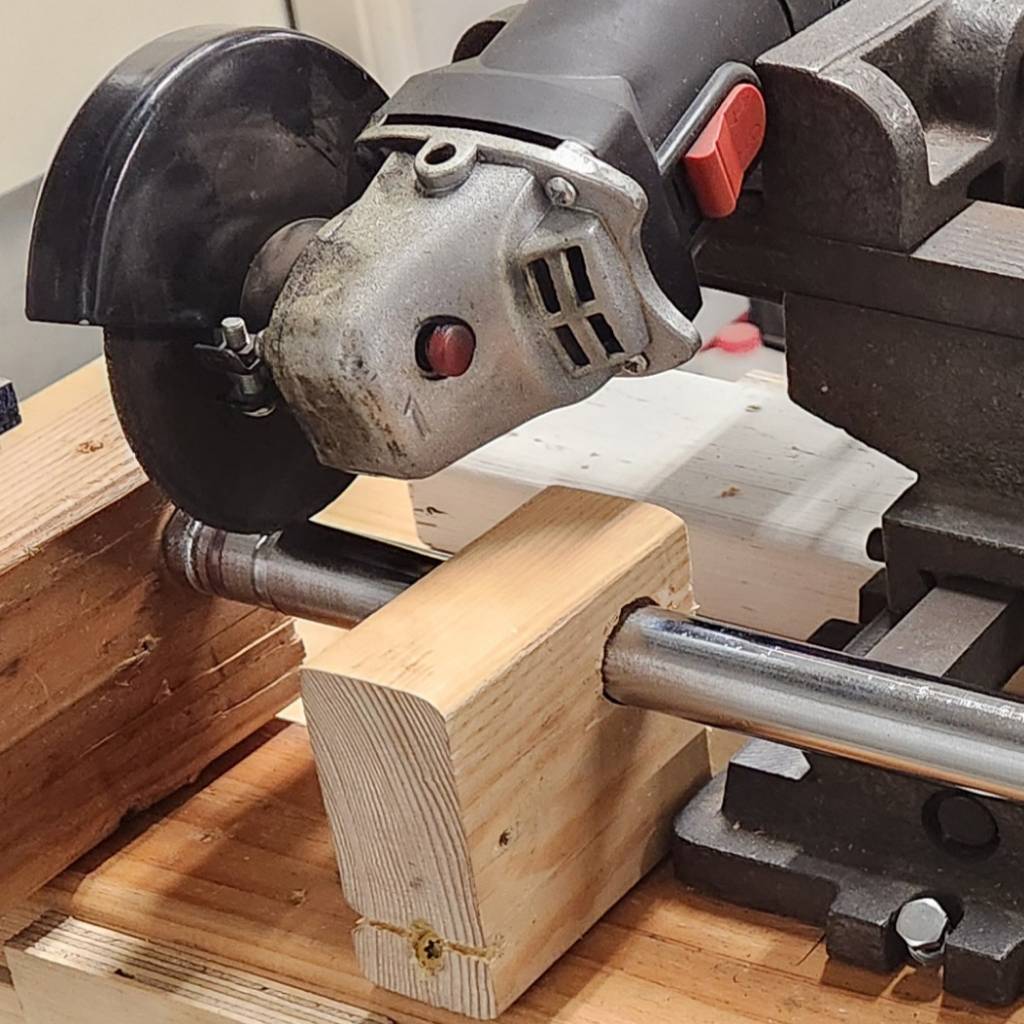
After reassembling both collars onto the new shaft and lubricating with white lithium, the final result is a long dumbbell (or short barbell) with Titan's 3.5 inch collars on the end, with 63 cm of shaft exposed and 80 cm from end to end. The ABS bushing is remarkably smooth against the brass bushing, after some sanding with 180 grit. The whole dumbbell weights 5.48 kg empty.
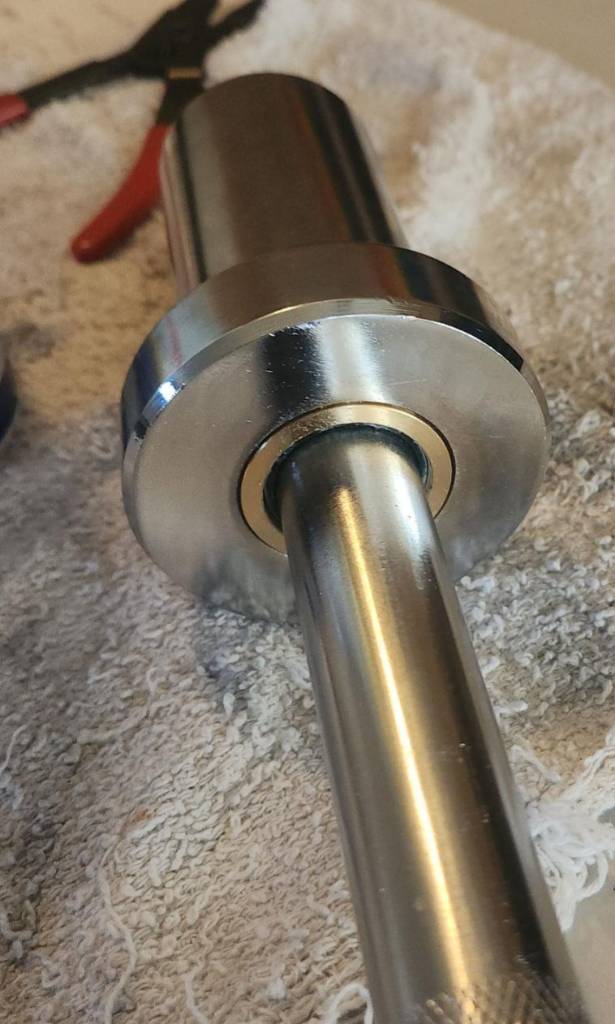
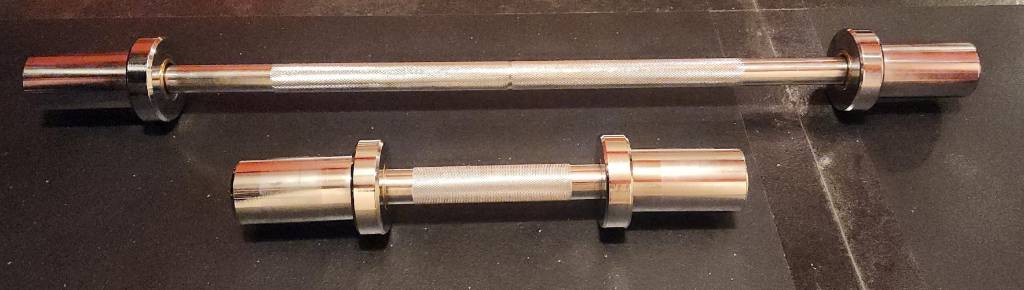
Here is the comparison with the stock Titan dumbbell. It's pretty amazing how the knurling conveniently lined up. It fits well onto the wood mounts of the leg press.
!Don't ever talk to me or my son ever again !
But why would I do all this just to add a weirdly long 3.5-inch collar dumbbell to a leg press, when it already can accept weights underneath the carriage? I will answer that in a follow-up post.
[USA] CVS: free 8x10 prints. Use code GIFT108 . Exp 19 June
When uploading photos using the desktop website, make sure to select Full Resolution in the Upload Preferences.
[USA] Walgreens: free 8x10 print. Use code TYDAD . Exp 16 June
Save on photo prints and enlargements. Print and enlarge your photos at Walgreens Photo with easy editing and same-day in-store pickup.

Use the code on the Walgreens app and the website to claim the same offer twice!
When uploading photos using the desktop website, make sure to select Full Resolution in the Upload Preferences.
$1000 Honda Suitcase - Motocompacto Review [electric folding scooter]
As is their custom, FortNine delivers a two-wheeler review in the most cinematic way possible, along with a dose of British sitcom humor.
I'm not sure I'd ever buy one, but I'd definitely borrow it from a friend haha. I've said before that I like seeing what novel ideas people will build atop two wheels, and this certainly is very unique.
My existing mid-drive Class 3 ebike weights 95 lbs (43 kg) loaded. What could I replace it with?
The title describes the gist of things. In 18 months of owning my Bikonit MD750, I've traveled over 2100 km (1300 miles) in day, night, and rain; swapped out four sets of tires trying to lower the rolling resistance; built my own new set of 29" wheels with ebike-speed rated tires; and have taken it on mixed-mode adventures by using light-rail as my range extender.
It's the latter where the weight is a small issue, as the light rail train has three stairsteps onboard, which I have to carry the bike up and onto. 43 kg is kinda a lot, although that does include all the things I will need for a day out. I can pursue getting stronger to lift it more easily, or convincing the transit department to acquire low-floor trains, but I'd like to know my options:
What are some Class 3, mid-drive ebikes currently available in the USA, that weigh less than 43 kg (95 lbs)? Ideally, less than 25 kg (55 lbs) too, as that's the most common weight restriction for buses. I want to see what y'all can recommend, irrespective of price or range or other considerations.
I'm not likely to terminate my investment in this current ebike, as it's provided sterling service thus far. But I wonder if maybe what I have has already been outmoded by the latest developments in this ever-changing slice of the mobility space.
TY in advance!
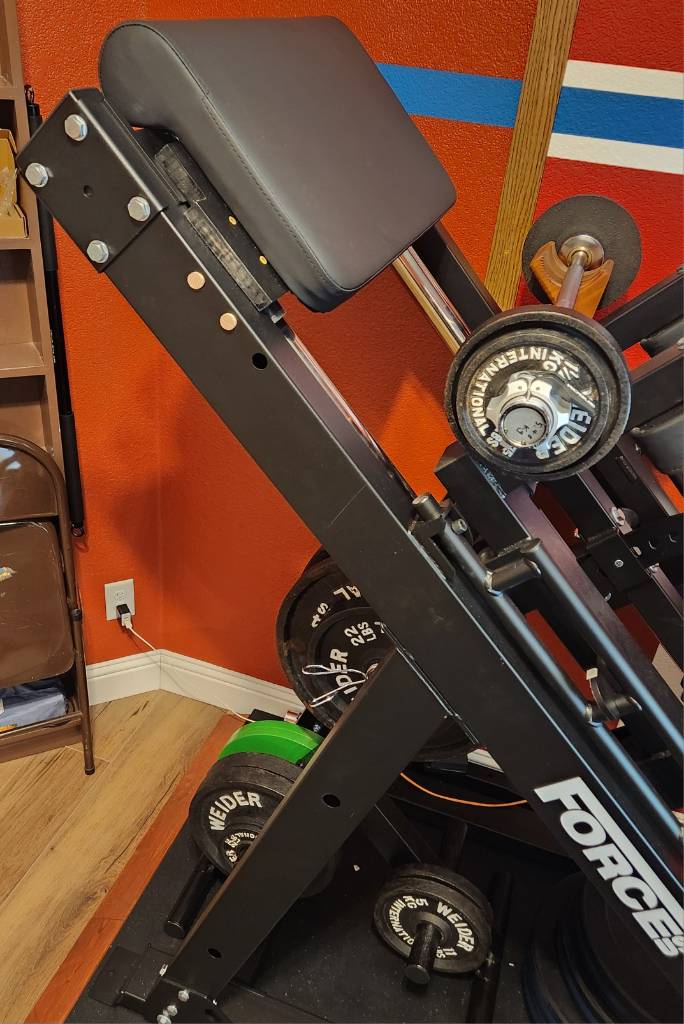
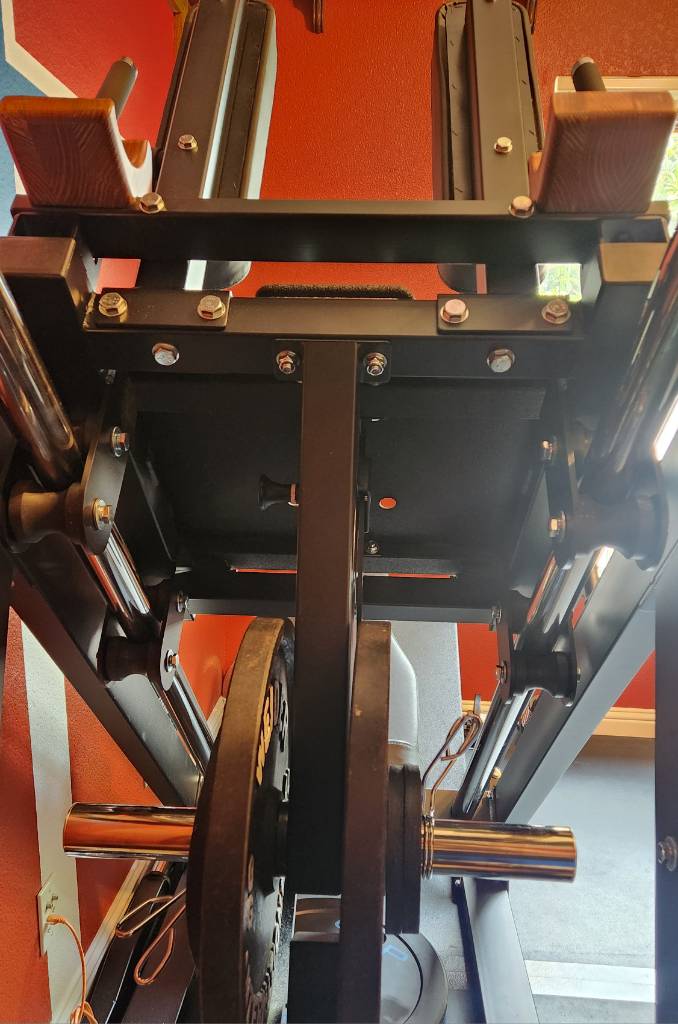
My wall-adjacent leg press/hack squat, to save floor space
One thing I've always wanted for my space-constrained homegym is a leg press. But even the most compact leg presses occupy a lot of space lengthwise and width-wide. I had my eye on the Force USA 45 degree leg press/hack squat combo machine, because it has so much capacity for me to grow into. So I picked one up and modified it so it can be placed up against the wall.
The primary issue is the barbell that attaches to the carriage (the part that moves up and down). This barbell extends about 45 cm (18 inch) beyond the left and right sides of the machine, taking up stationary space as well as dynamic space when the carriage is in motion. Eliminating that barbell would reduce the width requirement from the bare minimum of 162 cm to 80 cm, assuming the weight storage pegs are also removed.
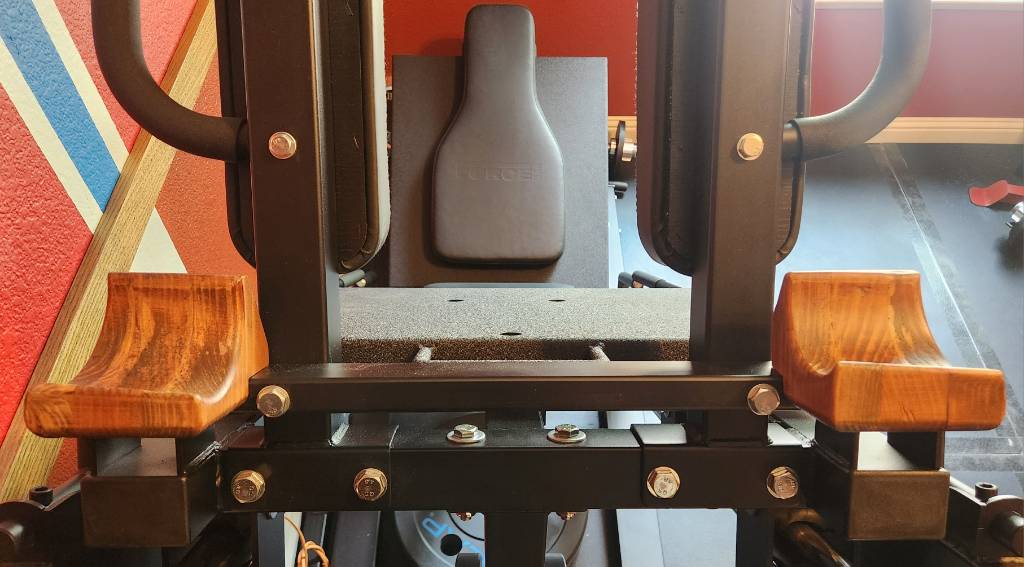
But of course, the barbell is how the leg press is loaded, with 34 cm on each end for Olympic-spec plates. It also provides some structural stability for the hack squat shoulder pads, where they attach to the carriage. However, dangling underneath the carriage is a much-smaller space for loading plates, with 20 cm on left/right for plates.
!Force USA leg press under-carriage plate holder
As an aside, this is a fairly substantial machine that arrived on a pallet, taking a few hours to assemble. The build quality is exemplary, and everything about it evinces durability and stability.
My approach was to remove the original barbell, loading only the under-carriage bar. To retain structure, I cut 1"x2" rectangular steel tube to the width of the carriage (59 cm), capped the ends, and drilled holes to reuse the same bolts as the original barbell. The reason for 1"x2" is because the backrest for the hack squat requires clearance; the stock barbell solved this by bending around that area, whereas 1x2 just barely clears the backrest, and that's good enough for me.
!top-down view of replacement steel tube and mounts
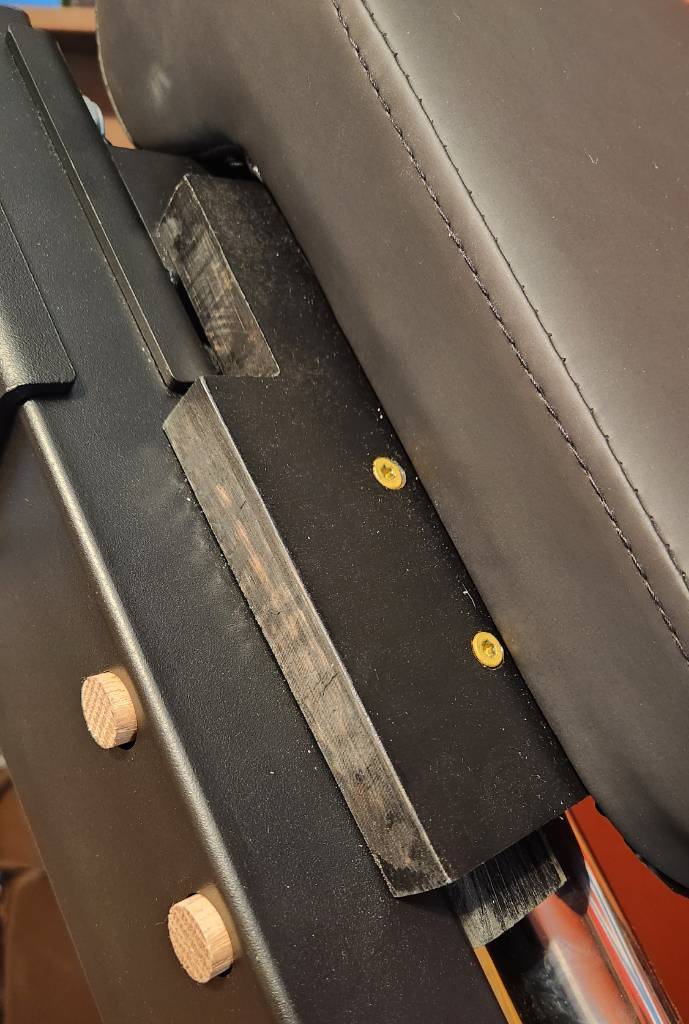
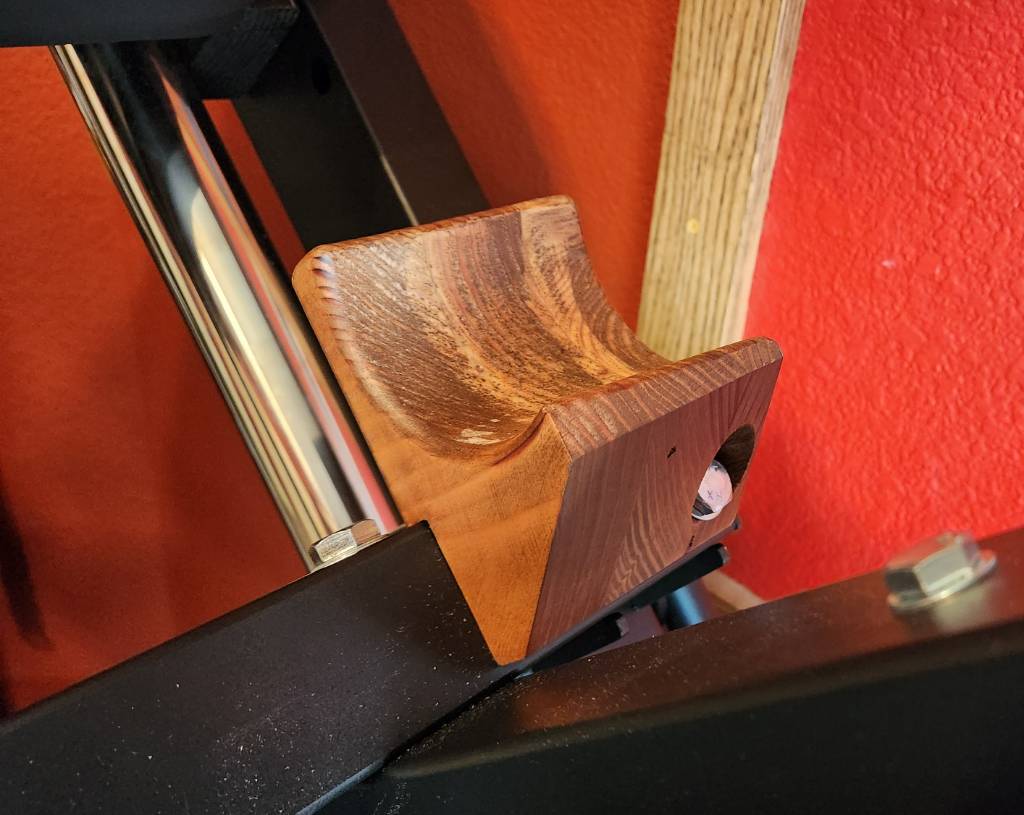
Later, I added a pair of wooden mounts where a conventional barbell can be rested. This is not my proudest woodworking achievement, but it's certainly the most unconventional. Each mount is made from three layers of reclaimed 2x6 lumber (from a bed frame) glued together, then a 3.5-inch diameter hole bored through axially, then sanded, stained in cherry, and finished with Polycrylic clear coat for durability. I'll explain the point of these mounts in a different post.
!left-side wooden mount on the leg press
The result of all this is a leg press that needs only about 1 meter by 2.4 meter (39" by 96") of floor space, and that's including weight storage pegs on the side away from the wall, plus space to swing the safety stopper bars in/out of place. And everything can be reverted back to the factory configuration.
The caveat is that I'm consigned to the 40 cm total barbell space under the carriage. To maximally load this machine, I would need to invest in thin iron plates, which apparently only are made to precise values, and are thus expensive. Examples: Rogue calibrated KG plates, and Hansu Power calibrated plates, both of which are 22.5 mm wide for 20 kg plates. Sixteen such plates would make 320 kg (700 lbs), and I'd be thrilled if I could get there one day. The tradeoff is reasonable to me, minimizing floor space today in exchange for requiring expensive plates in the future, until I upsize my space.
20 kg bumper plates, made from 45 lbs bumper plates
cross-posted from: https://sh.itjust.works/post/20133956
> With the exception of the weight stack for my functional trainer and its change plates, I wanted all my subsequent equipment to be metric. To that end, I saw some cheap 45 lbs CAP bumper plates, and figured that I could make them into metric with not too much effort. > > Some rough math prior to purchasing suggested that these plates -- with a width of 68 mm -- could be slimmed down from 20.4 kg (45 lbs) to nearly 20.0 kg, by boring two 2" holes (51 mm). To keep balance, the holes should be on on diametrically opposite ends. And should be neither too close to the edge, nor too close to the center, since the plate still needs to absorb a drop without deforming. That the bored holes are 51 mm is a fantastic happenstance, nearly identical to the center hole for Olympic-spec plates. > > Examining each plate before drilling, I found that the silkscreen letter A in "CAP" is well-centered diametrically, although it doesn't line up with the matching logo on the back side. Also, since these are cheap CAP plates, the initial weight tolerances are pretty poor. 45 lbs should be 20.41 kg (2 sig figs), but my first four plates registered at 20.58, 20.51, 20.64, 20.56. That's nearly an extra half pound! > > To drill the holes perfectly plumb, I did the work on a drill press using a 2-inch hole saw. Because the saw wasn't deep enough to go through the full width in one pass, I started with a 1/4-inch (6 mm) pilot hole straight through the tip of the letter A in "CAP". Then I drilled from both sides with the hole saw until a ~200 gram rubber core fell out. Repeat for the second bore. > > To finish, I took some sandpaper to remove the old "45 lbs" markings, then used my label maker to affix new values. All plates are still high, but ranged from 20.030 kg to 20.105 kg. Not too shabby, I think. > > In a happy coincidence, the position of these bored holes is perfect for one's thumbs when grasping the plate like a steering wheel, making it easier to pick up when laid flat on the floor. I also added a strip of blue electrical tape around the perimeter to make it easy to identify these as 20 kg. > > In the end, I got the cheap metric plates I wanted, and it came with a usability improvement as well. I've not dropped these yet, so time will tell how they hold up.
20 kg bumper plates, made from 45 lbs bumper plates
With the exception of the weight stack for my functional trainer and its change plates, I wanted all my subsequent equipment to be metric. To that end, I saw some cheap 45 lbs CAP bumper plates, and figured that I could make them into metric with not too much effort.
Some rough math prior to purchasing suggested that these plates -- with a width of 68 mm -- could be slimmed down from 20.4 kg (45 lbs) to nearly 20.0 kg, by boring two 2" holes (51 mm). To keep balance, the holes should be on on diametrically opposite ends. And should be neither too close to the edge, nor too close to the center, since the plate still needs to absorb a drop without deforming. That the bored holes are 51 mm is a fantastic happenstance, nearly identical to the center hole for Olympic-spec plates.
Examining each plate before drilling, I found that the silkscreen letter A in "CAP" is well-centered diametrically, although it doesn't line up with the matching logo on the back side. Also, since these are cheap CAP plates, the initial weight tolerances are pretty poor. 45 lbs should be 20.41 kg (2 sig figs), but my first four plates registered at 20.58, 20.51, 20.64, 20.56. That's nearly an extra half pound!
To drill the holes perfectly plumb, I did the work on a drill press using a 2-inch hole saw. Because the saw wasn't deep enough to go through the full width in one pass, I started with a 1/4-inch (6 mm) pilot hole straight through the tip of the letter A in "CAP". Then I drilled from both sides with the hole saw until a ~200 gram rubber core fell out. Repeat for the second bore.
To finish, I took some sandpaper to remove the old "45 lbs" markings, then used my label maker to affix new values. All plates are still high, but ranged from 20.030 kg to 20.105 kg. Not too shabby, I think.
In a happy coincidence, the position of these bored holes is perfect for one's thumbs when grasping the plate like a steering wheel, making it easier to pick up when laid flat on the floor. I also added a strip of blue electrical tape around the perimeter to make it easy to identify these as 20 kg.
In the end, I got the cheap metric plates I wanted, and it came with a usability improvement as well. I've not dropped these yet, so time will tell how they hold up.
[USA] CVS: 3x free 5x7 prints. Use code FREE3 . Exp 21 May
When uploading photos using the desktop website, make sure to select Full Resolution in the Upload Preferences.
[USA] Walgreens: free 8x10 print. Use code RAIN8X10 . Exp 12 May
Save on photo prints and enlargements. Print and enlarge your photos at Walgreens Photo with easy editing and same-day in-store pickup.

Use the code on the Walgreens app and the website to claim the same offer twice!
When uploading photos using the desktop website, make sure to select Full Resolution in the Upload Preferences.
[USA] CVS: free 8x10 prints. Use code PFREE24 . Exp 30 April
When uploading photos using the desktop website, make sure to select Full Resolution in the Upload Preferences.
[USA] Walgreens: 2x free 5x7 prints. Use code 2FREEPRINTS . Exp 27 April
Save on photo prints and enlargements. Print and enlarge your photos at Walgreens Photo with easy editing and same-day in-store pickup.

Use the code on the Walgreens app and the website to claim the same offer twice!
When uploading photos using the desktop website, make sure to select Full Resolution in the Upload Preferences.
[USA] CVS: free 8x10 prints. Use code 810FREE24 . Exp 22 April
When uploading photos using the desktop website, make sure to select Full Resolution in the Upload Preferences.
[USA] CVS: free 8x10 prints. Use code 810PRINT . Exp Unknown
When uploading photos using the desktop website, make sure to select Full Resolution in the Upload Preferences.
[USA] CVS: 2x free 5x7 prints. Use code 2FREE24 . Exp 1 April
The offer will apply only if there are two 5x7 prints in your cart.
When uploading photos using the desktop website, make sure to select Full Resolution in the Upload Preferences.
[USA] Walgreens: free 8x10 print. Use code 8X10-FRESH . Exp 2 April
Save on photo prints and enlargements. Print and enlarge your photos at Walgreens Photo with easy editing and same-day in-store pickup.

Use the code on the Walgreens app and the website to claim the same offer twice!
When uploading photos using the desktop website, make sure to select Full Resolution in the Upload Preferences.