Search
Bluetooth temperature sensor reporting through smartphone away from home
The problem I try to solve Looking for a temperature sensor using Bluetooth that can report to Home Assistant through my phone when out and about and preferably (but not necessarily) report through my ESPhome BT-proxies at home.
Background I have a 3 year old son with type 1 diabetes. As a result I always have to carry insulin, a temperature sensitive medication. The vials are stored long term in the door of my fridge together with a ZigBee sensor monitoring the temperature of the insulin. If it freezes the Insulin denatures and won’t have any relevant effect if used. The vial that I carry with me will last for around a month as long as it stays above 0 °C (and under around 25-30 °C). My son uses a CGM/pump-based system, creating a BAN that also involves his smartphone. This means that phone is always near the vial and could record temperature (and send telemetry data) continuously, even away from home. I want to use a temperature sensor to identify spoiled medication due to thermal conditions even when my son leaves our home.
My current (imperfect) solution I currently deploy a solution where I use a Meshtastic node with a BME280 sensor. It reports through the mesh to a node at home. This node uses MQTT to talk to Home Assistant. The problem with this system (although nice being totally independent from the Internet) is limited coverage of the surroundings as well as very infrequent telemetry reporting to not overload the common mesh in my city.
Is there an easier solution? Preferably one that uses the smartphones bluetooth (BLE?) and reports back over the Internet.
What companies are currently creating #ESPHome devices that you have bought and used? #homeassistant
What companies are currently creating #ESPHome devices that you have bought and used? @homeassistant #homeassistant
Examples:
Apollo Automation (https://apolloautomation.com/)
Elevated Sensors (https://www.elevatedsensors.com/)
Remote access questions
Hi everyone!
I’ve had my Hassio Yellow for a while and I am really happy with it – and because feck Philips and their spy-app.
However, I haven’t set up remote access yet because it seems really daunting and I’m worried I’ll make a mess. I am not bad with tech, but I’m not a computer engineer – and reading some Hassio texts makes me feel like I should, and I get easily overwhelmed…
I found the TOR add-on and I was considering that – but it mentions VPN, which I use, and to which my Hassio is connected.
My questions are:
- Do I need to install the add-on if I use VPN?
- If not, how do I set up remote access with my VPN?
- Should I stop using VPN if I set up TOR remote access?
Thank you all in advance.
Home Assistant is doing a user survey
Today we launch our annual survey of our community, the insights gained will help us make Home Assistant better reflect all our users.

> As Home Assistant continues to grow and evolve, so does our commitment to making it more inclusive, accessible, and aligned with the diverse needs of our community. To that end, we’re launching an annual survey—and we hope you’ll participate!
> We could keep assuming our community’s wants and needs, but we’d rather base our decisions on data-driven insights 😉. With this survey, we aim to better understand not just how you use Home Assistant, but also who you are as a person, a smart home user, and a member of our community.
> First and foremost, the survey is entirely anonymous, and you can skip any question you don’t want to answer. For sensitive questions (e.g., gender), we provide options like “prefer not to say” or open text fields.
---
Normally I wouldn't spread word of a survey, but considering Fenick has suggested the Home Assistant community use BlueSky over Mastodon, I thought it might be a good idea to reaffirm to them that the Fediverse has a voice. I also wrote in Lemmy in "Other" responses where applicable.
It's a fairly long survey; they estimate 20 minutes, I think it took me around 15 after skipping a few questions.
How many of you have a controlled #Christmas ornament?!
How many of you have a @homeassistant controlled #Christmas ornament?!
This awesome #ESPHome device from Apollo Automation can work standalone by pressing a button on the ornament, or you can flash the firmware with ESPHome capable firmware so you can control it with Home Assistant. Now I can automate the ornament turning on and off, change the colors, and even play built-in songs or even upload my own!
Better yet? 100% of profit goes to #charity !
https://apolloautomation.com/products/apollo-h-1-annual-holiday-ornament
Questions about Zigbee, Wifi and Smart-Plug measurement accuracy
I want to dip my toes into the smart home world and decided that I want to use homeassistant and primarily use devices based on zigbee, as I do not want to overload my wifi with a bunch of devices.
Smart plugs seem to be most interesting to me as I would like to have accurate power measurements for my homelab and applicances. The keyword is accurate here. There seems to be some science showing that the accuracy of smart plugs can vary a lot. I have read that devices that are flashed with the tasmota firmware can actually be calibrated. Unfortunately this firmware is only available for wifi devices.
So my questions are:
- Are there zigbee smartplugs that are known to be very accurate or can be calibrated to be very accurated?
- Is preferring zigbee over wifi actually a good Idea? I mean both use 2.4 GHz, which is known to be crowded. When will wifi smart home devices become a problem?
- Is a calibrated tasmota smart plug more accurated than a typical zigbee plug?
- Is this inaccuracy reported in the paper even relevant for non-scientific use?
Home Assistant compatibility questions
Hello,
I don't have any 'smart' items in my house (or home assistant currently) but I want to set this up but I have questions about compatibility with hardware before I purchase. They have a integration page does that mean all of those hardware devices work? Or do some work better than others? According to a person on Reddit they recommend https://www.zigbee2mqtt.io/supported-devices/ I'm just curious if anything has changed in the past year. Or if anyone here has a list of recommendations. I plan to start with some lights and a thermostat.
Cheers and thanks.
RGB+C+W light showing up as only C+W bulb
I have 4 RGB+C+W zigbee bulbs like this one: !Zigbee RGB+c+w bulb
However after adding it to home assistant, they only show up as c+w bulbs:
What am I doing wrong? How can I get it to detect it as RGB+C+W?
Trying to count a bunch of lights and switches
But it's not working, where did I mess up?
Currently {{ (states.switch | rejectattr('attributes.light.lamp_left', 'defined') | selectattr('state', 'eq', 'on') | list | count)+(states.switch | rejectattr('attributes.light.lamp_right', 'defined') | selectattr('state', 'eq', 'on') | list | count)+(states.switch | rejectattr('attributes.light.hall', 'defined') | selectattr('state', 'eq', 'on') | list | count)+(states.switch | rejectattr('attributes.switch.bedroom', 'defined') | selectattr('state', 'eq', 'on') | list | count)+(states.switch | rejectattr('attributes.switch.kitchen', 'defined') | selectattr('state', 'eq', 'on') | list | count)+(states.switch | rejectattr('attributes.switch.lounge', 'defined') | selectattr('state', 'eq', 'on') | list | count)+(states.switch | rejectattr('attributes.switch.bath_left', 'defined') | selectattr('state', 'eq', 'on') | list | count)+(states.switch | rejectattr('attributes.switch.bath_right', 'defined') | selectattr('state', 'eq', 'on') | list | count) }} lights are on!
I found a blog, https://www.devwithimagination.com/2023/01/21/counting-sensors-in-home-assistant/ , which pointed me in the right direction and subsequently I ended up with this working code
Currently {{ (states.light | selectattr('entity_id', 'in', ['light.0xa4c138643f553454', 'light.0xa4c138d8db3aa654', 'light.0xa4c138df3493b345', 'light.frontroom_lamp']) | selectattr('state', 'eq', 'on') | list | count)+(states.switch | selectattr('entity_id', 'in', ['switch.0xa4c1382764f5a877', 'switch.0xa4c1387c75807865', 'switch.0xa4c138a638208375', 'switch.0xa4c138bfbbe76454_left', 'switch.0xa4c138bfbbe76454_right']) | selectattr('state', 'eq', 'on') | list | count) }} lights are on!
WLED power limit for FCOB strip
Pardon a WLED question in the Home Assistant community, but I was unable to find a WLED community in the fediverse.
Regardless, I have this 720 LED/meter FCOB strip, which is 24v strip & I'm trying to figure out what to configure the "LED voltage (Max. current for a single LED):"
Since it's a 20IC per meter & they claim 21watts per meter that comes out to ~1w per IC. But I'm unsure how that converts to mA like WLED is asking for.
Any advice would be greatly appreciated 🤠
Eve Energy smart plugs transmit Energy information via Matter
I just learned that the Eve Energy smart plugs transmit energy consumption information via Matter. I didn't think energy consumption information was supported in Matter yet, but it is.
This makes them incredible to use with the Home Assistant Energy dashboard.
Even tho I was hesitant for a while, I took the leap to using the Matter beta Home Assistant integration and no issues so far.
YAML Newbie, stuck on what should be an easy question (using state attributes instead of numeric value)
Solved!
Solution was to create a group and perform an action on that:
action: light.turn_on target: entity_id: light.kitchen_cabinet_sink data_template: brightness_pct: "{{100*state_attr('light.kitchen_sink_ceiling','brightness')/255}}"
Original:
Trying to run an automation to match one light's state (on/off/dim) to another's. Have this currently:
``` alias: Sync cabinet lights with sink light if:
- condition: device type: is_on device_id: [something]5710 entity_id: [something]a438 domain: light then:
- type: turn_on device_id: [something]b447 entity_id: [something]470f domain: light brightness_pct: 100 else:
- type: turn_off device_id: [something]b447 entity_id: [something]470f domain: light ```
That works fine to turn the lights on or off, and I have triggers in the automation for that and changes in brightness. But using a non-static number for brightness_pct (yes, I know I'll probably have to math the 0-100 scale instead of 0-255) is giving me trouble. When I try something like this:
``` alias: Sync cabinet lights with sink light if:
- condition: device type: is_on device_id: [something]5710 entity_id: [something]a438 domain: light then:
- type: turn_on device_id: [something]b447 entity_id: [something]470f domain: light brightness_pct: {{state_attr("light.kitchen_sink_ceiling", "brightness")}} else:
- type: turn_off device_id: [something]b447 entity_id: [something]470f domain: light ```
I have also tried {{states.light.kitchen_sink_ceiling.attributes.brightness}} instead. Both seem to have the correct value when I play around in the developer tools. But when I put it in the automation, I get an error that a float value was expected. I see some similar issues online, but it always seems to be in a different context and people fix it by changing some value I never had.****
A better dehumidifier control
So sue me, I don't keep up all that well with all the changes in Home Assistant and I recently found something that is quite useful to me.
Because I live in the American South and because we recently had our water plumbing explode, the humidity in our house tends to be sky high. Like 60% or higher high. To counter this, a while ago I picked up a large dehumidifier from Amazon which has worked pretty well controlling the humidity in the house until recently.
Recently though, I noticed that the humidifier kept turning off and on. Dehumidifier was set to 35 but the household thermostat was reading 55% humidity. As a check, I set the dehumidifier to run continuously. It stayed running and the humidity in the house started dropping and went to the 30’s in the room where the device is located and down to 46 at the thermostat. My conclusion was that the humidity sensor on the device had failed.
I could go the hard route. Take apart the dehumidifier, try to find the problem and do a board level repair. Go the expensive route and replace a generally functioning dehumidifier. Or I could take cheap, simple, and admittedly jerry-rigged option. Home Assistant.
Turns out that Home Assistant has a new (to me anyways) helper called a Generic Hygostat that can connect a humidity sensor like this one to a smart outlet or plug and control that outlet based on a humidity level you set. It can be set to control either a humidifier or dehumidifier. Once you've created the helper you can add the helper to your dashboard and it gives you thermostat like control over your de/humidifier. Pretty slick.
Seeking assistance getting haos server running
I figured I might be able to find some answers here. I've been off and on trying to install home assistant after setting up an old desktop with proxmox, but I've never been able to get it running. I've been getting this issue:
[supervisor.docker.interface] Can't install ghcr.io/home-assistant/qemux86-64-homeassistant:2024.10.3: 500 Server Error for http+docker://localhost/v1.47/images/create?tag=2024.10.3&fromImage=ghcr.io%2Fhome-assistant%2Fqemux86-64-homeassistant&platform=linux%2Famd64: Internal Server Error ("Get "https://ghcr.io/v2/": net/http: request canceled while waiting for connection (Client.Timeout exceeded while awaiting headers)")
Attempting to go to ghcr.io/v2/ seperately in browser results in it saying I'm unauthorized
Z-Wave Thermostat for 120VAC
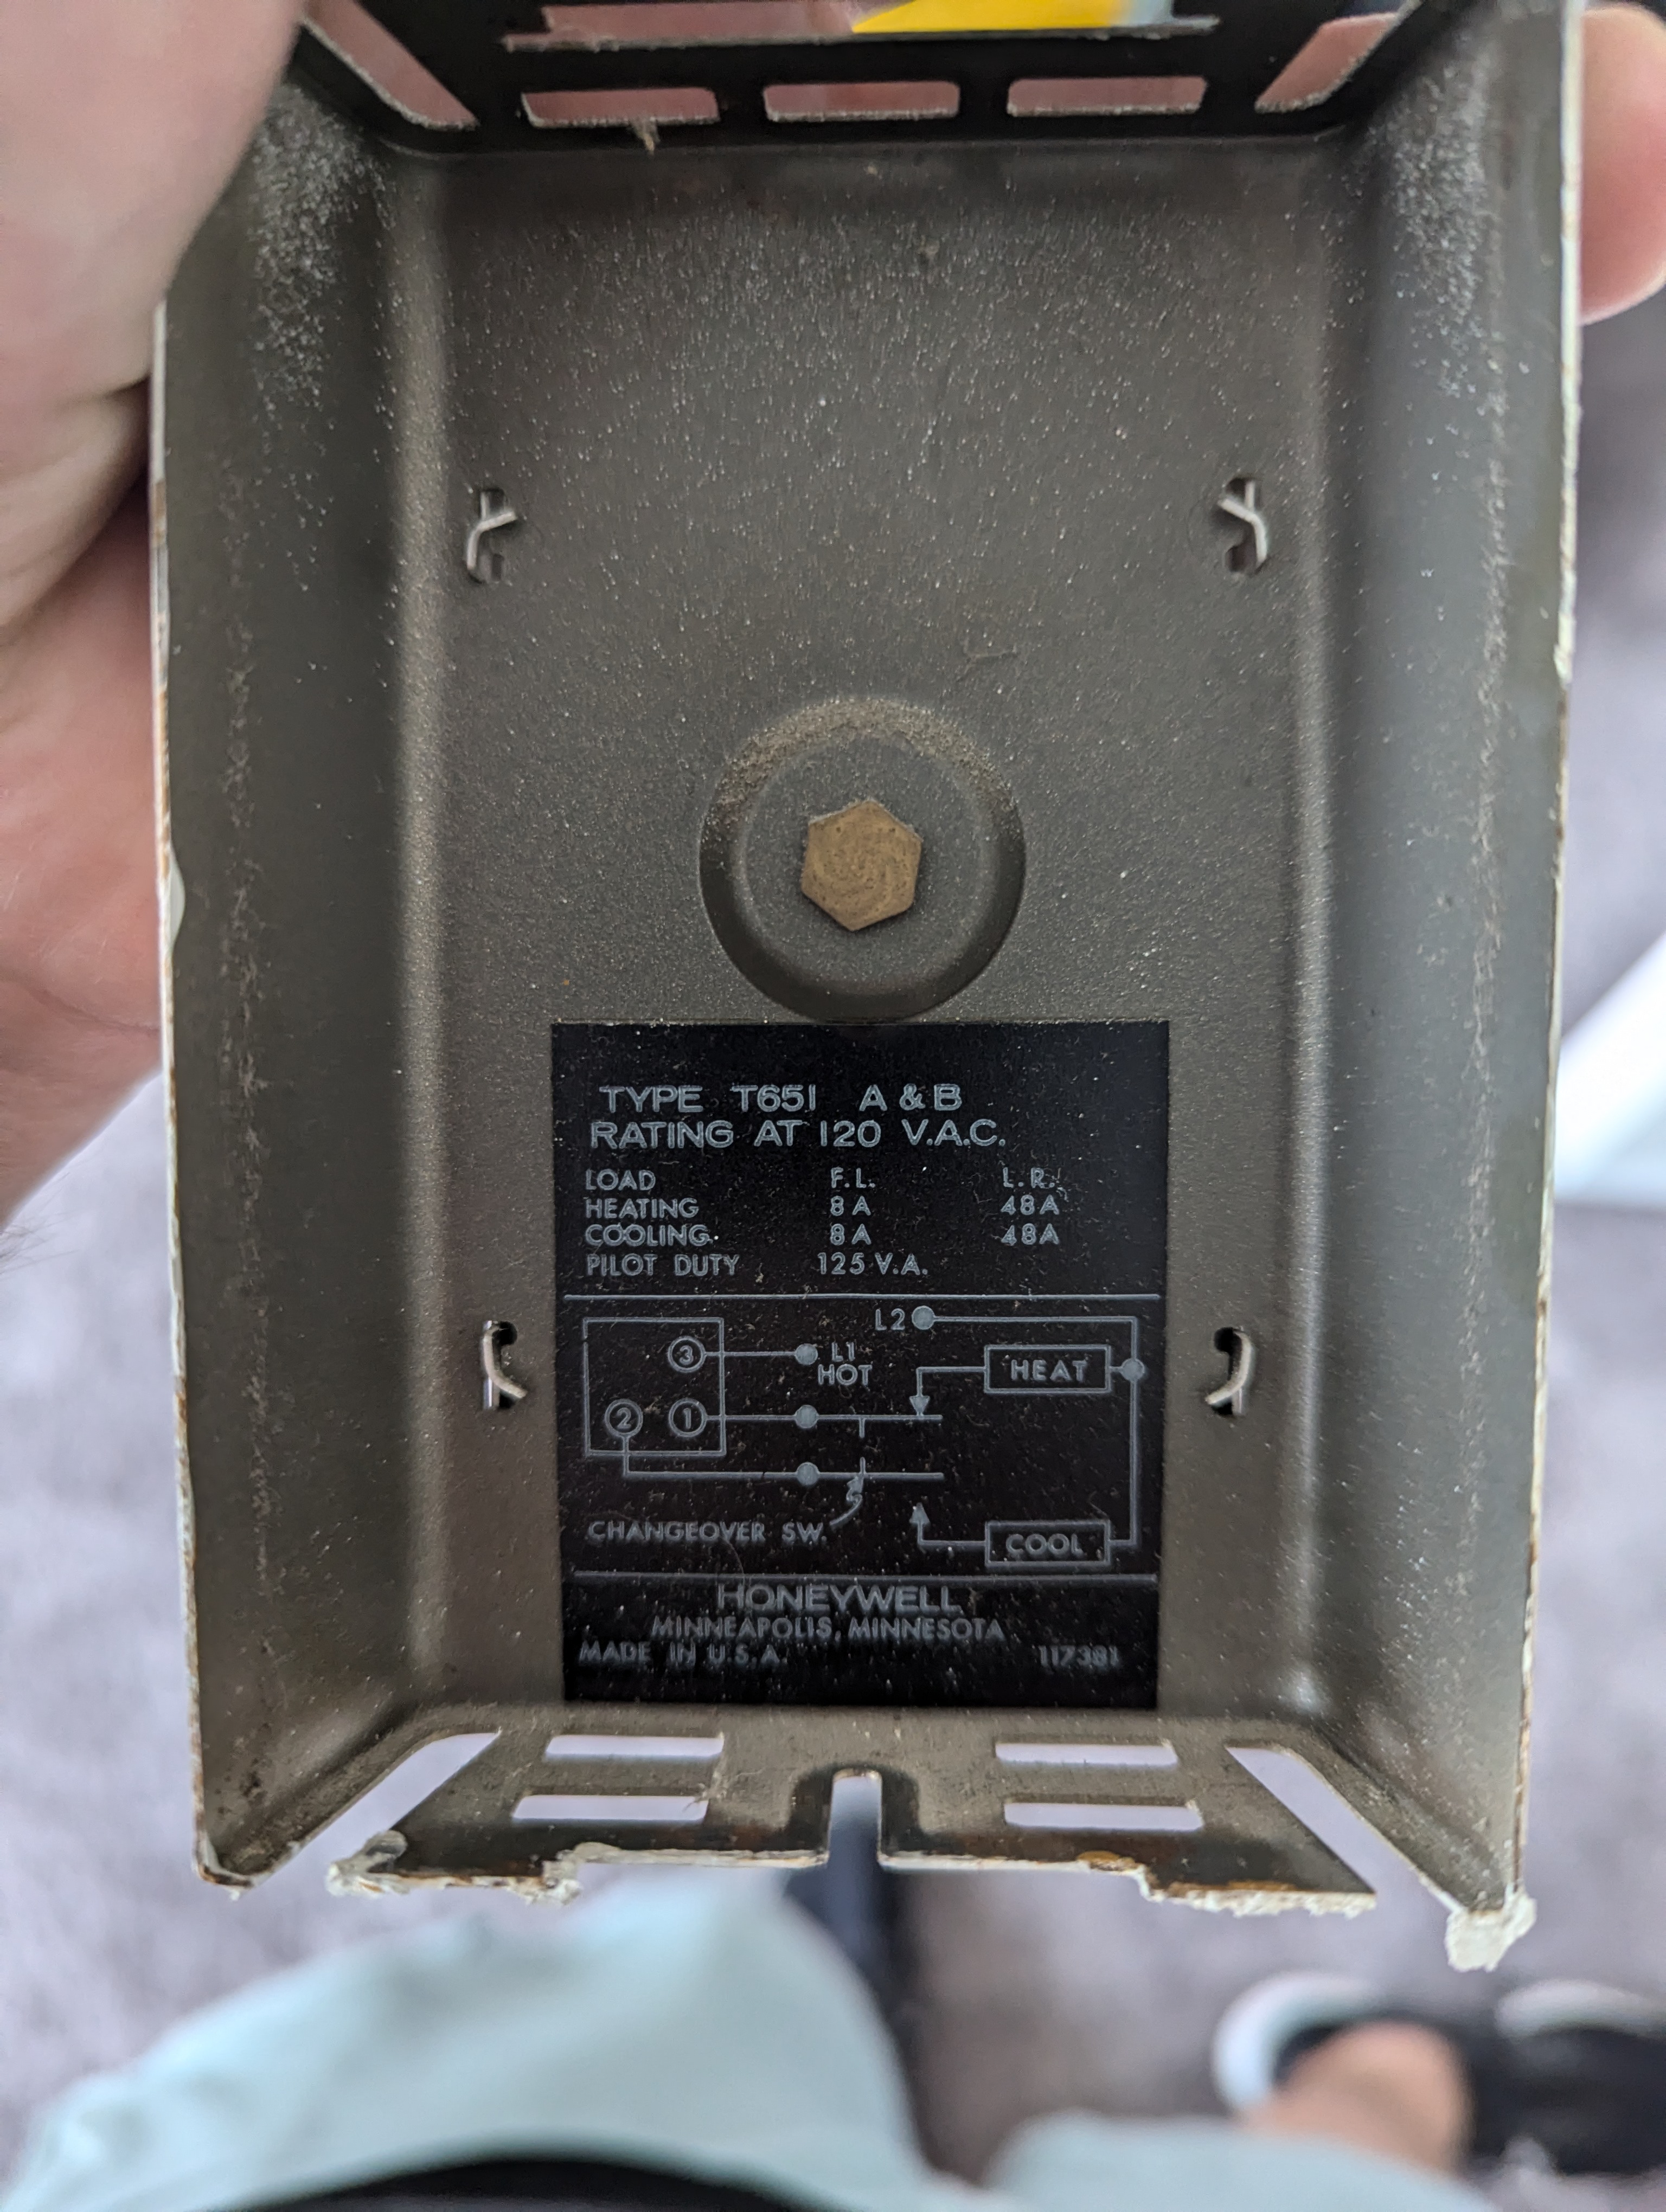
Hello all, I am moving into a new apartment, and was planning on replacing the thermostats with Z-Wave ones. I currently have a Honeywell T6 Pro Z-Wave in my current apartment, and was planning on picking up a couple more.
When I was at the new place today, I took a look inside of one of the thermostats and saw something I was not expecting. They are all 120VAC line voltage thermostats. The heating and cooling is shared between the building, and whether heating or cooling is on is a whole building schedule. The person in the leasing office that was touring us around the new place when we got our keys said that it switches to heat in october or November.
Attached are a couple of photos of the thermostat and a photo of the vent in the wall (although not sure if that is helpful). The thermostat is a Honeywell T651A. I am not sure of what the actual HVAC equipment looks like.
This obviously throws a hamper in my plans, and now I have to look for alternatives. I am not super familiar with 120VAC HVAC, so I wanted to get some advice from others. I believe it is a heated/chilled water system, and the thermostat simply controls the pump/blower in the wall panel (one of the photos). The fact that there is both heating and cooling is what is confusing me, since all of the 120VAC thermostats I have seen are only for heating. Obviously it all boils down to how the temperature is compared to the set point. If the building switches to cooling (which won't be a problem for about 6 months after it switches I am guessing), the comparison will be backwards.
If anyone is able to point me to any resources on how I can learn about this control system, that would be great. I found the Stelpro KI Z-Wave Thermostat which I think will work, but I am not sure what happens when it switches to cooling in the spring. I prefer Z-Wave since I have found it to be far more reliable (especially in a larger building. This is a 7 floor building with ~15 units on each floor. So there is a lot of 2.4GHz traffic I assume), however if anyone knows of a product that will work for this (if the Stelpro one won't) I'm all ears.
Entity control from iOS widget
Does anyone know if the 2024.5 Companion App update for iOS removed the ability to control entities from the widget? I've read the release notes but there's no mention of any features being removed.
I could absolutely swear that I had a working widget with most of my lights on it, a solitary button for each light, that I could single tap to toggle said light.
Then, a few months or so back, I noticed the widget didn't seem to be working. The entity icons had change to black, round shadows, and tapping them did nothing.
I deleted the widget, thinking it got corrupted somehow and have never been able to get it back exactly as described above.
Now, it seems that only thing I can do with widgets is use Actions. Some Actions have been auto-created by the Companion App for each scene on my server, and I can obviously create my own Actions, to trigger automations.
But, I don't want to have to frig around with Actions (using input_booleans and automations) to do something as simple as turning a light on or off.
Am I dreaming? Did the iOS widgets never have this ability? Or am I missing something really obvious to configure entities onto a widget?
Thanks in advance for any useful advice.
Setting up a bridged network for HomeAssistant in KVM Fedora
cross-posted from: https://mander.xyz/post/16531247
> I have tried to follow several tutorial to setup using either ip or nmtui:
> - https://linuxconfig.org/how-to-use-bridged-networking-with-libvirt-and-kvm
> - https://www.redhat.com/sysadmin/setup-network-bridge-VM
>
> However, the bridge inherits the MAC address of host after enslaving the host hardware enp1s0.... This causes my router to give both the host and the bridge the same ip address, making the ha instance inaccessible.
>
> The red hat tutorial clearly show that the bridge and the host have different IP, so I was wondering if I am doing something wrong.
>
> ---
>
> alternatively, I can set the home assistant vm to run in NAT and port forward from host, but I have several device that communicate over different ports. So it would be annoying to forward all these ports. Not to mention, many appliances don't have documentation about the ports they use.
>
> I can also potentially use virtualbox, but it is not well supported on silverblue, especially with secureboot enabled.
LNXLink - Link your Linux computer into Home Assistant

Windows and macOS have similar clients (Hass.Agent for Windows and Home Assistant for macOS).
I've found these kinds of clients useful because I can remotely wake-up or sleep computers, track how long they are turned on for, and automatically pause my lights and music when my webcam turns on.
Trigger when ChromeCast change from ON to OFF only
Hey guys,
I made an automation that powers off my bluetooth speaker (using IR blaster) when ChromeCast is powered off for more than 10 s. Automation is working fine, but sometimes ChromeCast changes state from OFF to Unavailable and back to OFF in just a few seconds. I have no idea why is that happening, but it triggers automation and turns ON the speaker (it is the same IR button for ON and OFF) and gets it out of sync.
What condition or trigger should I use to make it work only when ChromeCast state changes from ON to OFF and ignores Unavailable to OFF?
There is my automation:
```
alias: Turn off JBL description: if CC is off for 10 sec trigger:
- platform: device type: turned_off device_id: bc1049ea43a53092952d364749c3fb4c entity_id: ae0ea35649746ed5cea16f8d6ca54dd3 domain: remote for: hours: 0 minutes: 0 seconds: 10 condition: [] action:
- service: remote.send_command metadata: {} data: num_repeats: 1 delay_secs: 0.4 hold_secs: 0 device: jbl command: "off" target: device_id: 4f1f3a13324e03646ff6b03aed27f2fe mode: single
```
thanks in advance
@thehatfox
For cloud backup it is wise to encrypt. Guess they will implement op-out for local backup in a future release.

Check out Technology Connections on YouTube. Specifically this playlist on heat pumps.
The only thing more efficient would be mechanized Solar shades and passive techniques.
Dahua (professional side of Amcrest) still sells their video doorbell through B&H Photo. According to a Q&A answer on the site it will power a wired chime.
I have another wifi Dahua camera (also bought from B&H) and have been really impressed with it. It's used with Frigate and Home Assistant. Be aware that B&H offers their own warranty for Dahua products. I looked at the fine print before my purchase and felt it was reasonable.
EmpireTech sells rebranded Dahua products and they have a different model. The seller gets great reviews on ipcamtalk.com. Detailed user reviews here. EmpireTech also sells through Amazon.
Yeah, it threw me at first too, but its nonsense. I have about 20 Aqara sensors and switches without the Aqara hub. I use the Sonoff USB coordinator.
I always use this great resource to check compatibility:
I'd been planning for a new HVAC system for a while when that video came out, and it gave me the idea to cross-check the thermostat data with the Manual J calc I'd already done. They were in general agreement, though the Manual J block load was more conservative than empirical data for a design day.
In your case, since you don't have data from a healthy system on a representative heating design day, I'd suggest using a web tool like CoolCalc to simply calculate an approximate Manual J total heating and cooling load, and use that to guide your choices.
@pHr34kY @corroded Not from home automation but from my #pihole installation.
My internet radio tries to send the title of each new song to itunes.apple.com. My smartphone tries to report any new installation / update of SW packages to googletagmanager.com.
Those are among the reasons I use a #pihole in the first place.
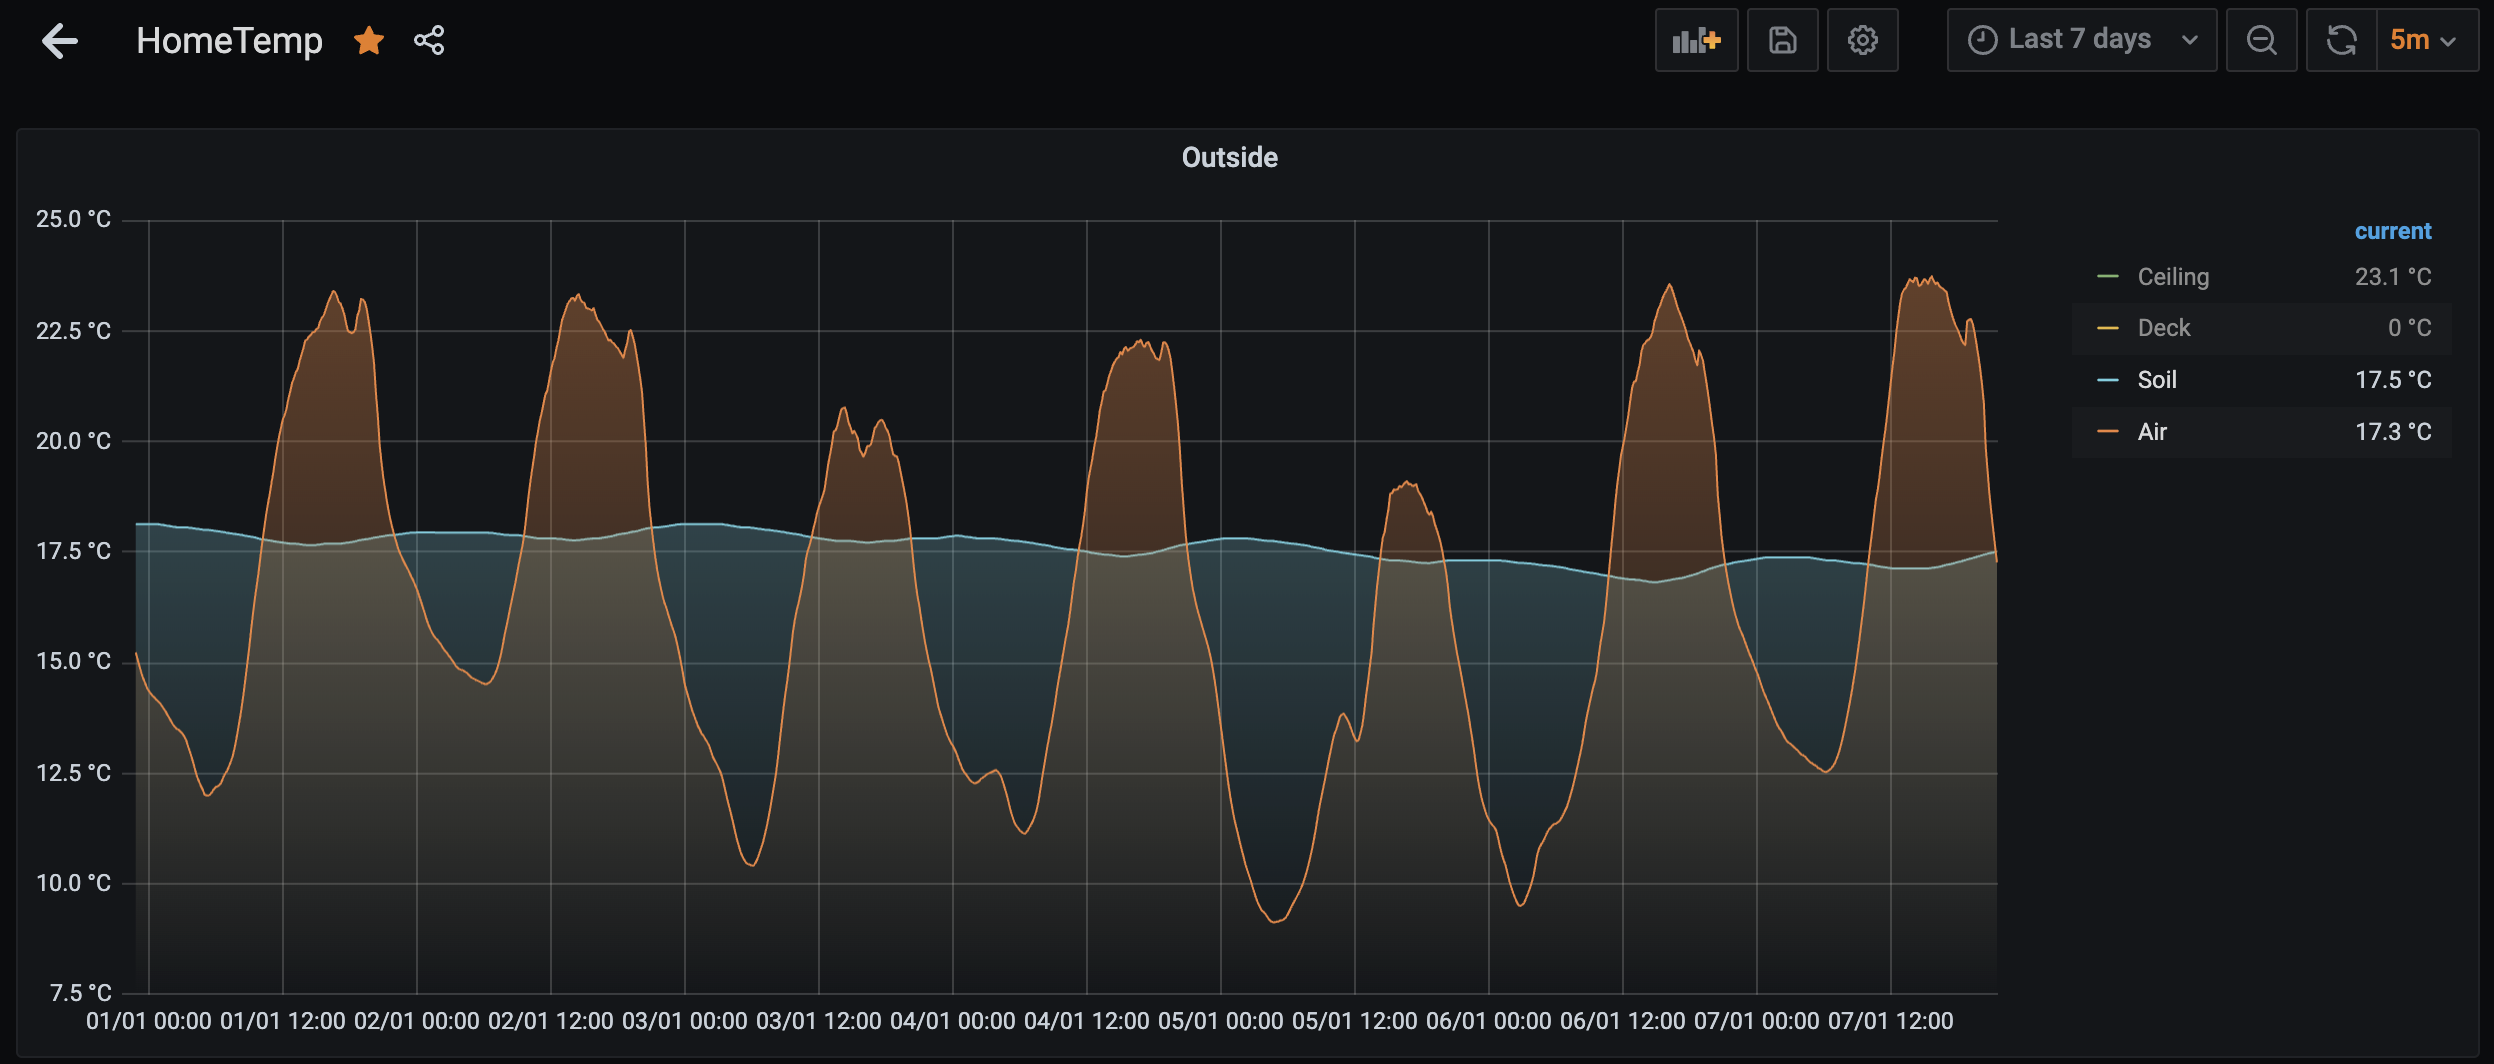
Along a similar line, ground temp (~200mm deep) lags air temps by about 12 hours
I, too, have such an interest. One thing I ran across about two months ago that I thought was neat was a project for a DIY wind gauge with no moving parts.
If you’re using OPNsense I recommend you install and enable Avahi to help route discovery traffic, and I would double check multicast is functioning on your wifi.
IIRC with home assistant there are some commands you can run to make it aware of your VLANs.. have a look at this
Is this the one you are talking about? Looks like it will do the job?
I totally understand your concerns. We just don't have such cold winters here in Germany. And I also understand your point more (also after having read your other comments). If the insulin vial in question is a spare it will most likely not being noticed if it freezes until it is needed.
In theory you could use the Bluetooth sensors of the companion app which can be used to detect BLE beacons. But that would require a special Bluetooth device that activates once a threshold temperature has been detected. Maybe such things exist (I'm thinking of (food) supply chain monitoring), but I am not aware of any.
I have Type 1 Diabetes, and I'm always looking for fun/interesting ways to help me manage it, including some Home Assistant tools, like the Nightscout integration.
If your son is using an insulin pump, why are you taking a vial of insulin with you day-to-day? Even small pumps like the omnipod hold much more than one day's worth.
When I do need to bring vials of insulin with me (if I'm camping in the summer for more than a few days, for instance), I just use a Frio pouch. They're little evaporative coolers that keep the insulin cold enough. I'm sorry for ignoring your question, but it sounds like you could be making things more difficult for yourself than you have to.
The one solution I can think of which is not involving adding any hardware is using Spotcast to start Spotify playback on your tablet.
Haven't tried exactly this setup, but based on their description it should work.
@canatella wow. Any idea how they bricked? I'm still new to ESPhome and learning the ropes but I didn't see any complaints about Athom before I purchased them.
@tj @homeassistant Athom energy monitoring wifi smart plugs for triggering other actions based on energy usage.
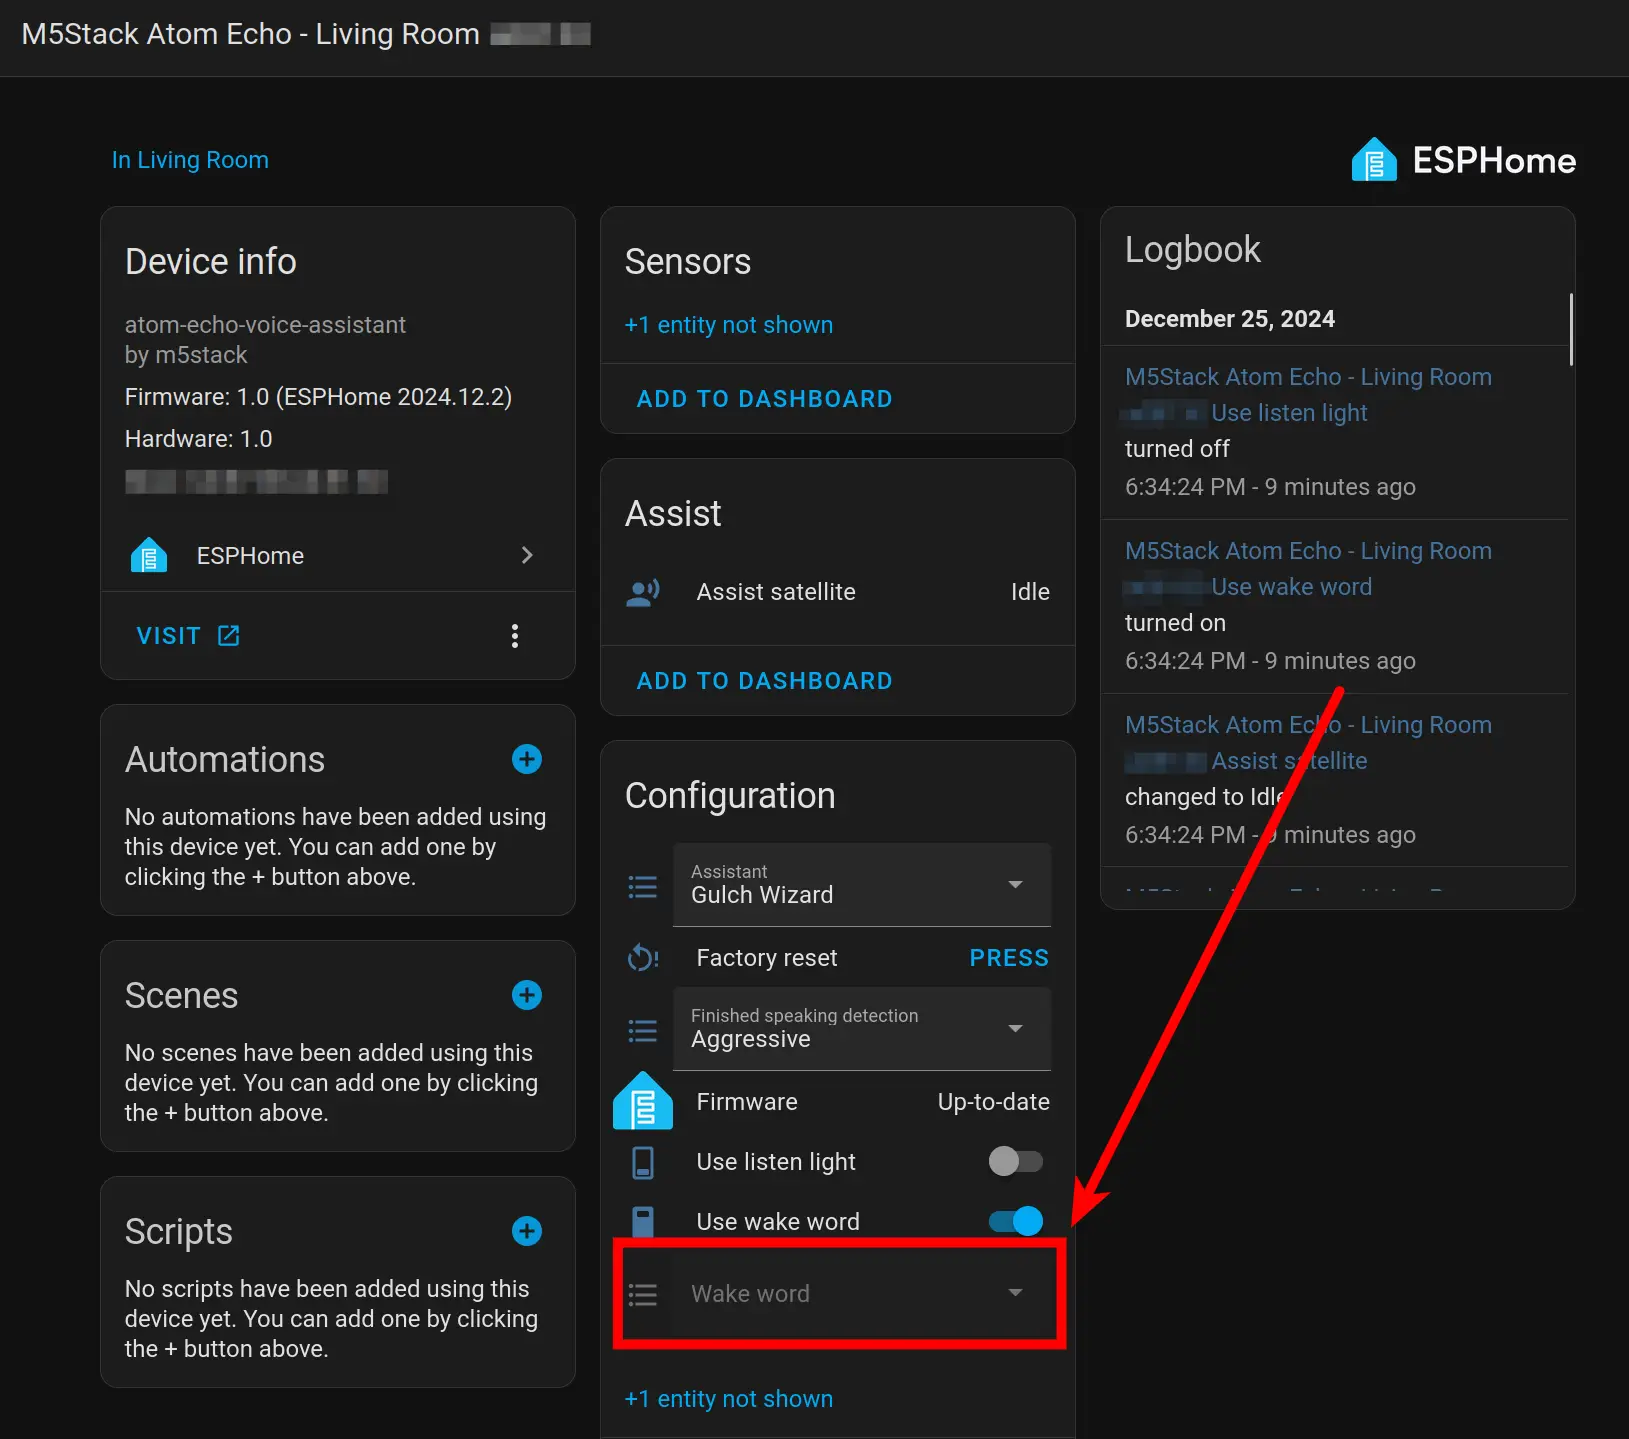
m5stack Atom Echo for a voice assistant.
Shout out to Everything Smart Home, great YouTube channel as well!
I think you either need a music player that is on or on standby 24/7, or build one yourself. That can be done with a microcontroller plus other components, some soldering and the ESPhome project.
This is pretty easy to DIY.
Esp32, PCM5102 DAC, and a small speaker.
ESPHome media player, the music either on Spotify via MusicAssistant or simply in a local folder on home assistant. You can adjust the speaker volume via the pcm5102.
Hell, wire an i2s microphone to it also and you have a voice assistant satellite.
Here's the search I used, with a six month range on it. There are a variety of issues shown with the wake word with different versions, etc., but I don't know your exact specs. There are also some for mini wake word, which may or may not be relevant to you. That's about all the help I can give, unfortunately.