SEC Probes Ryan Cohen’s Bed Bath & Beyond Trades

source *** SEC Probes Ryan Cohen’s Bed Bath & Beyond Trades Billionaire took $120 million position in housewares retailer, then abruptly sold it
Ryan Cohen sold his 11.8% interest in Bed Bath & Beyond in August 2022, just days after tweeting positively about the company. PHOTO: MARK ABRAMSON FOR THE WALL STREET JOURNAL By
Dave Michaels and Lauren Thomas Sept. 7, 2023 5:45 pm ET The Securities and Exchange Commission is investigating billionaire Ryan Cohen’s ownership—and surprise sale—of Bed Bath & Beyond shares at a time when such so-called meme stocks were all the rage with investors. Cohen took a $120 million stake in Bed Bath & Beyond and pushed for changes to the housewares retailer’s sales strategy, but abruptly sold his 11.8% interest in August 2022, just days after tweeting positively about the company. The five-month investment netted him a profit of nearly $60 million. Cohen’s interest in the company spurred a frenzy of trading that caused its stock to soar 34% in a day before collapsing after he disclosed the sales, before which he had gotten three new members appointed to the board. The SEC has requested information from Cohen about his trades and his communications with officers or directors at Bed Bath & Beyond, according to people familiar with the matter. The regulator has also sought records from some of the company’s current and former board members. The SEC’s civil investigations sometimes take more than two years and can end without the regulator bringing formal claims of wrongdoing. Cohen founded online pet retailer Chewy and later developed a deep fan base of individual investors who herd into the stocks he buys. He most notably took control in 2021 of videogame retailer GameStop, where he currently serves as executive chairman. A group of Bed Bath and Beyond investors sued Cohen last year in Washington, D.C., federal court, alleging he committed fraud because he was aware of bad news about the company that hadn’t been disclosed when he sold his shares. They claim his statements on Twitter and in SEC filings were part of a pump-and-dump strategy that left small investors nursing big losses. In an order issued in late July declining to dismiss the investors’ claims, U.S. District Judge Trevor N. McFadden called the timing of Cohen’s trades “sketchy.” Cohen’s ability to attract a bandwagon of retail investors grew from the depths of the Covid-19 pandemic, when traders triggered by social-media posts and online communities such as Reddit began gambling on meme stocks. According to the investors’ lawsuit, Cohen misled investors when he tweeted on Aug. 12, 2022, in response to a negative news article about Bed Bath & Beyond, that included an emoji showing the face of the moon. Some investors took it as a bullish signal, indicating that Bed Bath & Beyond stock would go “to the moon,” according to the lawsuit. The stock rose 12% that day, according to FactSet data. In his response to the investors’ lawsuit, Cohen denied misleading the market about his trading plans. He decided to sell, he said in a court filing, because the stock price had “unexpectedly increased to a value that exceeded what he believed it was worth.” Cohen also said that one of his earlier disclosures told investors that he could sell some or all of his shares. He didn’t change that statement, so investors were on notice that Cohen could dump his stake at any time, his court filing said. In declining to dismiss the case, Judge McFadden wrote that investors “plausibly alleged that the moon tweet relayed that Cohen was telling his hundreds of thousands of followers that Bed Bath’s stock was going up and that they should buy or hold.” In the week after his tweet, Cohen filed two public updates to his Bed Bath & Beyond holdings. The first, on Aug. 16, 2022, said he hadn’t done any trading during the prior 60 days. The second, filed on Aug. 18, said he began selling all of his shares two days earlier. The company filed for bankruptcy in April and has closed hundreds of its stores since last year. Write to Dave Michaels at [email protected] and Lauren Thomas at [email protected]
reports of your death are greatly exaggerated
source *** I seem to remember the BlockBuster stock along with lots of the other Cellar Boxed stocks doing strange stuff around the time of the original squeeze.
If I’m not mistaken that was the original impetus for the creation of the so called “eXpErTs MaRkEt”. Because we have to sAvE rEtAiL iNvEsToRs from themselves.
It’s criminal how many companies Wall Street has been able to victimize with these Bust Out & Cellar Boxing schemes.
User 1fuzzypickel and The-doctor-is-real have put in a tremendous amount of energy in compiling lists of companies that have fallen prey to these private equity driven leveraged takeovers. The list includes some very well known names such as: Blockbuster, OfficeMax, Pizza Hut, K-Mart, Neiman Marcus, Pier 1 Imports, Sears, Toys R Us, Circuit City, JC Penny, Radio Shack... and the list goes on, and on, and on.
You can find the lists here:
Can we make a list of the companies that BCG has sabotaged? ***
I think I have a fair grasp on how it works but it is difficult to see exactly how all the pieces slot together inside Wall Street’s black box full of imaginary numbers.
This is an intro to the Wall Street take on the classic Mob “Bust Out” scheme.
You really have to consider shorting and the “Bust Out” activities as more of a “group” activity rather than a direct dynamic between only one or two Wall Street entities. All of them have a part to play in this feted little scheme. And sure, there’s probably some stronger (RICO) ties between a few of the players here and there, but overall they don’t really even need to communicate between each other much. They can play the game just fine without too much talking, because it’s like musical parts in a band. As long as they all know who the victim company is - they can pretty much just hum along in time with each other. They all know how the song goes.
Predatory Lending and the debt trap is one of the core requirements for a successful Wall Street “Bust Out” operation.
It typically starts with getting a Board Member onboard the victim company. This can often be done through Corporate Vote Manipulation. Corporate voting is surprisingly easy to manipulate. All you have to do is borrow enough shares prior to the company vote and you can vote those shares to achieve whatever corporate action you want to accomplish. Initially the first goal is usually to get a Board Member (or members) onboard the victim company.
Once a Board Member(s) are on board you need to “trim the fat” to make the company reliant upon Wall Streets services. Specifically Debt. Debt, especially cheap debt is how they get you. How they own you. The Debt trap is why Wall Street generally does not allow companies to carry large surpluses of cash. It’s generally leached out through the Board members bonuses, their “golden parachutes”, extravagant expenditures like the company jet, the “overpriced consultants”, payed out to the majority shareholders as dividends, etc...
This is done so that companies “run lean” and they often don’t keep much cash on handset all. Instead companies borrow cash from Banks to pay big expenditures. Some even run so lean that they will not even keep enough cash on hand for payroll.
They take short term loans for things like payrolls, operating expenses. The loans are a key component. You make a company reliant on debt, and then you own them. The scam works because the stock price of a company works something like a credit score. Banks use the stock price as a key component of an analysis of that companies credit worthiness.
So if they can drop the price of a particular stock low enough through Naked Shorting, the victim company will not be able to pay their day to day bills and will go bankrupt immediately unless they obtain emergency financing from somewhere else. That’s when the predatory lenders come in. They will be willing to provide emergency funding, but at a steep cost.
The predatory lenders will often use what is called a Convertible Bond to provide funding to the victim companies. What a Convertible Bond does; is allow the predatory lenders to convert that bond into shares. The Predatory Lenders are secretly involved with the Naked Shorters that are trying to drive the stock to zero. What the predatory lenders do is structure the loan in such a way that it’s extremely difficult to pay off on time without penalty.
When the victim companies enviably can’t meet the terms and conditions of the loan, the predatory lenders “convert” those Convertible Bonds into shares and dump them on the marketplace. This further depresses the share price of the company. It’s called “Death Spiral Financing”.
Once the share price is close to zero the predators refuse to continue lending, this bankrupts the company, forces a sale, where the private equity predators again come in and scoop up the companies assets at pennies on the dollar.
The Private Equity Companies benefit by being able to keep or sell off the victim companies assets.
The Naked Shorters (Market Makers) get to keep all the profits of selling those Naked Short Shares and they get to “Cellar Box” the remaining shares of stock that has reached around $0.0001 to ~$0.0004. Cellar Boxing is taking advantage of the arbitrage between the 100% spreads at the price “cellar”. If you own $1,000 dollars worth of a stock at $0.0001, your stock value can never decline. And if you drive up the price of that stock to $0.0002, you now have $2,000 worth of stock. And because they never close those positions, they get to keep the Naked Shorting proceeds Tax Free.
The Predatory Lenders (Banks) profit by keeping the proceeds of the loans and from selling those shares obtained from the Convertible Bonds.
The DTCC benefits from all the FTDs because of how FTDs are “resolved”. The DTCC charges a “small” fee (much smaller than the actual price of the shares) to maintain those FTD records, so the more FTDs, the more money they make.
The Board Members deliberately drive the company into the ground, get fat bonuses for doing so and golden parachutes on the way out. They probably get kickbacks from bringing in the “Overpriced Consultants”. And they get to move on to their “next assignment” to bankrupt the next company.
The “Overpriced Consultants” like BCG extract fat fees from the Victim Companies and have a dual function to keep the Victim Companies on the path to Bust Out and as a data breach funneling information back to the Naked Shorters and the Private Equity company. The data breach is important because it allows the Private Equity to either sabotage innovation or to front run products.
The the Lawyers and Judges in important jurisdictions are also often involved in keeping both the regulators deaf and dumb but in making sure that court decisions swing in favor of the Private Equity as often as possible.
The politicians get paid fat “speaking fees” to look the other way. They are also fed juicy stock tips through their Wall Street lobbyists. The court officials (judges) are given lavish vacations and other monetary benefits (goods, property) to rule on the side of Wall Street. The SEC is also effectively kept deaf and dumb by the aspersions of its own staff. SEC staffers all have a big fat carrot dangling in front of the courtesy of big financial institutions. The staffers all want to move on to those cushy Bank or Institutional jobs in the financial industry that involve using their experience to circumvent the regulations that they often wrote while inside the SEC.
The other beneficiary of this little scam is the company that is going to take over that market that the Victim Company has just been forced to vacate. Amazon for example has benefited immensely by the “Bust Out” scam. They have taken over electric components from RadioShack, Home good sales from Sears, on demand video from Blockbuster, office goods from OfficeMax, Toys from Toys R Us. The list goes on and on: K-Mart, Neiman Marcus, Pier 1 Imports, Circuit City, JC Penny...
Wall Street has figured out that they can make more money by destroying companies than by supporting them. Everyone wins and makes money hand over fist doing so.
Everyone except the Victim Companies and their Retail / Household Investors. They get fucked. Hard.
Bonus material: The Bust-Out ***
https://www.reddit.com/r/Superstonk/comments/np33hr/amazon_bain_capital_and_citadel_bust_out_the/
https://www.reddit.com/r/Superstonk/comments/s4moop/bustout_the_movie_stock_edition_players_include/
https://www.rollingstone.com/feature/wall-streets-naked-swindle-194908/
https://www.rollingstone.com/politics/politics-news/greed-and-debt-the-true-story-of-mitt-romney-and-bain-capital-183291/
Wall Street Whistle Blower - Laser Haas https://youtu.be/aURQbtmgrfQ
[!watch](https://youtu.be/aURQbtmgrfQ)
~ ~ ~ Laser Haas ~ ~ ~
Former Morgan Stanley employee. —“Gaming Wall Street” https://youtu.be/i-tKiiHWGkE [!watch](https://youtu.be/i-tKiiHWGkE)
~ ~ ~ I naked short sold stocks EVERY single day ~ ~ ~
EX-HEDGE FUND MANAGER EXPOSES THE TRUTH ABOUT NAKED SHORTS https://m.youtube.com/watch?v=WUAfc4S3djU
Legacy Swaps, Margin Requirements, Phase 6, oh my!
Legacy Swaps, Margin Requirements, Phase 6, oh my! I AM NOT SEEING ENOUGH CONVERSATION ABOUT THIS Sept 1st margin requirement that has been delayed longer than usual...
I tried posting this earlier but it contained the virus word that is blocked by automod here.
The following is discussion of the rule published by the CFTC in Jan 2021 with a recent proposed rule change. Herein I post a summary of the rule (important terms bolded), my interpretation, and speculation on how this relates to our beloved stock. I would like more EyeBalls on this. The Rule explains that the majority (492 of 514) entities would fall under this rule; seems rather important to me and not many have discussed this thoroughly here in detail.
Margin Requirements for Uncleared Swaps for Swap Dealers and Major Swap Participants
Final Rule Jan 5 21 / Document Citation: 86 FR 229
- Old Rule: Margin requirements start Jan 1st every year based on average daily aggregate notional amount from Jun-Aug.
- New Initial Margin (IM) requirements started Sept 1 2022 based on average month-end aggregate notional amount (ANAA) positions over Mar-May of that year. Margin requirements are required every Sept 1st based upon the Mar-May monitoring period. Previously this was a daily average with margin requirement starting on Jan 1st and based on Jun-Aug of the prior year. If the entity’s position is >$8B then margin requirements are in effect. Most situations use a risk-based model (ranging 1-15%), but certain participants can elect to use a standard model.
- ELI5: entity marks positions during a timeframe and if they meet the criteria they are subject to posting the margin (IM) requirements on the listed date.
Final Rule Jan 25 21 / Document Citation: 86 FR 6850
Proposed Rule (comments close 10/10/23) / Document Citation: 88 FR 53409
- "The proposed amendment would revise the definition of “margin affiliate” to provide that certain collective investment vehicles (“investment funds” or “funds”) that receive all of their start-up capital, or a portion thereof, from a sponsor entity (“seeded funds”) would be deemed not to have any margin affiliates for the purposes of calculating certain thresholds that trigger the requirement to exchange initial margin (“IM”) for uncleared swaps. This proposed amendment (“Seeded Funds Proposal”) would effectively relieve SDs and MSPs from the requirement to post and collect IM with certain eligible seeded funds for their uncleared swaps for a period of three years from the date on which the eligible seeded fund's asset manager first begins making investments on behalf of the fund (“trading inception date”). "
TRANSITION PERIOD
- “The shift of the MSE determination date from January 1 to September 1 may defer for nine months to September 1, 2023, the obligation to exchange IM for a firm that absent the rule change would have been subject to the IM requirements on January 1, 2023. Uncleared swaps entered into by the firm during the nine-month deferral period will be deemed legacy swaps, or uncleared swaps exempt from the IM requirements.[49] As a result, in 2023, less collateral may be collected for uncleared swaps, which could render uncleared swap positions riskier and increase the risk of contagion and systemic risk.”
ELI5: If you were required to post margin on Jan 1 2023 based on the old rules, you can elect to defer until Sept 1 2023.
- "The Commission further notes that the amendment to the timing of post-phase-in compliance, as proposed, will defer compliance with the IM requirements with respect to uncleared swaps entered into by a CSE with an FEU that comes into the scope of IM compliance after the end of the last compliance phase. Under the current rule being amended, FEUs with MSE as measured in June, July, and August 2022 would have come into the scope of compliance post-phase-in beginning on January 1, 2023. On the other hand, under the Final Rule, FEUs with MSE as measured in March, April, and May 2023 will come into scope, post-phase-in compliance, beginning on September 1, 2023. As a result, for FEUs with MSE in both periods, less collateral for uncleared swaps may be collected given that the Final Rule changes the beginning of post-phase-in compliance from January 1, 2023, to September 1, 2023, rendering uncleared swap positions entered into between January 1, 2023, and September 1, 2023, riskier, as no IM will be required to be collected during that period, which could increase the risk of contagion and the potential for systemic risk."
ELI5: If you came into the scope of our margin requirements you can defer to Sept 1 2023.
CONCERNS
There are several concerns aired in the documents about how the month-end calculation can have fuckery such that entities do things to avoid meeting the margin cutoff or to improve their positions during the monitoring period. I would defer the reader to the above initial Rule for discussion there.
SIMILAR POSTS ABOUT THIS
TECHNICAL ANALYSIS
- I would encourage the reader to review 2022 and 2023 Mar-May month-end (last business day) price action - the position on that day determines whether future margin is required. Take note of how a swap and counterparty may consider managing other securities before/after swap dates.
- Notice the consistent attempts at price suppression and/or stabilization during the monitoring period.
- Pardon me for using Yahoo.
JAN 1 2019 MARGIN: Mar-May was monitoring period (daily avg). Jan 1st margin required. Position going as planned… ! JAN 1 2020 MARGIN: Jun-Aug was monitoring period (daily avg). Jan 1st margin required. Position going as planned… ! JAN 1 2021 MARGIN: Jun-Aug was monitoring period (daily avg). Jan 1st margin required. We should all know the company events here. Macro equity V-shaped recovery period. RC buy-in on Aug 28, Aug 31, Sept 21 2020. ! JAN 1 2022 MARGIN: Jun-Aug was monitoring period (daily avg). Jan 1st margin required. Macro market peak around Dec 2021. ! SEPT 1 2022 MARGIN: New Rule in effect (except for Legacy Swaps). Mar-May end-month monitoring. Sept 1st margin required. Macro market starts transitioning upwards in October 2022. Opinion: RC buy-in in March 22 2022 messed up the end-month calculation. 
NY Fed Fired Examiner Who Took on Goldman
Justice Network - Occupy Wall Street
NY Fed Fired Examiner Who Took on Goldman by Jake Bernstein ProPublica, Oct. 10, 2013
A version of this story was co-published with The Washington Post.
In the spring of 2012, a senior examiner with the Federal Reserve Bank of New York determined that Goldman Sachs had a problem.
Under a Fed mandate, the investment banking behemoth was expected to have a company-wide policy to address conflicts of interest in how its phalanxes of dealmakers handled clients. Although Goldman had a patchwork of policies, the examiner concluded that they fell short of the Fed’s requirements.
That finding by the examiner, Carmen Segarra, potentially had serious implications for Goldman, which was already under fire for advising clients on both sides of several multibillion-dollar deals and allegedly putting the bank’s own interests above those of its customers. It could have led to closer scrutiny of Goldman by regulators or changes to its business practices.
Before she could formalize her findings, Segarra said, the senior New York Fed official who oversees Goldman pressured her to change them. When she refused, Segarra said she was called to a meeting where her bosses told her they no longer trusted her judgment. Her phone was confiscated, and security officers marched her out of the Fed’s fortress-like building in lower Manhattan, just 7 months after being hired.
"They wanted me to falsify my findings," Segarra said in a recent interview, "and when I wouldn’t, they fired me." read more
So Who is Carmen Segarra? A Fed Whistleblower Q&A
by Jake Bernstein ProPublica, Oct. 28, 2013
Former bank examiner Carmen Segarra vaulted into public consciousness earlier this month when she filed a wrongful termination lawsuit alleging that the Federal Reserve Bank of New York fired her after she refused to go soft on investment banking behemoth Goldman Sachs.
As ProPublica has reported, the Fed hired Segarra in late 2011 as part of a group of examiners brought on to monitor systemically important banks in the aftermath of the Dodd-Frank regulatory overhaul. The Fed wanted experts in key areas — such as operations, compliance and credit risk — to examine the "Too Big To Fail" financial institutions.
Segarra's career path seemed to make her a perfect fit. Segarra, 41, was born in Indiana, raised mostly in Puerto Rico and graduated from Harvard. Her father, a doctor, encouraged a life-long love of learning. She is a polyglot, fluent in Spanish and French, conversant in German and Italian. Even in the midst of preparing her lawsuit, she continued with classes in Dutch, which she says is "totally messing up my German."
After getting a master's degree in French cultural studies at Columbia's campus in Paris, she went on to law school at Cornell. She then spent 13 years working at different financial firms, including Citigroup and Société Générale. Outside of the office, she held leadership positions in the Hispanic National Bar Association. Hired by the Fed as a legal and compliance specialist, she was told to pay particular attention to how Goldman was complying with the Fed's requirements on conflicts of interest. read more
Phila Police Capt Ray Lewis (Ret) joins OWS, Arrested
[!](https://www.nosue.org/s/cc_images/teaserbox_4209200671.jpg?t=1415654030)
OCCUPY! - OWS Occupy Wall Street
OCCUPY! - OWS Occupy Wall Street
Brian Tracy: This is long overdue, throughout history the bankers have expanded credit and the money supply, encouraged construction and improvements and then contracted the supply of money to effectively confiscate all that was created during the expansion years. The federal reserve system has been quietly asset stripping the middle class out of existence since the 1970's with inflationary policies ... When are the payments by insurance (AIG) and payments by others going to be applied to balances?
Alrady Regnah: I think people today are too afraid to protest as "normal" you are looked at as an idiot if you stand up for what is true and good. With 10 million foreclosures coming down the pike and houses sitting for YEARS, one wonders how long it will take for a REAL protest to occur. Love Rachel's report and how she touched on the foreclosure MILL - T his is a MUST SEE MEDIA report. Touching on what REALLY happened in the depression is important -two thumbs up!
Matthew Weidner: I am currently prosecuting a half dozen cases where the banks have kicked down doors, changed locks and in some cases stolen property....including one case that has been pending in federal district court for more than a year. In several of my cases, the homeowner IS NOT EVEN IN FORECLOSURE. The banks have taken the position that they can kick down any door anytime they want....and courts and law enforcement are supporting this position.
[!](http://www.huffingtonpost.com/2012/12/23/fbi-occupy-wall-street_n_2355883.html)
FBI Investigated 'Occupy' As Possible 'Terrorism' Threat, Internal Documents Show Huffington Post by Alice Hines December 23, 2012
According to internal documents newly released by the FBI, the agency spearheaded a nationwide law enforcement effort to investigate and monitor the Occupy Wall Street movement. In certain documents, divisions of the FBI refer to the Occupy Wall Street protests as a "criminal activity" or even "domestic terrorism."
The internal papers were obtained by the Partnership for Civil Justice fund via a Freedom of Information Act Request. The fund, a legal nonprofit that focuses on civil rights, says it believes the 112 pages of documents, available for public viewing on its website, are only "the tip of the iceberg."
"This production ... is a window into the nationwide scope of the FBI’s surveillance, monitoring, and reporting on peaceful protestors organizing with the Occupy movement," wrote Mara Verheyden-Hilliard, the fund's executive director, in a press release Saturday. Read more
[!](http://www.justiceonline.org/commentary/fbi-files-ows.html)
Partnership for Civil Justice Fund 617 Florida Avenue NW Washington, DC 20001 (202) 232-1180 http://www.justiceonline.org/
Shani Smith of SOUL Speaks at Protest outside of White House & AG - Big Bank negotiations
No Sweetheart Deal for Wall Street!
[!](http://www.democracynow.org/2010/10/5/headlines/report_debtor_prisons_on_the_rise)
Report: Debtor Prisons on the Rise New reports by the ACLU and the Brennan Center for Justice have found a sharp rise in debtor prisons across the country. Poor defendants are being jailed for failing to pay legal debts. In Ohio, a man named Howard Webb, who earns $7 an hour as a dishwasher, has served two stints in jail totaling over 300 days for being unable to pay nearly $3,000 in fines and costs from various criminal and traffic cases. In Michigan, a twenty-five-year-old single mother named Kawana Young has been jailed five times for being unable to afford to pay a few minor traffic tickets. Eric Balaban of the ACLU said, "Incarcerating people simply because they cannot afford to pay their legal debts is not only unconstitutional but also has a devastating impact upon men and women, whose only crime is that they are poor."
[!](http://www.nytimes.com/2006/10/01/books/chapters/1001-1st-macp.html)
Hypocrisy is the state of pretending to have beliefs, opinions, virtues, ideals, thoughts, feelings, qualities, or standards that one does not actually have. Hypocrisy involves the deception of others and is thus a kind of lie.
Hypocrisy Merriam-Webster Dictionary
[!](http://www.theatlantic.com/national/archive/2011/11/pepper-spray-brutality-at-uc-davis/248764/)
Pepper-Spray Brutality at UC Davis The Atlantic by James Fallows November 19, 2011
Selected passages
This Occupy moment is not going to end any time soon. That is not just because of the underlying 99%-1% tensions but also because of police response of this sort -- and because there have been so many similar videos coming from cities across the country.
I can't see any legitimate basis for police action like what is shown here. Watch that first minute and think how we'd react if we saw it coming from some riot-control unit in China, or in Syria. The calm of the officer who walks up and in a leisurely way pepper-sprays unarmed and passive people right in the face? We'd think: this is what happens when authority is unaccountable and has lost any sense of human connection to a subject population. Read more
NYT: Officers Put on Leave After Pepper Spraying Protesters
[!](http://www.zerohedge.com/contributed/we-are-confused-oakland-police-officers-association-open-letter-citizens-oakland)
"We are Confused" Oakland Police Officer's Association Open Letter to the Citizens of Oakland
Zero Hedge by 4closureFraud November 1, 2011
An Open Letter to the Citizens of Oakland from the Oakland Police Officer’s Association 1 November 2011 – Oakland, Ca.
We represent the 645 police officers who work hard every day to protect the citizens of Oakland. We, too, are the 99% fighting for better working conditions, fair treatment and the ability to provide a living for our children and families. We are severely understaffed with many City beats remaining unprotected by police during the day and evening hours.
As your police officers, we are confused. Read more
The Case information was moved to the Banking page, thanks.
Pro se credit card case, Neil J. Gillespie v. HSBC Bank, et al, no. 5:05-cv-362-Oc-WTH-GRJ, US District Court, M.D. Fla., Ocala Division
An unprecedented look inside one of the most powerful, secretive institutions in the country.

source ***
The Secret Recordings of Carmen Segarra - This American Life
An unprecedented look inside one of the most powerful, secretive institutions in the country. The NY Federal Reserve is supposed to monitor big banks. But when Carmen Segarra was hired, what she witnessed inside the Fed was so alarming that she got a tiny recorder and started secretly taping.
Prologue
Ira introduces Carmen Segarra, a bank examiner for the Federal Reserve in New York who, in 2012, started secretly recording as she and her colleagues went about regulating one of the most powerful financial institutions in the country. This was during a time when the New York Fed was trying to become a stronger regulator, so that it wouldn't fail to miss another financial crisis like it did with the meltdown in 2008. As part of that effort to reform, the Fed had commissioned a highly confidential report, written by Columbia professor David Beim, that identified why the regulator failed in the years leading up to the crisis. Beim laid out specific recommendations for how the Fed could fix its problems. Carmen's recordings allow us to see if the Fed successfully heeded those recommendations more than two years later. What we hear is not reassuring.
Act One
ProPublica's Jake Bernstein tells the story of Carmen's first months at the New York Fed, and how she came to start recording. And we hear the story of how the Fed examiners respond to an unusual, questionable deal that Goldman Sachs did — a deal that the top Fed guy stationed inside Goldman calls "legal but shady."
Act Two
We hear what the New York Fed and Goldman Sachs say about all this. We hear a New York Fed supervisor tell Carmen Segarra how an examiner should talk and act to be successful at the Fed. And we hear what happens to Carmen when she does exactly what David Beim's confidential report told the Fed it needed to encourage its examiners to do in order to spot the next financial crisis.
Learn how to mount a Windows directory in Linux using the SMB Protocol. This enables you to remotely access and modify you files.

source ***
Mount an SMB Share in Linux |
Linode Docs Determining how to share files and directories between computers is a common problem — one that has many different solutions. Some of these solutions include file transfer protocols (like SFTP), cloud storage services, and distributed file system protocols (like NFS and SMB). Figuring out what solution is right for your use case can be confusing, especially if you do not know the correct terminology, techniques, or the tools that are available. Sharing files can be made even more complicated if you intend to do so over the internet or use multiple operating systems (like Linux, Windows, and macOS).
This guide covers the Server Message Block (SMB) protocol. Specifically, it discusses using the SMB protocol to mount a Windows SMB share (a shared directory) to a Linux system. By following this guide, you will be able to access all of your files within a Windows folder (such as C:\My_Files) on your Linux system at whichever directory you choose as a mount point (such as /mnt/my_files). This method of file sharing is appropriate when you need to access entire Windows directories remotely as if they were local resources. In most cases, SMB is a native (or easily installed) file sharing solution for users that need access to the same directory and is commonly shared through a corporate intranet or the same private network.
Note
Network File System (NFS) is another distributed file system protocol that’s similar to SMB. While SMB is more commonly used in primarily Windows environments and NFS is used in primary Linux environments, both have cross-platform support. This guide does not cover NFS, but you can learn more about it by reading through our NFS guides. If you are not in a Windows environment and are looking to share directories between Linux systems, consider using NFS.
Warning
While security and performance of the SMB protocol has improved over time, it is often still a concern when connecting to an SMB share over the internet. This is typically not recommended unless you are using SMB over QUIC (recently introduced on Windows 11 and Windows Server 2022), intend to always use the latest protocol version (3.1.1 as of this writing), or are connected through a personal or corporate VPN. If you are not able to implement these recommendations and still wish to share files over the internet, consider if the SFTP protocol would work for you instead.
Overview of the SMB Protocol -------------------------------------------------------------
The SMB protocol provides the ability to share entire directories and printers between multiple machines over a network (typically a private network). It is widely used in Windows environments due to its relative simplicity (for system administrators), built-in Windows support, and extensive Linux support (basic support is also included in recent Linux kernels).
SMB Versions
To understand SMB and some of the related terminology (specifically CIFS), it’s helpful to know a little about the history of the protocol:
-
SMB1: (1983+) While Microsoft is the developer and maintainer of SMB, it was originally designed at IBM. Microsoft modified that original design and implemented the “SMB 1.0/CIFS Server” as part of their LAN Manager OS and, eventually, in Windows. Version 1 of the protocol has been discontinued (as of 2013) and is no longer installed on modern Windows systems. There are many security and performance issues with SMB1 that make it largely unfit for use today.
-
CIFS: (1996) Microsoft attempted to rename SMB to CIFS (Common Internet File System) as it continued to develop features for it, including adding support for the TCP protocol. While the name was retired in subsequent versions, the term still appears in various tooling and documentation as it was in use for over 10 years.
-
SMB2: (2006) Version 2 introduced huge performance benefits as it greatly reduced the amount of requests sent between machines and expanded the size of data/storage fields (from 16-bit to 32-bit and 64-bit). It was released alongside Windows Vista. Even though SMB2 (and all SMB versions) remained a proprietary protocol, Microsoft released the specifications for it so that other services (like Linux ports) could provide interoperability with this new version.
-
SMB3: (2012) Version 3 was released alongside Windows 8 and brought extensive updates to security (including end-to-end encryption) and performance. Additional updates were released with Windows 8.1 (SMB 3.0.2) and Windows 10 (3.1.1). When using the SMB protocol today, always use the latest version — unless you are supporting legacy systems and have no other choice.
For a more comprehensive version history of SMB, review the Server Message Block > History Wikipedia entry.
Linux SMB Support
-
Samba: Unix support for the SMB protocol was initially provided by Samba. Since Microsoft initially did not release public specifications for their proprietary protocol, the developers of Samba had to reverse engineer it. Future versions of Samba were able to use the public specifications of later SMB protocols. Samba includes support for SMB3 (3.1.1) and is actively updated. Samba provides extensive support for all features of the SMB protocol and acts as a stand-alone file and print server. For more background information, see the Samba Wikipedia entry.
-
LinuxCIFS utils: This in-kernel software acts as an SMB client and is the preferred method of mounting existing SMB shares on Linux. It was originally included as part of the Samba software, but is now available on its own. LinuxCIFS utils, available as the cifs\_utils package in most Linux distributions, is used within this guide.
-
ksmbd: Developed as an in-kernel SMB server in cooperation with the Samba project, ksmbd is designed to be a more performant fileserver. It doesn’t implement all of Samba’s extensive features (beyond file sharing).
Before You Begin -------------------------------------
-
Obtain the necessary information required to access an existing SMB share, including the IP address of the SMB server and the path of the share. If you do not have a share, you can create a local directory using the
mkdircommand and then create a Samba share for that location. Access to an existing SMB share on a Windows or Linux machine. Creating an SMB share is beyond the scope of this tutorial. -
Have access to an Ubuntu or Debian Linux system where you intend to access your SMB share.
Installation -----------------------------
The LinuxCIFS utils package provides the tools needed to connect to a share and manage mounts on a Linux system. You use it to help create and manage a connection to a Windows, macOS, or Linux share.
-
Update the list of available packages using the below command:
sudo apt update && sudo apt upgrade -
Install the both the LinuxCIFS utils package (needed to mount SMB shares) and the psmisc package (needed to gain access to the
fusercommand, which shows you which users are using the various mounts on your server).sudo apt install cifs-utils psmisc -
Verify that LinuxCIFS is available using the following command:
No error or output message is expected as there are no CIFS connections set up yet.
-
Verify that you have access to the
fusercommand.This command shows a list of the various command line switches that can be used with the
fuserutility.Usage: fuser [-fMuvw] [-a|-s] [-4|-6] [-c|-m|-n space] [-k [-i] [-s sig] | -SIGNAL] NAME...
All files in Linux are accessible on a single giant hierarchical directory tree, which starts at the root (/). The mount command (used in this tutorial) enables you to access other storage devices or file systems from that same tree. These other storage resources do not have to be physical disks and they do not have to be using the same file system. To learn more about the mount command, review the following guides:
The following sections detail how to mount an SMB share on Ubuntu, but the essential process is the same for other Linux distributions.
-
Create an empty directory to be used as the mount point. This directory can be located wherever you wish, though it’s common to use the
/mntdirectory. -
Enter the following command to mount the SMB share, replacing \[server-ip\] with the IP address of your SMB server, \[share-path\] with the file path to your SMB share on that server, and \[mount-point\] with the new directory you just created.
mount -t cifs //[server-ip]/[share-path] /[mount-point]In the example below, the SMB server’s IP is 192.0.2.17, the share’s path is SharedFiles, and the mount point is /mnt/smb\_share.
mount -t cifs //192.0.2.17/SharedFiles /mnt/smb_share -
When prompted, enter the password to connect to the remote share.
-
If the connection is successful, you should see the remote share mounted on the mount point directory you created. To verify this, type the following command:
The command above lists all mounted SMB shares. Among this list, you should see the share you just mounted.
-
You should now be able to access the files as if they were on a local drive. In the command below, replace \[mount-point\] with the directory you have created (such as
/mnt/smb_share).From here, you can run the
lscommand to view your files and you can interact with the files as you would any other files on your system.
Create a Credentials File -------------------------------------------------------
You don’t want to have to type in your credentials every time you access a share. On the other hand, putting the credentials where everyone can see is not a good idea. The following steps help you create a credentials file to automate the process of logging in.
-
Use your preferred text editor such as vi or nano to create a file to store the credentials. You can name the file anything you want, but using a period before the filename will hide it from view. For example, you can create a file named
.credentialsusing the following command: -
Add the necessary credentials to the file in the following format:
File: .credentials
If the
domainis not required (except on Windows systems), you can omit that entry. Replace thetarget_user_nameandtarget_user_passwordwith the actual credentials you need to use to access the SMB share. Save and close the file. -
Set ownership of the credentials file to the current user by running the following command:
sudo chown :Replace
with your username andwith the name of your credentials file. -
Set the file permissions to
600to ensure that only the owner has read and write access:sudo chmod 600 -
To mount the share using the credentials file, run the following command:
sudo mount -t cifs -o credentials= /// /Replace
with the IP address of the server hosting the share,with the name of the share you want to mount, and `` with the local mount point where you want to access the share. You aren’t asked for credentials this time because mount uses the credentials file instead. -
Verify that the share has been successfully mounted using the following command:
This should show you the share information as output, confirming that the share has been successfully mounted using the credentials file.
Remounting the SMB share every time you restart the server can be tedious. You can instead set your server up to automatically remount the share every time you restart it using the following steps. Before starting these steps, make sure that the share is currently unmounted.
-
Open the
/etc/fstabfile in your preferred text editor. This file contains configurations that the server uses on reboot to reconnect to shares (among other things). There are columns for the file system, mount point, type, and options. -
Enter the information below in each of the columns:
File: /etc/fstab
From the file above, replace
with the IP address of the server hosting the share,with the name of the share you want to mount,with the local mount point where you want to access the share,with the name of your credentials file, -
Save the file so the share is available next time you reboot the server.
-
Verify that the share is mounted correctly using the `` as an identifier because the mount is reading the
/etc/fstabfile.
You may need to unmount a share at some point. To unmount an SMB share that has been mounted using the mount command, you can use the umount command followed by the mount point of the share. The correct command is umount, not unmount.
So to unmount an SMB share at the mount point ``, run the following command:
umount -t cifs /
The share should not appear in the output of this command.
Conclusion -------------------------
You now have an understanding of SMB (and CIFS), what an SMB share is, and what a mount point is. These pieces of information allow you to share remote data in a way that’s transparent to users. From the user’s perspective, the resource is local to the server that they’re accessing. This guide also shows you how to use the mount and umount commands in a basic way to create and delete shares, how to create and use a credentials file to automate the sharing process to some extent, and how to automatically remount the share after a reboot.
More Information ----------------
You may wish to consult the following resources for additional information on this topic. While these are provided in the hope that they will be useful, please note that we cannot vouch for the accuracy or timeliness of externally hosted materials.
This page was originally published on Tuesday, June 6, 2023.
A Beginners Guide To Cron Jobs
This guide explains the basic usage of Cron Jobs in Linux. It also discusses about crontab syntax generators and crontab graphical frontends.

source ***
A Beginners Guide To Cron Jobs - OSTechNix
Cron is one of the most useful utility that you can find in any Linux and Unix-like operating system. Cron is used to schedule commands at a specific time. These scheduled commands or tasks are known as "Cron Jobs". Cron is generally used for running scheduled backups, monitoring disk space, deleting files (for example log files) periodically which are no longer required, running system maintenance tasks and a lot more. In this Cron jobs tutorial, we will see the basic usage of Cron Jobs in Linux with examples.
1\. The Beginners Guide To Cron Jobs ------------------------------------
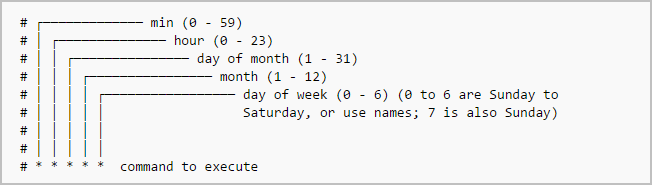
The typical format of a cron job is:
Minute(0-59) Hour(0-24) Day_of_month(1-31) Month(1-12) Day_of_week(0-6) Command_to_execute
Just memorize the cron job format or print the following illustration and keep it in your desk.
~ ~ ~ ~ Cron job format~ ~ ~ ~
In the above picture, the asterisks refers the specific blocks of time.
To display the contents of the crontab file of the currently logged in user:
$ crontab -l
To edit the current user's cron jobs, do:
$ crontab -e
If it is the first time, you will be asked to choose an editor to edit the cron jobs.
``` no crontab for sk - using an empty one
Select an editor. To change later, run 'select-editor'.
- /bin/nano <---- easiest
- /usr/bin/vim.basic
- /usr/bin/vim.tiny
- /bin/ed
Choose 1-4 [1]: ```
Choose any one that suits you. Here it is how a sample crontab file looks like.
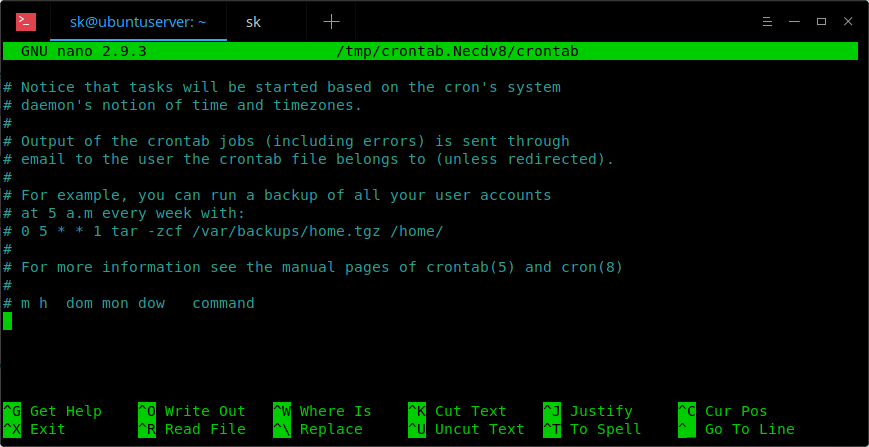
~ ~ ~ ~ crontab file~ ~ ~ ~
In this file, you need to add your cron jobs one by one.
By default, cron jobs run under the user account that created them. However, you can specify a different user by editing the crontab for that user. To edit the crontab of a different user, for example ostechnix, do:
$ sudo crontab -u ostechnix -e
1.1. Cron Jobs tutorial
Here is the list of most commonly used cron job commands with examples. I have also included the detailed explanation for each cron job expression.
1. To run a cron job at every minute, the format should be like below.
```
```
This cron job is scheduled to run every minute, every hour, every day, every month, and every day of the week. For example if the time now is 10:00, the next job will run at 10:01, 10:02, 10:03 and so on.
Explanation:
Here is the breakdown of the above cron expression.
The asterisks (\*) in each field represent a wildcard, meaning "any value". So, in this case:
- The first asterisk (\*) represents any minute (0-59).
- The second asterisk (\*) represents any hour (0-23).
- The third asterisk (\*) represents any day of the month (1-31).
- The fourth asterisk (\*) represents any month (1-12).
- The fifth asterisk (\*) represents any day of the week (0-7).
- The `` represents the actual command that will be executed every minute.
Please note that running a command every minute can have resource implications and should be used with caution. It's important to ensure that the command you specify is appropriate for frequent execution and does not overload your system.
2. To run cron job at every 5th minute, add the following in your crontab file.
*/5 * * * *
This cron job is scheduled to run every 5 minutes. For example if the time is 10:00, the next job will run at 10:05, 10:10, 10:15 and so on.
Explanation:
Here's how to interpret the cron expression:
- The
*/5in the first field represents a step value, indicating that the cron job will run every 5 minutes. It matches all values that are divisible evenly by 5 (e.g., 0, 5, 10, 15, 20, etc.). - The second asterisk (\*) represents any hour of the day (0-23).
- The third asterisk (\*) represents any day of the month (1-31).
- The fourth asterisk (\*) represents any month (1-12).
- The fifth asterisk (\*) represents any day of the week (0-7).
- The `` represents the actual command that will be executed every 5 minutes.
So, this cron job will run the specified `` every 5 minutes, continuously throughout the day and month, regardless of the specific date or time.
Please keep in mind that running a command at such frequent intervals can generate a high volume of executions. Ensure that the command is suitable for such frequent execution and that it won't overload your system or cause unintended side effects.
3. To run a cron job at every quarter hour (i.e every 15th minute), add this:
*/15 * * * *
For example if the time is 10:00, the next job will run at 10:15, 10:30, 10:45 and so on.
Explanation:
The cron job */15 * * * * is scheduled to run every 15 minutes.
Let's break down the cron expression:
- The
*/15in the first field represents a step value, indicating that the cron job will run every 15 minutes. It matches all values that are divisible evenly by 15 (e.g., 0, 15, 30, 45, etc.). - The second asterisk (\*) represents any hour of the day (0-23).
- The third asterisk (\*) represents any day of the month (1-31).
- The fourth asterisk (\*) represents any month (1-12).
- The fifth asterisk (\*) represents any day of the week (0-7).
- The `` represents the actual command that will be executed every 15 minutes.
Therefore, this cron job will run the specified command every 15 minutes, throughout the day and month, regardless of the specific date or time.
4. To run a cron job every hour at minute 30:
30 * * * *
For example if the time is 10:00, the next job will run at 10:30, 11:30, 12:30 and so on.
Explanation:
The cron job 30 * * * * is scheduled to run at 30 minutes past every hour.
Let's break down the cron expression:
- The
30in the first field represents the specific minute when the cron job will run. In this case, it's set to 30, so the cron job will execute at 30 minutes past the hour. - The second asterisk (\*) represents any hour of the day (0-23).
- The third asterisk (\*) represents any day of the month (1-31).
- The fourth asterisk (\*) represents any month (1-12).
- The fifth asterisk (\*) represents any day of the week (0-7).
- The `` represents the actual command that will be executed at 30 minutes past every hour.
Therefore, this cron job will run the specified command once an hour, specifically at the 30-minute mark. It will execute at 30 minutes past every hour throughout the day and month, regardless of the specific date or day of the week.
Please note that the cron job will not run continuously every minute. Instead, it will run once per hour, always at 30 minutes past the hour.
5. You can also define multiple time intervals separated by commas. For example, the following cron job will run three times every hour, at minute 0, 5 and 10:
0,5,10 * * * *
Explanation:
The cron job 0,5,10 * * * * is scheduled to run at the 0th, 5th, and 10th minute of every hour.
Let's break down the cron expression:
- The
0,5,10in the first field represents the specific minutes when the cron job will run. In this case, it's set to 0, 5, and 10. The cron job will execute at the 0th, 5th, and 10th minute of every hour. - The second asterisk (\*) represents any hour of the day (0-23).
- The third asterisk (\*) represents any day of the month (1-31).
- The fourth asterisk (\*) represents any month (1-12).
- The fifth asterisk (\*) represents any day of the week (0-7).
- The `` represents the actual command that will be executed at the specified minutes.
Therefore, this cron job will run the specified command multiple times within each hour. It will execute at the 0th, 5th, and 10th minute of every hour throughout the day and month, regardless of the specific date or day of the week.
Please note that the cron job will execute only at the specified minutes and not continuously throughout the hour.
6. Run a cron job every half hour i.e at every 30th minute:
*/30 * * * *
For example if the time is now 10:00, the next job will run at 10:30, 11:00, 11:30 and so on.
Explanation:
The cron job */30 * * * * is scheduled to run every 30 minutes.
Here's how to interpret the cron expression:
- The
*/30in the first field represents a step value, indicating that the cron job will run every 30 minutes. It matches all values that are divisible evenly by 30 (e.g., 0, 30). - The second asterisk (\*) represents any hour of the day (0-23).
- The third asterisk (\*) represents any day of the month (1-31).
- The fourth asterisk (\*) represents any month (1-12).
- The fifth asterisk (\*) represents any day of the week (0-7).
- The `` represents the actual command that will be executed every 30 minutes.
Therefore, this cron job will run the specified command every 30 minutes, throughout the day and month, regardless of the specific date or time.
7. Run a job every hour (at minute 0):
0 * * * *
For example if the time is now 10:00, the next job will run at 11:00, 12:00, 13:00 and so on.
Explanation:
The cron job 0 * * * * is scheduled to run at the 0th minute of every hour.
Here's how to interpret the cron expression:
- The
0in the first field represents the specific minute when the cron job will run. In this case, it's set to 0, so the cron job will execute at the start of every hour. - The second asterisk (\*) represents any hour of the day (0-23).
- The third asterisk (\*) represents any day of the month (1-31).
- The fourth asterisk (\*) represents any month (1-12).
- The fifth asterisk (\*) represents any day of the week (0-7).
- The `` represents the actual command that will be executed at the 0th minute of every hour.
Therefore, this cron job will run the specified command once per hour, specifically at the start of each hour. It will execute at the 0th minute of every hour throughout the day and month, regardless of the specific date or day of the week.
Please note that the cron job will not run continuously every minute. Instead, it will run once per hour, precisely at the 0th minute.
8. Run a job every 2 hours:
0 */2 * * *
For example if the time is now 10:00, the next job will run at 12:00.
Explanation:
The cron job 0 */2 * * * is scheduled to run at the 0th minute of every other hour.
Here's how to interpret the cron expression:
- The
0in the first field represents the specific minute when the cron job will run. In this case, it's set to 0, so the cron job will execute at the start of every hour. - The
*/2in the second field represents a step value, indicating that the cron job will run every 2 hours. It matches all values that are divisible evenly by 2 (e.g., 0, 2, 4, 6, etc.). - The third asterisk (\*) represents any day of the month (1-31).
- The fourth asterisk (\*) represents any month (1-12).
- The fifth asterisk (\*) represents any day of the week (0-7).
The `` represents the actual command that will be executed at the 0th minute of every other hour.
Therefore, this cron job will run the specified command once every 2 hours. It will execute at the 0th minute of every other hour throughout the day and month, regardless of the specific date or day of the week.
Please note that the cron job will not run continuously every minute or every hour. Instead, it will run once every 2 hours, precisely at the 0th minute of those hours.
9. Run a job every day (It will run at 00:00):
0 0 * * *
Explanation:
The cron job 0 0 * * * is scheduled to run at midnight (00:00) every day.
Here's how to interpret the cron expression:
- The
0in the first field represents the specific minute when the cron job will run. In this case, it's set to 0, so the cron job will execute at the start of the hour (00 minutes). - The
0in the second field represents the specific hour when the cron job will run. In this case, it's set to 0, which corresponds to midnight. - The third asterisk (\*) represents any day of the month (1-31).
- The fourth asterisk (\*) represents any month (1-12).
- The fifth asterisk (\*) represents any day of the week (0-7).
- The `` represents the actual command that will be executed at midnight (00:00) every day.
Therefore, this cron job will run the specified command once per day, precisely at midnight. It will execute at 00:00 hours every day, regardless of the specific date or day of the week.
Please note that the cron job will run once per day, specifically at midnight, to perform the task defined by the command.
10. Run a job every day at 3am:
0 3 * * *
Explanation:
The cron job 0 3 * * * is scheduled to run at 3:00 AM every day.
Here's how to interpret the cron expression:
- The
0in the first field represents the specific minute when the cron job will run. In this case, it's set to 0, so the cron job will execute at the start of the hour (00 minutes). - The
3in the second field represents the specific hour when the cron job will run. In this case, it's set to 3, which corresponds to 3:00 AM. - The third asterisk (\*) represents any day of the month (1-31).
- The fourth asterisk (\*) represents any month (1-12).
- The fifth asterisk (\*) represents any day of the week (0-7).
- The `` represents the actual command that will be executed at 3:00 AM every day.
Therefore, this cron job will run the specified command once per day, specifically at 3:00 AM. It will execute at 3:00 AM every day, regardless of the specific date or day of the week.
11. Run a job every Sunday:
0 0 * * SUN
Or,
0 0 * * 0
It will run at exactly at 00:00 on Sunday.
The cron job will run once per week, specifically at midnight on Sundays, to perform the task defined by the command.
Explanation:
The cron job 0 0 * * SUN is scheduled to run at midnight (00:00) on Sundays.
Here's how to interpret the cron expression:
- The
0in the first field represents the specific minute when the cron job will run. In this case, it's set to 0, so the cron job will execute at the start of the hour (00 minutes). - The
0in the second field represents the specific hour when the cron job will run. In this case, it's set to 0, which corresponds to midnight. - The asterisks (\*) in the third and fourth fields represent any day of the month (1-31) and any month (1-12), respectively.
- The
SUNin the fifth field represents the specific day of the week when the cron job will run. In this case, it's set to SUN, indicating Sundays. - The `` represents the actual command that will be executed at midnight on Sundays.
Therefore, this cron job will run the specified command once per week, specifically at midnight on Sundays. It will execute at 00:00 hours every Sunday, regardless of the specific date or month.
12. Run a job on every day-of-week from Monday through Friday i.e every weekday:
0 0 * * 1-5
The job will start at 00:00.
The cron job will run once per day, specifically at midnight, from Monday to Friday, to perform the task defined by the command.
Explanation:
The cron job 0 0 * * 1-5 is scheduled to run at midnight (00:00) from Monday to Friday.
Here's how to interpret the cron expression:
- The
0in the first field represents the specific minute when the cron job will run. In this case, it's set to 0, so the cron job will execute at the start of the hour (00 minutes). - The
0in the second field represents the specific hour when the cron job will run. In this case, it's set to 0, which corresponds to midnight. - The asterisks (\*) in the third and fourth fields represent any day of the month (1-31) and any month (1-12), respectively.
- The
1-5in the fifth field represents the range of days of the week when the cron job will run. In this case, it's set to 1-5, indicating Monday to Friday. - The `` represents the actual command that will be executed at midnight from Monday to Friday.
Therefore, this cron job will run the specified command once per day, specifically at midnight, from Monday to Friday. It will execute at 00:00 hours on weekdays, regardless of the specific date or month.
13. Run a job every month (i.e at 00:00 on day-of-month 1):
0 0 1 * *
The cron job will run once per month, specifically at midnight on the 1st day of the month, to perform the task defined by the command.
Explanation:
The cron job 0 0 1 * * is scheduled to run at midnight (00:00) on the 1st day of every month.
Here's how to interpret the cron expression:
- The
0in the first field represents the specific minute when the cron job will run. In this case, it's set to 0, so the cron job will execute at the start of the hour (00 minutes). - The
0in the second field represents the specific hour when the cron job will run. In this case, it's set to 0, which corresponds to midnight. - The
1in the third field represents the specific day of the month when the cron job will run. In this case, it's set to 1, indicating the 1st day of the month. - The asterisks (\*) in the fourth and fifth fields represent any month (1-12) and any day of the week (0-7), respectively.
- The `` represents the actual command that will be executed at midnight on the 1st day of every month.
Therefore, this cron job will run the specified command once per month, specifically at midnight on the 1st day of each month. It will execute at 00:00 hours on the 1st day of the month, regardless of the specific month or day of the week.
14. Run a job at 16:15 on day-of-month 1:
15 16 1 * *
The cron job will run once per month, specifically at 4:15 PM (16:15) on the 1st day of the month, to perform the task defined by the command.
Explanation:
The cron job 15 16 1 * * is scheduled to run at 4:15 PM (16:15) on the 1st day of every month.
Here's how to interpret the cron expression:
- The
15in the first field represents the specific minute when the cron job will run. In this case, it's set to 15, so the cron job will execute at 15 minutes past the hour. - The
16in the second field represents the specific hour when the cron job will run. In this case, it's set to 16, which corresponds to 4:00 PM. - The
1in the third field represents the specific day of the month when the cron job will run. In this case, it's set to 1, indicating the 1st day of the month. - The asterisks (\*) in the fourth and fifth fields represent any month (1-12) and any day of the week (0-7), respectively.
- The `` represents the actual command that will be executed at 4:15 PM on the 1st day of every month.
Therefore, this cron job will run the specified command once per month, specifically at 4:15 PM on the 1st day of each month. It will execute at 16:15 hours on the 1st day of the month, regardless of the specific month or day of the week.
15. Run a job at every quarter i.e on day-of-month 1 in every 3rd month:
0 0 1 */3 *
The cron job will run once every three months, specifically at midnight on the 1st day of the applicable month, to perform the task defined by the command.
Explanation:
The cron job 0 0 1 */3 * is scheduled to run at midnight (00:00) on the 1st day of every third month.
Here's how to interpret the cron expression:
- The
0in the first field represents the specific minute when the cron job will run. In this case, it's set to 0, so the cron job will execute at the start of the hour (00 minutes). - The
0in the second field represents the specific hour when the cron job will run. In this case, it's set to 0, which corresponds to midnight. - The
1in the third field represents the specific day of the month when the cron job will run. In this case, it's set to 1, indicating the 1st day of the month. - The
*/3in the fourth field represents a step value, indicating that the cron job will run every 3rd month. It matches all values that are divisible evenly by 3 (e.g., 1, 4, 7, 10). - The asterisks (\*) in the fifth field represent any day of the week (0-7).
- The `` represents the actual command that will be executed at midnight on the 1st day of every third month.
Therefore, this cron job will run the specified command once every three months, specifically at midnight on the 1st day of each applicable month. It will execute at 00:00 hours on the 1st day of every third month, regardless of the specific day of the week.
16. Run a job on a specific month at a specific time:
5 0 * 4 *
The job will start at 00:05 in April. The cron job will run once per day, specifically at 12:05 AM, during the month of April, to perform the task defined by the command.
Explanation:
The cron job 5 0 * 4 * is scheduled to run at 12:05 AM (00:05) every day during the month of April.
Here's how to interpret the cron expression:
- The
5in the first field represents the specific minute when the cron job will run. In this case, it's set to 5, so the cron job will execute at 5 minutes past the hour. - The
0in the second field represents the specific hour when the cron job will run. In this case, it's set to 0, which corresponds to midnight. - The asterisk (\*) in the third field represents any day of the month (1-31).
- The
4in the fourth field represents the specific month when the cron job will run. In this case, it's set to 4, indicating April. - The asterisk (\*) in the fifth field represents any day of the week (0-7).
- The `` represents the actual command that will be executed at 12:05 AM every day in April.
Therefore, this cron job will run the specified command once per day, specifically at 12:05 AM, during the month of April. It will execute at 00:05 hours on each day of April, regardless of the specific day of the week.
17. Run a job every 6 months:
0 0 1 */6 *
This cron job will start at 00:00 on day-of-month 1 in every 6th month. The cron job will run once every six months, specifically at midnight on the 1st day of the applicable month, to perform the task defined by the command.
Explanation:
The cron job 0 0 1 */6 * is scheduled to run at midnight (00:00) on the 1st day of every 6th month.
Here's how to interpret the cron expression:
- The
0in the first field represents the specific minute when the cron job will run. In this case, it's set to 0, so the cron job will execute at the start of the hour (00 minutes). - The
0in the second field represents the specific hour when the cron job will run. In this case, it's set to 0, which corresponds to midnight. - The
1in the third field represents the specific day of the month when the cron job will run. In this case, it's set to 1, indicating the 1st day of the month. - The
*/6in the fourth field represents a step value, indicating that the cron job will run every 6th month. It matches all values that are divisible evenly by 6 (e.g., 1, 7, 13). - The asterisks (\*) in the fifth field represent any day of the week (0-7).
- The `` represents the actual command that will be executed at midnight on the 1st day of every 6th month.
Therefore, this cron job will run the specified command once every six months, specifically at midnight on the 1st day of each applicable month. It will execute at 00:00 hours on the 1st day of every 6th month, regardless of the specific day of the week.
18. Run a job on the 1st and 15th of every month:
0 0 1,15 * *
This cron job is scheduled to run on the 1st and 15th of every month at midnight (00:00). The cron job will run twice per month, specifically at midnight on the 1st and 15th days, to perform the task defined by the command.
Explanation:
The cron job 0 0 1,15 * * is scheduled to run at midnight (00:00) on the 1st and 15th day of every month.
Here's how to interpret the cron expression:
- The
0in the first field represents the specific minute when the cron job will run. In this case, it's set to 0, so the cron job will execute at the start of the hour (00 minutes). - The
0in the second field represents the specific hour when the cron job will run. In this case, it's set to 0, which corresponds to midnight. - The
1,15in the third field represents the specific days of the month when the cron job will run. In this case, it's set to 1 and 15, indicating the 1st and 15th day of the month. - The asterisks (\*) in the fourth and fifth fields represent any month (1-12) and any day of the week (0-7), respectively.
- The `` represents the actual command that will be executed at midnight on the 1st and 15th day of every month.
Therefore, this cron job will run the specified command twice per month, specifically at midnight on the 1st and 15th day of each month. It will execute at 00:00 hours on the 1st and 15th days, regardless of the specific month or day of the week.
19. Run a job every year:
0 0 1 1 *
This cron job will start at 00:00 on day-of-month 1 in January. The cron job will run once per year, specifically at midnight on January 1st, to perform the task defined by the command.
Explanation:
The cron job 0 0 1 1 * is scheduled to run at midnight (00:00) on the 1st day of January.
Here's how to interpret the cron expression:
- The
0in the first field represents the specific minute when the cron job will run. In this case, it's set to 0, so the cron job will execute at the start of the hour (00 minutes). - The
0in the second field represents the specific hour when the cron job will run. In this case, it's set to 0, which corresponds to midnight. - The
1in the third field represents the specific day of the month when the cron job will run. In this case, it's set to 1, indicating the 1st day of the month. - The
1in the fourth field represents the specific month when the cron job will run. In this case, it's set to 1, indicating January. - The asterisk (\*) in the fifth field represents any day of the week (0-7).
- The `` represents the actual command that will be executed at midnight on the 1st day of January.
Therefore, this cron job will run the specified command once per year, specifically at midnight on the 1st day of January. It will execute at 00:00 hours on January 1st, regardless of the specific day of the week.
Using Cron Job Strings:
We can also use the following strings to define a cron job.
|Cron job strings|Action | |----------------|---------------------| |@reboot |Run once, at startup.| |@yearly |Run once a year. | |@annually |(same as @yearly). | |@monthly |Run once a month. | |@weekly |Run once a week. | |@daily |Run once a day. | |@midnight |(same as @daily). | |@hourly |Run once an hour. |
Supported Cron strings
20. To run a job every time the server is rebooted, add this line in your crontab file.
@reboot
Explanation:
The code @reboot is not a cron job syntax. Instead, it is a special directive that can be used in the cron configuration file.
When the @reboot directive is used in the cron configuration file, it indicates that the specified `` should be run once when the system reboots or starts up.
Here's how it works:
- When the system boots up or restarts, the cron daemon reads the cron configuration file.
- If a cron job has the
@rebootdirective followed by a ``, the specified command is executed at that time. - The command can be any valid command or script that you want to run when the system starts up.
Therefore, using @reboot in the cron configuration file allows you to schedule a command or script to run automatically once when the system boots up.
Please note that the availability and usage of the @reboot directive may vary depending on the specific cron implementation and system configuration.
21. To remove all cron jobs for the current user:
$ crontab -r
The command crontab -r is used to remove or delete the current user's crontab (cron table) entries.
When you execute crontab -r, it removes all the scheduled cron jobs associated with your user account. This action is irreversible, and the cron jobs will no longer be executed as per their previously scheduled times.
It's important to exercise caution when using this command because it permanently deletes all the cron jobs for your user account, including any recurring tasks or scheduled commands.
Before running crontab -r, ensure that you have a backup or make sure you no longer need the existing cron jobs. If you accidentally delete your crontab, it may not be recoverable unless you have a backup.
To confirm the removal of your crontab, the command usually displays a message such as "crontab: no crontab for ," indicating that the cron table has been successfully removed.
If you wish to edit your crontab in the future, you will need to create new cron entries using crontab -e or restore from a backup if available.
22. For cron job detailed usage, check man pages.
$ man crontab
At this stage, you might have a basic understanding of what is Crontab and how to create, run and manage cron jobs in Linux and Unix-like systems.
Now we will learn about some graphical tools which helps us to make the cron job management a lot easier.
2\. Crontab syntax generators -----------------------------
As you can see, scheduling cron jobs is much easier. Also there are a few web-based crontab syntax generators available to make this job even easier. You don't need to memorize and/or learn crontab syntax.
The following two websites helps you to easily generate a crontab expression based on your inputs. Once you generated the line as per your requirement, just copy/paste it in your crontab file.
2.1. Crontab.guru
Crontab.guru is dedicated website for learning cron jobs examples. Just enter your inputs in the site and it will instantly create a crontab syntax in minutes.
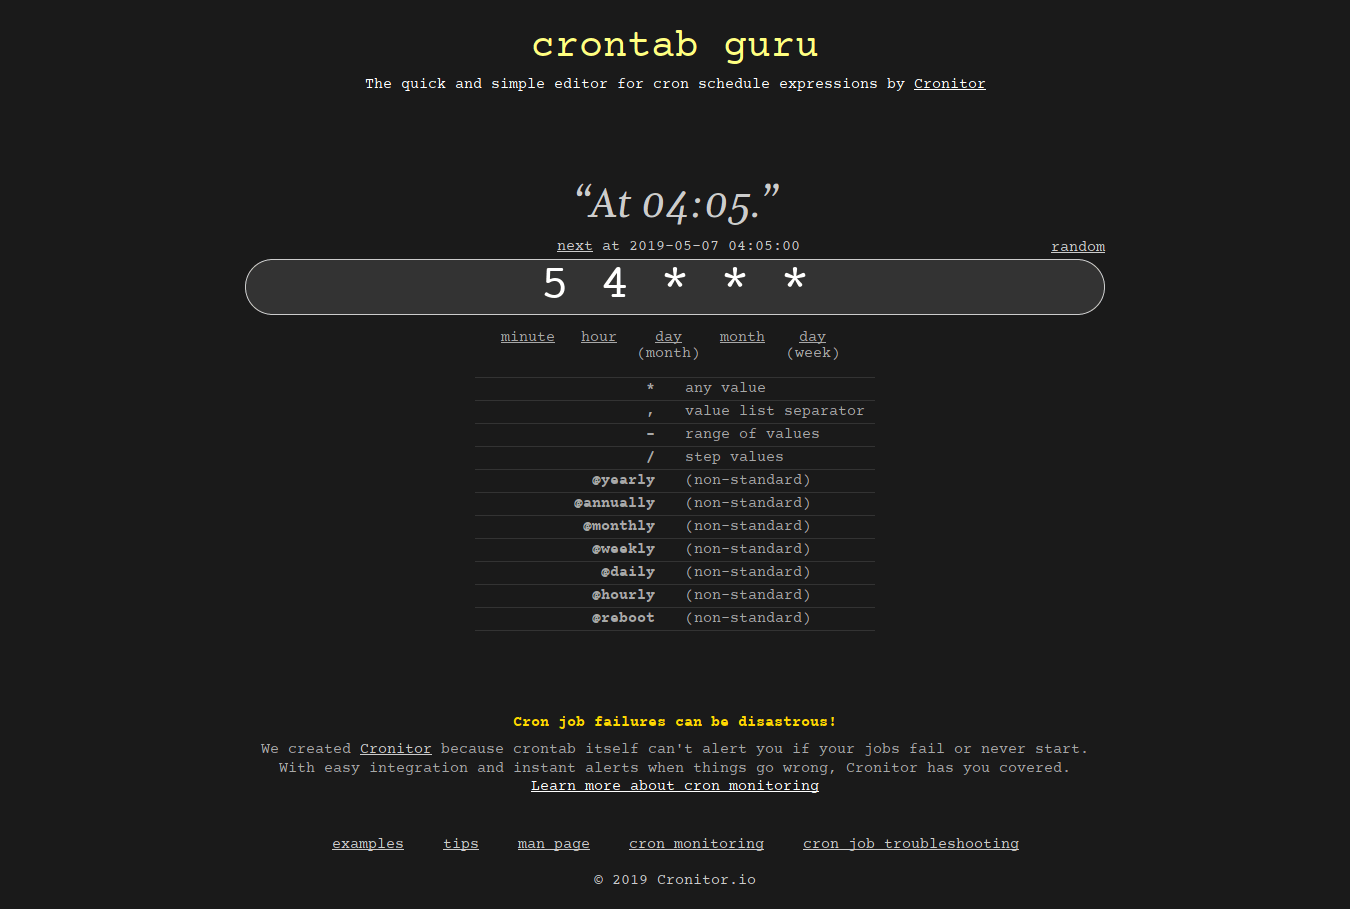
Crontab guru - A quick and simple editor for cron schedule expressions
This site also provides a lot of cron job examples and tips. Do check them and learn how to schedule a cronjob.
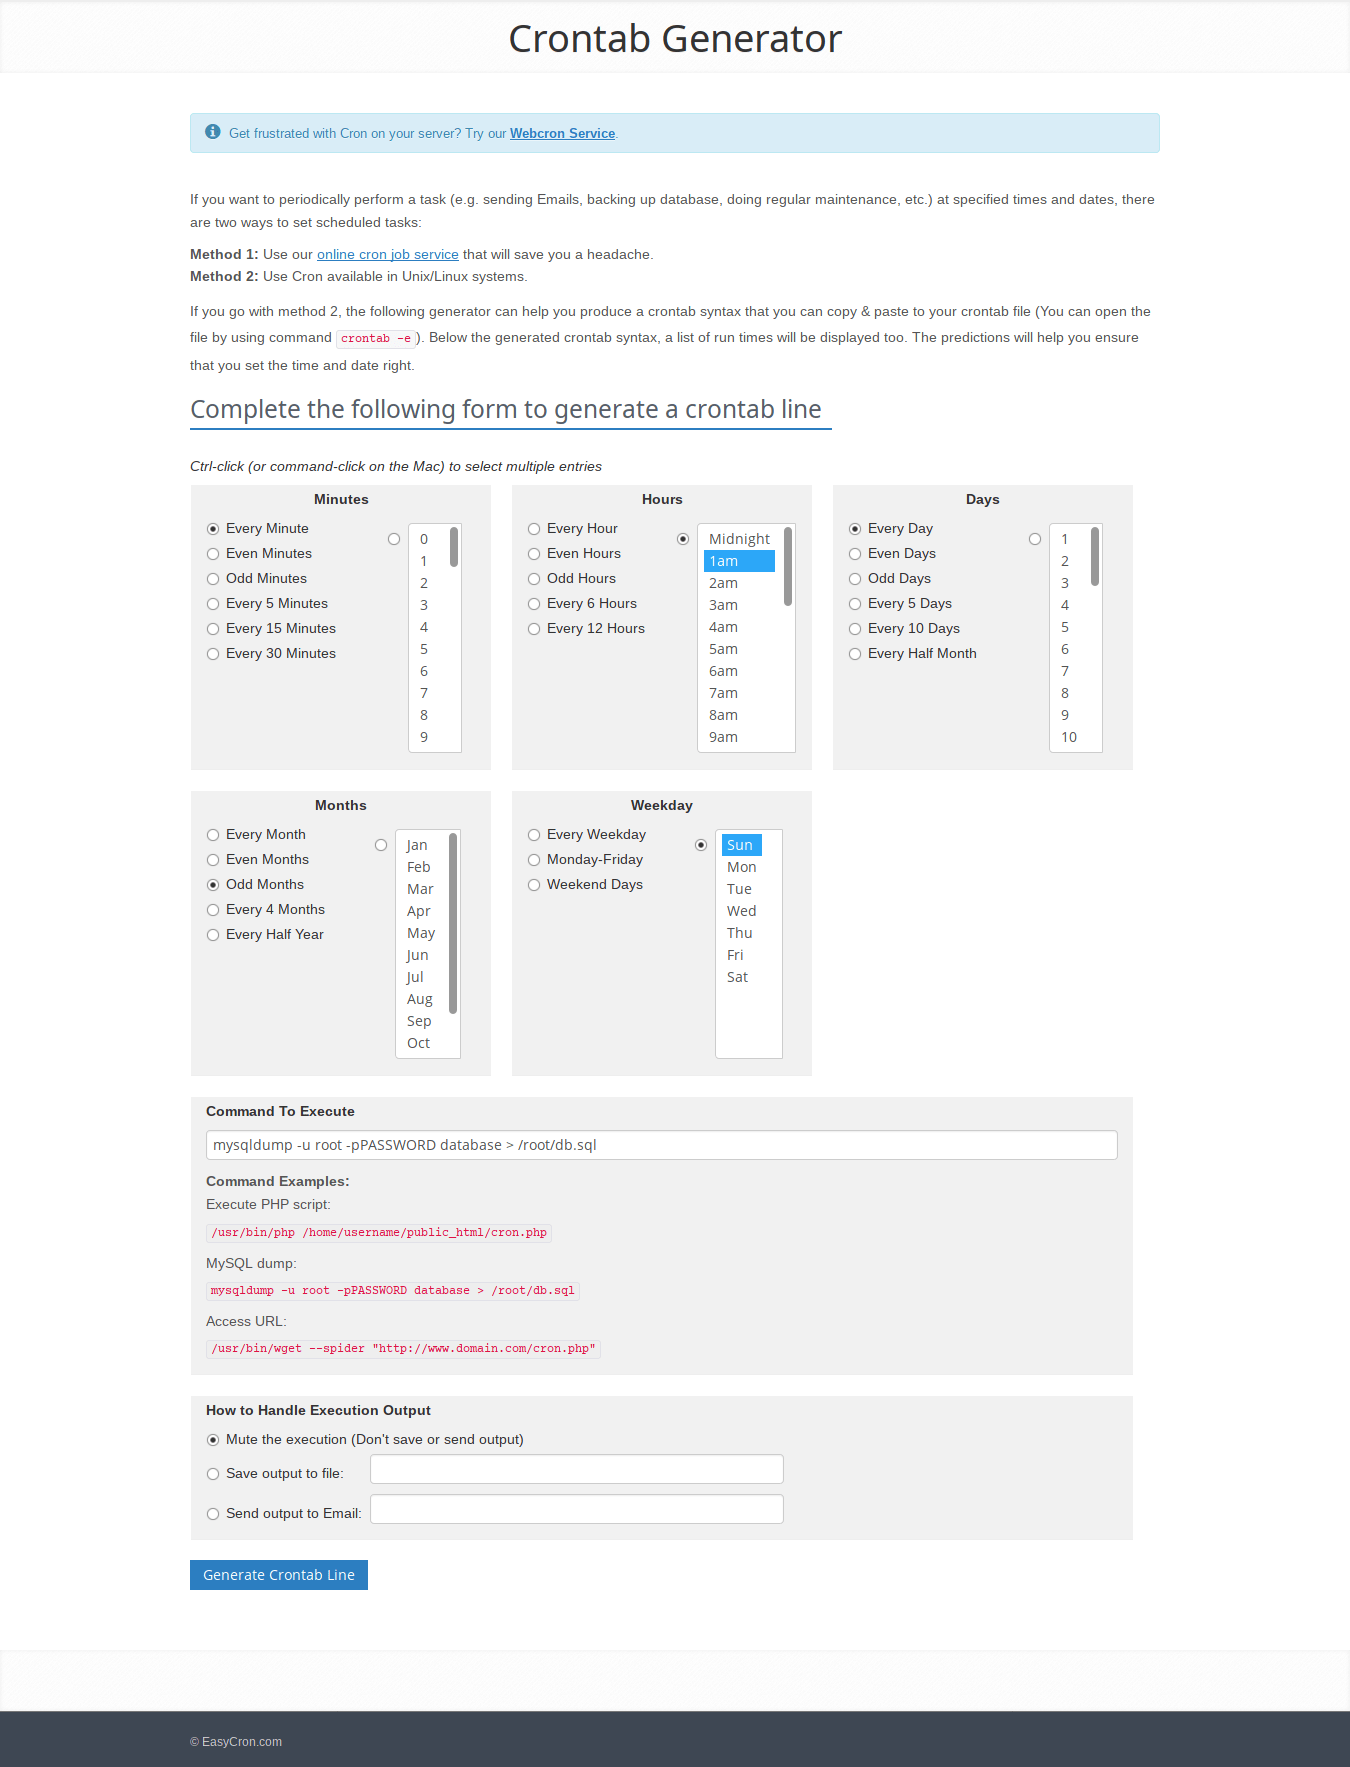
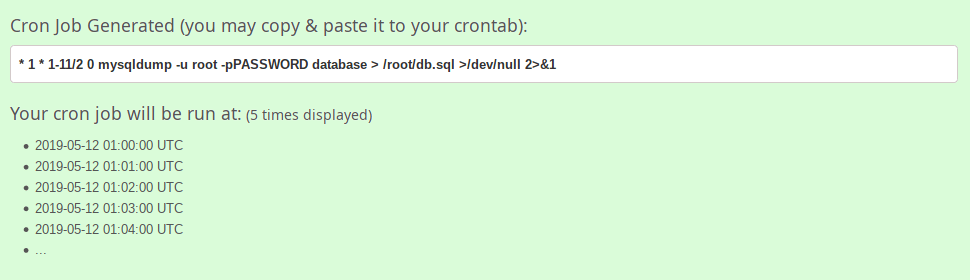
2.2. Crontab Generator
This has been pointed out by one of our reader Mr.Horton in the comment section below.
Crontab Generator is yet another website that helps us to quickly and easily generate crontab expressions. A form that has multiple entries is given in this site. The user must choose all required fields in the form.
Finally, hit the "Generate Crontab Line" button at the bottom.
Crontab Generator - Easily generate crontab expressions
In the next screen, the user will see his/her crontab expression. Just copy/paste it to the crontab file. It is that simple.
!Generate crontab entries using Crontab Generator
Generate crontab entries using Crontab Generator
Easy, isn't? Both of these websites will definitely help the newbies who don't have much experience in creating cron jobs.
Remember to review and verify the generated cron syntax from these tools before using it in your cron configuration to ensure it aligns with your requirements and environment.
3\. Crontab graphical front-ends --------------------------------
There are a few Crontab front-end tools available to easily create cron jobs via a graphical interface. No need to edit the Crontab file from command line to add or manage cron jobs! These tools will make cron job management much easier!
3.1. Crontab UI
Crontab UI is a web-based tool to easily and safely manage cron jobs in Linux. You don't need to manually edit the crontab file to create, delete and manage cron jobs. Everything can be done via a web browser with a couple mouse clicks.
Crontab UI allows you to easily create, edit, pause, delete, backup cron jobs and also import, export and deploy jobs on other machines without much hassle.
Have a look at the following link if you're interested to read more about it.
3.2. Zeit
Zeit is a Qt front-end to crontab and at command. Using Zeit, we can add, edit and delete cron jobs via simple graphical interface. For more details, refer the following link:
4\. Frequently Asked Questions ------------------------------
Here's an FAQ (Frequently Asked Questions) for Cron jobs.
Q: What is a Cron job?
A: A Cron job is a time-based task scheduler in Linux and Unix-like operating systems. It allows you to schedule and automate the execution of commands or scripts at specified intervals, such as minutes, hours, days, or months.
Q: How do I create a Cron job?
A: To create a Cron job, you can use the crontab command to edit your user-specific cron table. Run crontab -e to open the table in a text editor and add your desired cron job entry using the specified cron syntax.
Q: What is the cron syntax?
A: The cron syntax consists of five fields: minute, hour, day of month, month, and day of week. Each field allows you to specify the desired time or condition for the job to run. For example, 0 12 * * * represents a cron job scheduled to run at 12:00 PM every day.
Q: How do I specify multiple values in a field?
A: You can use commas (,) to specify multiple values within a field. For example, 1,15 * * * * means the job will run at the 1st and 15th minute of every hour.
Q: Can I use step values in the cron syntax?
A: Yes, you can use step values. For example, */15 * * * * means the job will run every 15 minutes. It matches all values divisible evenly by 15.
Q: How can I specify the user for a cron job?
A: By default, cron jobs run under the user account that created them. However, you can specify a different user by using sudo crontab -u username -e to edit the crontab for that particular user.
Q: How do I view existing cron jobs?
A: To view the existing cron jobs for your user, run crontab -l. This command lists the contents of your current crontab.
Q: How do I remove a cron job?
A: To remove a cron job, run crontab -e to edit your crontab and delete the corresponding entry. Alternatively, you can use crontab -r to remove all cron jobs for your user.
Q: Are there any web-based tools available to help generate cron job syntax?
A: Yes, there are web-based crontab syntax generators that can assist you in creating cron job schedules without needing to memorize the syntax. Some notable examples include Crontab.guru and Crontab Generator. These tools allow you to interactively select the desired schedule using user-friendly interfaces and generate the corresponding cron job syntax for you.
These web-based tools can be helpful, especially for those who are new to cron jobs or need a quick way to generate complex schedules. However, it's still important to understand the basics of cron syntax to effectively use and troubleshoot cron jobs in various environments.
Q: Are there any graphical interfaces or front-end tools available for managing cron jobs?
A: Yes, there are Crontab front-end tools that provide graphical interfaces to easily create and manage cron jobs without needing to edit the Crontab file manually from the command line.
Notable examples of such tools include Crontab UI and Zeit. These tools typically offer user-friendly interfaces where you can define cron job schedules, specify the commands or scripts to run, set environment variables, and manage multiple cron jobs in a visual manner.
5\. Conclusion --------------
In this Cron tab tutorial, we discussed what is a cron job, and the basic usage of cron jobs in Linux with example commands.
We also discussed a few web-based crontab syntax generators and crontab graphical front-ends which are used to easily create and manage cron jobs in Linux. Finally, we have listed some most commonly asked questions and answers (FAQ) for Cron Jobs.
Resources:
The OTC Conspiracy - The Final Chapter? Presenting 135 weeks of GME OTC and ATS data, in pictures, including a pre-split / post-split analysis, some intriguing subplots (Citadel and Virtu, Robinhood a
The OTC Conspiracy - The Final Chapter? Presenting 135 weeks of GME OTC and ATS data, in pictures, including a pre-split / post-split analysis, some intriguing subplots (Citadel and Virtu, Robinhood and Drivewealth, Credit Suisse, UBS and the banks), and some forward-looking statements! I'm not much for long intros or shout outs to all the OG bros
Just a simple ape who likes to rhyme, and keep tabs on all the financial crime
Citadel, Virtu, Jane Street and G1, gonna send this rocket into the Sun
So without further ado, here's some data, swing back through and thank me lata!
My wife said she would leave with her boyfriend if I make one more graph... We've come a long way from FINRA ADF to Missing Bananas, OTC Conspiracy and the Infinite Banana Tree, to today. I've learned a lot through this journey and I hope you have too!
OTC and ATS data
- OTC trades are internalized retail trades, payment for order flow, odd lots (i.e. I purchase 10 shares through "Insert retail broker", which gets routed to Citadel, Virtu, G1 Execution (Sus), Jane Street, and doesn't impact the NBBO.
- ATS trades are dark pool trades
Here's a nice video by Dave on Off-Exchange vs. On-Exchange trading:
https://learn.urvin.finance/content/on-exchange-vs-off-exchange-trading
The Data:
All information is taken directly from FINRA OTC Transparency website:
https://otctransparency.finra.org/otctransparency/OtcIssueData
Please refer to The Cooks Keep Cooking the Books series for additional information and details on Robinhood and Dirvewealth LLC 'adjusting' their reported OTC trades 8-12 months after they supposedly occurred:
Volume 2 - Robinhood does it again
Volume 3 - Robinhood and Drivewealth
Volume 4 - Featuring Drivewealth LLC adding 3 million OTC trades
See some of my previous OTC write-ups for additional context and explanation:
This latest data represents 135 weeks (over 2.5 years). I started with August 2020, which is when RC bought in, but as we've all learned, the story starts even earlier.
This data is especially important given the proposed SEC rule changes. Send in your comment letter!
Citadel wants you to do Nothing
Weekly GME OTC Shares traded
This shows the total weekly shares traded OTC by Citadel, Virtu, G1 Execution, Two Sigma, UBS, Drivewealth, and Robinhood (and others) over the counter (OTC), as internalized trades from retail across 135 weeks.
- The data ranges from 8/3/2020 - 3/3/2023
- The data is delayed by 2 weeks, so we will have the data from Week of 3/6 - 3/10 on Monday (3/27) ! GME OTC shares 8/3/2020 - 3/3/2023
Weekly OTC Trades
! GME OTC trades 8/3/2020 - 3/3/2023
Weekly OTC Shares/Trade
! GME OTC shares/trade 8/3/2020 - 3/3/2023
So as not to weigh down this post, please see my previous posts for some in-depth analysis on this nefarious OTC trading activity.
Besides an overall decrease in the OTC trades (which may reflect the change in share price after the split), we see increase in shares/trade has increased, and cyclical increases in volume. We'll dig deeper into the data further down.
Weekly Range (split-adjusted and including last week)
! As you can see, we've had a lot of volatile weeks in terms of share price, but last week's adjusted Range of $43.00 doesn't really align with the significant increase in volume
SHiTeR Score
If we multiply OTC Shares /* Trades /* Range, we get a value that helps normalize the amount of OTC trading and weekly price volatility. The Range is adjusted for the split (closing price /*4). ! Helps detect crime
Who is responsible for all these shares and all these trades?
Let's compare pre-split distribution to post-split distribution for shares:
Here, we can see:
- A decrease in OTC market share for Citadel (from around 40% pre-split to 33% post-split)
- A slight decrease in market share for Virtu (from around 31% pre-split to 27.5% post-split)
- An increase in OTC market share by Jane Street (from 4% pre-split to just under 10% post-split). This is accentuated in the Shares/*Trades (SHiT score), where they have increased from 1% to 6% post-split
- A decrease in market share for Two Sigma and UBS (UBS has been completely absent for 24 of the past 25 weeks)
- A significant increase in market share for De Minimis Firms (from less than 3% pre-split to almost 9% post-split)
- I'll try to add more later! What are your conclusions?
The biggest shift here is the decrease in OTC trading share by Robinhood, from over 16% pre-split to less than 6% post-split.
GME OTC Leaderboard
ATS (Dark Pool) trading
! ATS (dark pool) trading 8/3/2020 - 3/3/2023
ATS Participants:
I have been using Frigate for a while now and recently I moved my whole Frigate setup first from Home Assistant as an add-on to a VirtualBox VM, and finally to a Dell Optiplex Micro running Frigate in a Docker Container. This post and related video are at the request of a number of you who asked to explain how to install Frigate using Docker and then integrating it with Home Assistant.
For those of you unfamiliar with Frigate, it is an "NVR" of sorts. The definition of NVR is loosely applied but is in the official description by the software's author so we'll go with it. It is a complete solution and is designed for Home Assistant. It comes complete with object detection using OpenCV and Tensorflow and can do this real-time with locally based IP cameras from a number of different manufacturers. You can read more about the specifics on their website.
For the sake of this video, I assume that you have a bare metal system running some variant of supported Linux. In addition, you also have Docker Compose installed. When I had this installed on VirtualBox Ubuntu with a Windows 10 host, I was never able to reliably pass my Coral TPU through to Frigate. Having a TPU greatly reduces overhead on the CPU and allows more cameras for the same or fewer compute resources. With that in mind, the Frigate author recommends bare metal Debian-based distributions. My OptiPlex is running Ubuntu 20.04.
Installing this via docker compose is simple. The hardest part (but not really that hard) is getting the environment set up via a docker-compose.yml file such as the one here.
version: "3.9" services: frigate: container_name: frigate privileged: true # this may not be necessary for all setups restart: unless-stopped image: blakeblackshear/frigate:stable shm_size: "64mb" # update for your cameras based on calculation above devices: - /dev/bus/usb:/dev/bus/usb # passes the USB Coral, needs to be modified for other versions - /dev/apex_0:/dev/apex_0 # passes a PCIe Coral, follow driver instructions here https://coral.ai/docs/m2/get-started/#2a-on-linux - /dev/dri/renderD128 # for intel hwaccel, needs to be updated for your hardware volumes: - /etc/localtime:/etc/localtime:ro - /home/mostlychris/frigate/config.yml:/config/config.yml:ro - /home/mostlychris/frigate/storage:/media/frigate - type: tmpfs # Optional: 1GB of memory, reduces SSD/SD Card wear target: /tmp/cache tmpfs: size: 1000000000 ports: - "5000:5000" - "1935:1935" # RTMP feeds environment: FRIGATE_RTSP_PASSWORD: "yourpassword"
The important parts are the volumes and ports. You need to make sure that you have mapped the local storage on your device to the location in the frigate docker container. You also need to have config.yml ready to go in the mapped directory of your choice. You can see mine below. It is in the home/mostlychris/frigate.
``` volumes: - /etc/localtime:/etc/localtime:ro - /home/mostlychris/frigate/config.yml:/config/config.yml:ro - /home/mostlychris/frigate/storage:/media/frigate - type: tmpfs # Optional: 1GB of memory, reduces SSD/SD Card wear target: /tmp/cache
```
Additionally, make sure the ports specified are free and not used by another application. The left-hand port is the port on your local machine and the right-hand port is the port inside the docker container. If you need to modify a port because that port is already being, make sure you change the left-hand side.
``` ports: - "5000:5000" - "1935:1935" # RTMP feeds
```
Once you have the docker-compose.yml file set up and you have a valid config.yml for Frigate itself, you can start up the container. Make sure you are in the directory where your docker-compose.yml file and issue the following command (use sudo if you need to).
sudo docker compose up
If all goes well, you'll see log files that show Frigate is up and running.
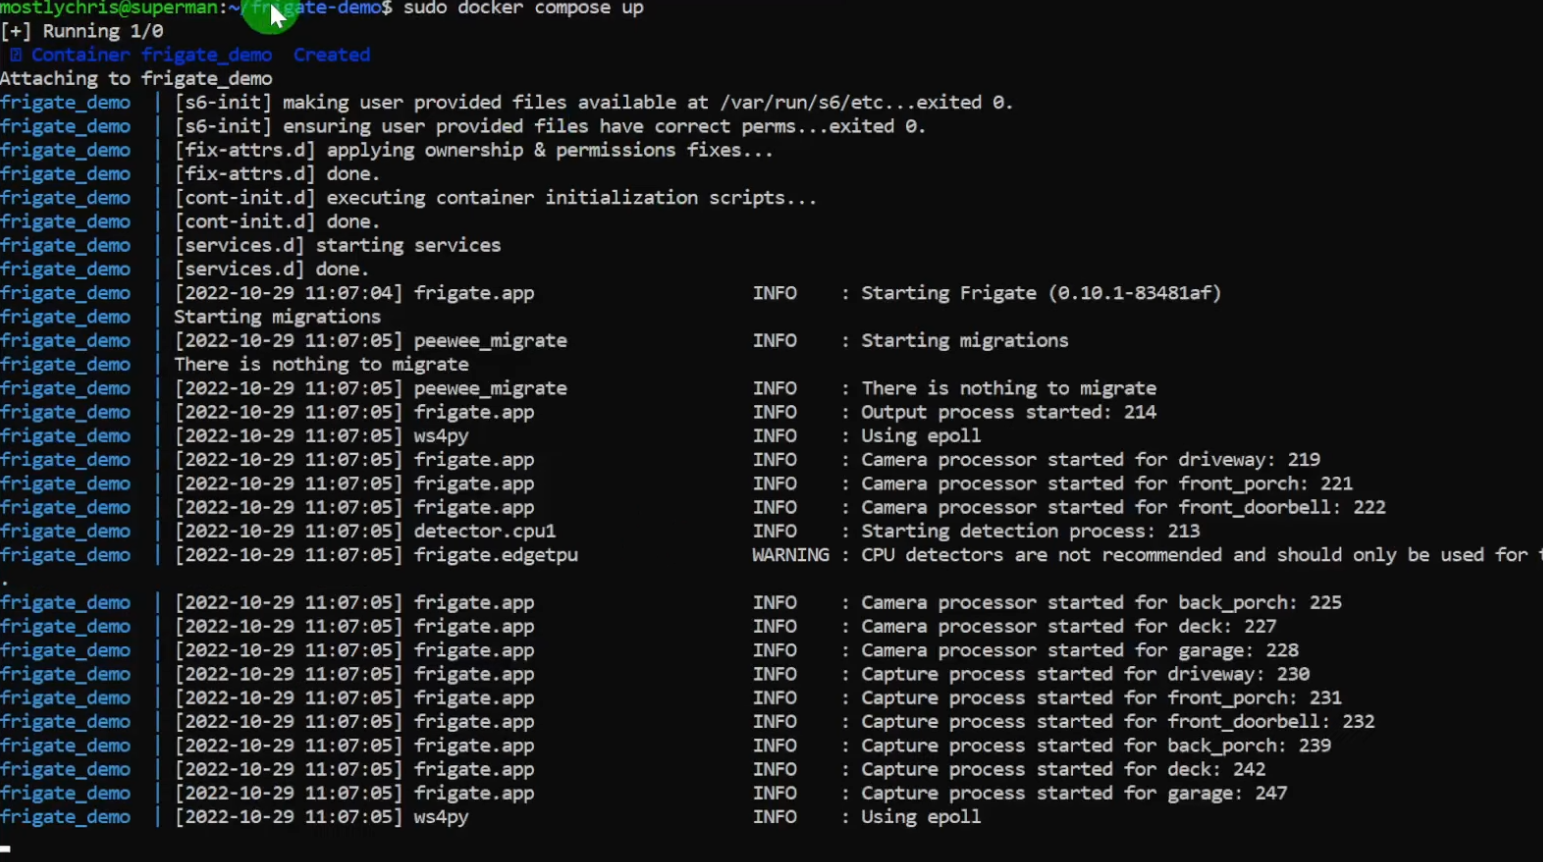
Sample logfile output
If you are satisfied that it is working correctly, you can ctrl-c out of the running docker container and re-issue the command with a -d flag which will set the container running in the background.
Now that you have that running, you need to integrate into Home Assistant via an integration. Integrations bind external resources or add-ons in to Home Assistant core. For this, go to the Home Assistant intgrations page and add integration.
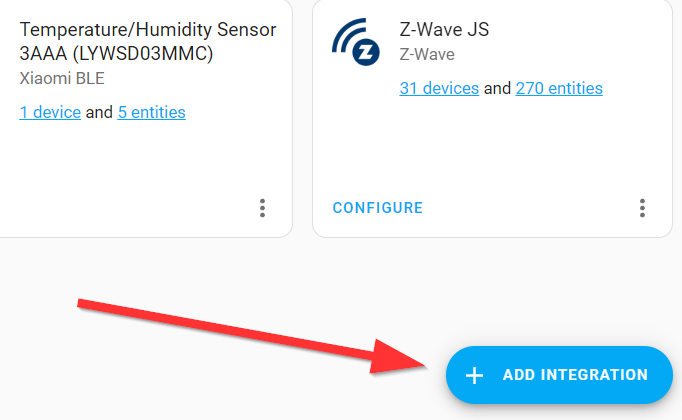
Add Integration Button on the bottom right of the integrations page
Search for the Frigate integration and select it.
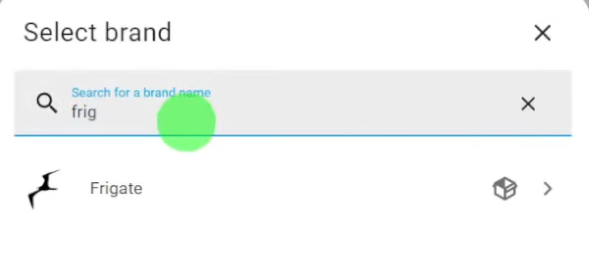
Frigate Integration
You will be presented with a dialog box. An important note here is that you probably won't use the default URL. You will change these to the bare metal device's IP address that you installed Frigate Docker on. In my case, the URL is http://172.16.1.153:5001. You might notice that I have a different port specified. This is because I already had something else running on 5000 on that box, so I changed the docker-compose.yml file to map 5001 on the hardware to 5000 in the Frigate Docker container.
Dialog for integrating Frigate in Home Assistant
If all is successful, you will be presented a dialog showing all the cameras and camera zones you have configured in your Frigate config.yml file.
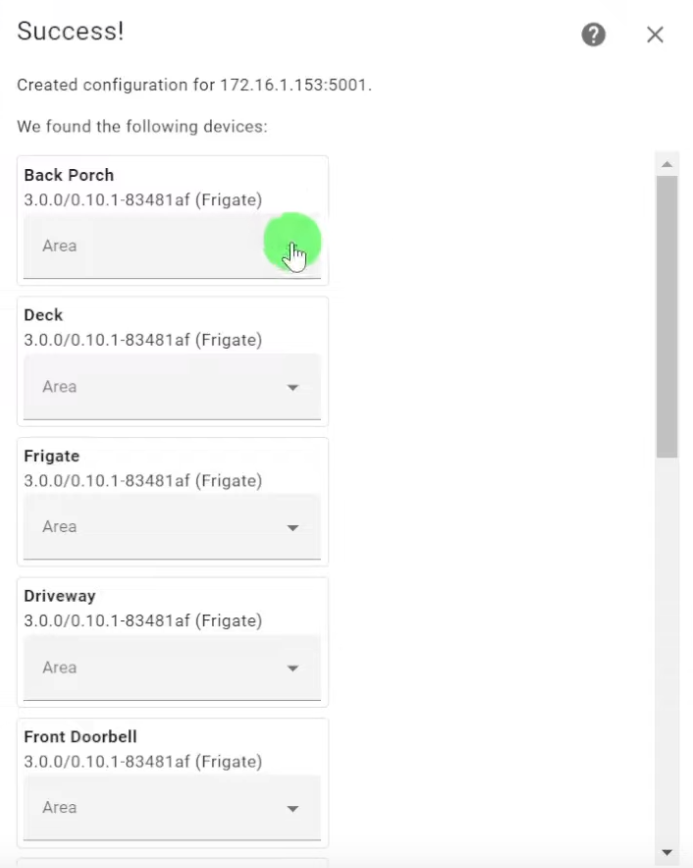
That about covers the installation of Frigate with Docker and integrating it with Home Assistant. For those asking about the config.yml file I use, I will post it below.
If you want more detail and a walk-through of the whole process, please take a moment to watch my video. Even if you don't need more detail, please watch it anyway 😁. It is super helpful and appreciated because, you know, YouTube algorithms and all. While you're at it, take a moment and do the subscribe thing. That also helps a bunch!
Frigate config.yml file at the time of this posting.
``` ui: use_experimental: true
mqtt: host: 172.16.1.121 port: 1883 topic_prefix: frigate client_id: frigate user: yourmqttuser password: yourmqttpassword stats_interval: 300
record: expire_interval: 10
timestamp_style: position: "tl" format: "%m/%d/%Y %H:%M:%S" color: red: 255 green: 255 blue: 255thickness: 2 effect: shadow
cameras: driveway: ffmpeg: inputs: - path: rtsp://camerauser:[email protected]:554/cam/realmonitor?channel=1&subtype=1 roles: - detect - path: rtsp://camerauser:[email protected]:554/cam/realmonitor?channel=1&subtype=0 roles: - record - rtmp detect: width: 640 height: 480 fps: 5 objects: track: - person - dog - bicycle - cat snapshots: enabled: true timestamp: true bounding_box: true required_zones: - drivewayclose_in - driveway_whole_area - driveway_right_side crop: True height: 500 retain: default: 3 zones: drivewayclose_in: coordinates: 0,480,429,480,443,335,460,173,263,133,88,120,36,212,0,279 objects: - person - dog - cat - bicycle driveway_whole_area: coordinates: 383,52,497,105,569,316,575,480,261,480,0,480,0,225,148,57 objects: - person - cat - dog - bicycle driveway_right_side: coordinates: 424,96,345,438,70,405,307,88 objects: - car motion: mask: - 2,465,328,468,330,432,5,431 - 72,43,154,0,0,0,0,129 record: enabled: True retain: days: 0 events: retain: default: 5 mode: motion required_zones: - drivewayclose_in - driveway_whole_area - driveway_right_side pre_capture: 5 post_capture: 15
front_porch: ffmpeg: inputs: - path: rtsp://camerauser:[email protected]:554/cam/realmonitor?channel=1&subtype=1 roles: - detect - path: rtsp://camerauser:[email protected]:554/cam/realmonitor?channel=1&subtype=0 roles: - record detect: width: 640 height: 480 fps: 5 objects: track: - person - dog - bicycle - cat mask: - 0,480,198,480,200,449,0,451 - 640,0,640,36,640,111,608,135,485,96,504,0 - 439,200,441,324,512,320,532,261,554,188,540,129,451,134 - 370,0,356,100,291,79,292,0 snapshots: enabled: true timestamp: false bounding_box: false crop: True height: 500 required_zones: - front_porch_close_in retain: default: 5 motion: mask: - 0,480,191,480,193,450,0,449 - 459,208,545,202,539,135,481,132 zones: front_porch_close_in: coordinates: 45,480,362,480,640,480,640,213,554,145,524,252,458,259,408,272,348,70,253,64,181,118,67,178 record: enabled: True retain: days: 0 mode: active_objects events: retain: default: 4 mode: active_objects required_zones: - front_porch_close_in pre_capture: 5 post_capture: 15
front_doorbell: ffmpeg: inputs: - path: rtsp://camerauser:[email protected]:554/cam/realmonitor?channel=1&subtype=0 roles: - record - path: rtsp://camerauser:[email protected]:554/cam/realmonitor?channel=1&subtype=1 roles: - detect detect: width: 720 height: 576 fps: 15 objects: track: - person - dog - bicycle - cat snapshots: enabled: true timestamp: false bounding_box: false crop: True height: 500 retain: default: 5 motion: mask: - 720,0,720,28,430,22,428,0 record: enabled: True retain: days: 0 mode: active_objects events: retain: default: 4 mode: active_objects pre_capture: 10 post_capture: 15
back_porch: ffmpeg: inputs: - path: rtsp://camerauser:[email protected]:554/Streaming/Channels/102 roles: - detect - path: rtsp://camerauser:[email protected]:554/Streaming/Channels/101 roles: - record detect: width: 640 height: 480 fps: 6 objects: track: - person - dog - cat - bird - mouse filters: cat: min_score: 0.3 threshold: 0.5 dog: min_score: 0.3 threshold: 0.5 mask: - 23,480,333,480,333,442,26,440 - 640,95,640,0,464,0 - 258,211,323,246,357,142,274,140 - 383,342,457,365,477,261,401,232 - 425,131,553,227,640,251,640,213,607,176,460,88 snapshots: enabled: true timestamp: false bounding_box: true retain: default: 3 motion: mask: - 337,480,341,437,0,433,0,480,40,480
zones: deck_area: coordinates: 0,284,0,457,207,480,474,480,640,480,540,406,392,259,253,106,166,31,108,49,0,72 record: enabled: True retain: days: 0 events: retain: default: 4 mode: motion pre_capture: 5 post_capture: 15
deck: ffmpeg: inputs: - path: rtsp://camerauser:[email protected]:554/Streaming/Channels/102 roles: - detect - path: rtsp://camerauser:[email protected]:554/Streaming/Channels/101 roles: - record detect: width: 640 height: 480 fps: 6 objects: track: - person - dog - cat - bird - mouse filters: cat: min_score: 0.3 threshold: 0.5 dog: min_score: 0.3 threshold: 0.5 person: mask: - 79,385,107,480,287,480,259,313,107,268 - 294,82,396,93,411,57,295,44 snapshots: enabled: true timestamp: false bounding_box: true retain: default: 4 motion: mask: - 374,480,640,480,640,442,372,442 record: enabled: True retain: days: 0 events: retain: default: 4 mode: motion pre_capture: 5 post_capture: 15
garage: ffmpeg: inputs: - path: rtsp://camerauser:[email protected]:554/cam/realmonitor?channel=1&subtype=1 roles: - detect - path: rtsp://camerauser:[email protected]:554/cam/realmonitor?channel=1&subtype=0 roles: - record detect: width: 640 height: 480 fps: 5 objects: track: - person - dog - cat snapshots: enabled: true timestamp: false bounding_box: true retain: default: 3 record: enabled: True retain: days: 0 events: retain: default: 4 mode: active_objects pre_capture: 5 post_capture: 15 motion: mask: - 352,93,477,95,554,99,640,94,640,0,343,0 - 457,480,640,480,640,445,453,444
Reolink
reolink_portable: ffmpeg: inputs: - path: rtsp://camerauser:[email protected]:554/h264Preview_01_main roles: - record - path: rtsp://camerauser:[email protected]:554/h264Preview_01_sub roles: - detect detect: width: 640 height: 360 fps: 7 objects: track: - person - dog - bicycle - cat snapshots: enabled: true timestamp: true bounding_box: true retain: default: 5 record: enabled: true retain_days: 0 events: retain: default: 5 motion: mask: - 640,360,640,330,411,325,415,360 - 640,33,640,0,0,0,0,34 - 640,109,640,170,576,121,589,78
detectors:
cpu1:
type: cpu
num_threads: 3
coral: type: edgetpu device: usb
rtmp: enabled: false
birdseye:
enabled: True
width: 1280
height: 720
quality: 1
mode: objects
live:
height: 640
quality: 1
MOASS Prediction: October 24, 2023 (a Tuesday).
An option trap?
SEC asked Coinbase to halt trading in everything except bitcoin, CEO says
source ***
SEC asked Coinbase to halt trading in everything except bitcoin, CEO says | Financial Times
Receive free Cryptocurrencies updates
We’ll send you a myFT Daily Digest email rounding up the latest Cryptocurrencies news every morning.
The US Securities and Exchange Commission asked Coinbase to halt trading in all cryptocurrencies other than bitcoin prior to suing the exchange, in a sign of the agency’s intent to assert regulatory authority over a broader slice of the market.
Coinbase chief executive Brian Armstrong told the Financial Times that the SEC made the recommendation before launching legal action against the Nasdaq-listed company last month for failing to register as a broker.
The SEC’s case identified 13 mostly lightly traded cryptocurrencies on Coinbase’s platform as securities, asserting that by offering them to customers the exchange fell under the regulator’s remit.
But the prior request for Coinbase to delist every one of the more than 200 tokens it offers — with the exception of flagship token bitcoin — indicates that the SEC, under chair Gary Gensler, has pushed for wider authority over the crypto industry.
“They came back to us, and they said . . . we believe every asset other than bitcoin is a security,” Armstrong said. “And, we said, well how are you coming to that conclusion, because that’s not our interpretation of the law. And they said, we’re not going to explain it to you, you need to delist every asset other than bitcoin.”
If Coinbase had agreed, that could have set a precedent that would have left the vast majority of the American crypto businesses operating outside the law unless they registered with the commission.
“We really didn’t have a choice at that point, delisting every asset other than bitcoin, which by the way is not what the law says, would have essentially meant the end of the crypto industry in the US,” he said. “It kind of made it an easy choice . . . let’s go to court and find out what the court says.”
!Brian Armstrong, chief executive of Coinbase
According to Brian Armstrong, if Coinbase had agreed, the vast majority of the American crypto businesses would risk operating outside the law unless they registered with the SEC © Reuters
Oversight of the crypto industry has hitherto been a grey area, with the SEC and the Commodity Futures Trading Commission jockeying for control.
The CFTC sued the largest crypto exchange, Binance, in March of this year, three months before the SEC launched its own legal action against the company.
Gensler has previously said he believes most cryptocurrencies with the exception of bitcoin are securities. However, the recommendation to Coinbase signals that the SEC has adopted this interpretation in its attempts to regulate the industry.
Ether, the second-largest cryptocurrency, which is fundamental to many industry projects, was absent from the regulator’s case against the exchange. It also did not feature in the list of 12 “crypto asset securities” specified in the SEC’s lawsuit against Binance.
The SEC said its enforcement division did not make formal requests for “companies to delist crypto assets”.
“In the course of an investigation, the staff may share its own view as to what conduct may raise questions for the commission under the securities laws,” it added.
Stocks, bonds and other traditional financial instruments fall under the SEC’s remit, but US authorities remain locked in debate as to whether all — or any — crypto tokens should fall under its purview.
Oversight by the SEC would bring far more stringent compliance standards. Crypto exchanges typically also provide custody services, and borrow and lend to customers, a mix of practices that is not possible for SEC-regulated companies.
“There are a bunch of American companies who have built business models on the assumption that these crypto tokens aren’t securities,” said Charley Cooper, former CFTC chief of staff. “If they’re told otherwise, many of them will have to stop operations immediately.”
“It’s very difficult to see how there could be any public offerings or retail trading of tokens without some sort of intervention from Congress,” said Peter Fox, partner at law firm Scoolidge, Peters, Russotti & Fox.
The SEC declined to comment on the implications for the rest of the industry of a settlement involving Coinbase delisting every token other than bitcoin.___
Bill Hwang seeks to subpoena 10 banks, shift blame for Archegos collapse
source ***
Bill Hwang seeks to subpoena 10 banks, shift blame for Archegos collapse | Reuters
NEW YORK, July 27 (Reuters) - Bill Hwang, the founder of Archegos Capital Management, on Thursday asked a judge to let him subpoena documents from 10 banks, in an effort to shift blame as he defends against criminal fraud charges that the firm's collapse was his fault.
In a filing in Manhattan federal court, Hwang said the documents will show that Archegos' counterparties "played a pivotal role" in the March 2021 collapse of his once-$36 billion firm, and that his swaps trades were legal.
The office of U.S. Attorney Damian Williams, which is prosecuting Hwang, did not immediately respond to a request for comment.
Hwang's request came three days after UBS (UBSG.S) agreed to pay $388 million in fines to U.S. and British regulators over poor risk management at Credit Suisse, which lost $5.5 billion when Archegos met its demise.
UBS bought Credit Suisse last month, under pressure from Swiss regulators. Other banks also lost money when Archegos collapsed, but less than Credit Suisse.
Prosecutors accused Hwang of borrowing aggressively to fund total return swaps that boosted Archegos' exposure to stocks such as ViacomCBS and Discovery to more than $160 billion, and concealing the risks by borrowing from several banks.
Archegos failed after the prices of some of its stocks fell. That caused it to miss margin calls, and banks to dump stocks that had backed the swaps and which they had bought as hedges.
"Any disconnect or attenuation between Archegos's swaps and its counterparties' hedges bears directly on the likelihood that Mr. Hwang could have affected, or did affect, the market in the manner alleged in the indictment," Thursday's filing said.
Other banks that Hwang wants to subpoena, in addition to UBS, are Bank of Montreal (BMO.TO), Deutsche Bank (DBKGn.DE), Goldman Sachs (GS.N), Jefferies (JEF.N), Macquarie (MQG.AX), Mitsubishi UFJ (8411.T), Mizuho (8411.T), Morgan Stanley (MS.N) and Nomura (8604.T).
In March, U.S. District Judge Alvin Hellerstein rejected Hwang's motion to dismiss his 11-count indictment. Hwang has pleaded not guilty. A trial is scheduled for Feb. 20, 2024.
The case is U.S. v. Hwang et al, U.S. District Court, Southern District of New York, No. 22-cr-00240.
Reporting by Jonathan Stempel in New York; Editing by Daniel Wallis
Our Standards: The Thomson Reuters Trust Principles.
How to install SAMBA on Ubuntu 22.04 LTS Jammy Linux
Samba is a free tool for file-sharing between Linux and other OSs. Read this guide and learn how to install and configure Samba in Ubuntu.

How to configure Samba Server share on Ubuntu 22.04 Jammy Jellyfish Linux - Linux Tutorials - Learn Linux Configuration
File servers often need to accommodate a variety of different client systems. Running Samba on Ubuntu 22.04 Jammy Jellyfish allows Windows systems to connect and access files, as well as other Linux systems and MacOS. An alternative solution would be to run an FTP/SFTP server on Ubuntu 22.04, which can also support the connections from many systems.
The objective of this tutorial is to configure a basic Samba server on Ubuntu 22.04 Jammy Jellyfish to share user home directories as well as provide read-write anonymous access to selected directory.
There are myriads of possible other Samba configurations, however the aim of this guide is to get you started with some basics which can be later expanded to implement more features to suit your needs. You will also learn how to access the Ubuntu 22.04 Samba server from a Windows system.
In this tutorial you will learn:
- How to install Samba server
- How to configure basic Samba share
- How to share user home directories and public anonymous directory
- How to mount Samba share on MS Windows 10
!How to configure Samba Server share on Ubuntu 22.04 Jammy Jellyfish Linux
How to configure Samba Server share on Ubuntu 22.04 Jammy Jellyfish Linux
Software Requirements and Linux Command Line Conventions
- Category: System
- Requirements, Conventions or Software Version Used: Ubuntu 22.04 Jammy Jellyfish
- Category: Software
- Requirements, Conventions or Software Version Used: Samba
- Category: Other
- Requirements, Conventions or Software Version Used: Privileged access to your Linux system as root or via the sudo command.
- Category: Conventions
- Requirements, Conventions or Software Version Used: # – requires given linux commands to be executed with root privileges either directly as a root user or by use of sudo command$ – requires given linux commands to be executed as a regular non-privileged user
How to configure Samba Server share on Ubuntu 22.04 step by step instructions -----------------------------------------------------------------------------
- Let’s begin by installation of the Samba server. This is a rather trivial task. First, open a command line terminal and install the
taskselcommand if it is not available yet on your Ubuntu 22.04 system. Once ready, usetaskselto install the Samba server.
``` $ sudo apt update $ sudo apt install tasksel $ sudo tasksel install samba-server
```
- We will be starting with a fresh clean configuration file, while we also keep the default config file as a backup for reference purposes. Execute the following Linux commands to make a copy of the existing configuration file and create a new
/etc/samba/smb.confconfiguration file:
``` $ sudo cp /etc/samba/smb.conf /etc/samba/smb.conf_backup $ sudo bash -c 'grep -v -E "#|;" /etc/samba/smb.conf_backup | grep . > /etc/samba/smb.conf'
```
- Samba has its own user management system. However, any user existing on the samba user list must also exist within the
/etc/passwdfile. If your system user does not exist yet, hence cannot be located within/etc/passwdfile, first create a new user using theuseraddcommand before creating any new Samba user. Once your new system user eg.linuxconfigexits, use thesmbpasswdcommand to create a new Samba user:
``` $ sudo smbpasswd -a linuxconfig New SMB password: Retype new SMB password: Added user linuxconfig.
```
- Next step is to add the home directory share. Use your favourite text editor, ex. atom, sublime, to edit our new
/etc/samba/smb.confAamba configuration file and add the following lines to the end of the file:
``` [homes] comment = Home Directories browseable = yes read only = no create mask = 0700 directory mask = 0700 valid users = %S
```
- Optionally, add a new publicly available read-write Samba share accessible by anonymous/guest users. First, create a directory you wish to share and change its access permission:
``` $ sudo mkdir /var/samba $ sudo chmod 777 /var/samba/
```
- Once ready, once again open the
/etc/samba/smb.confsamba configuration file and add the following lines to the end of the file:
``` [public] comment = public anonymous access path = /var/samba/ browsable =yes create mask = 0660 directory mask = 0771 writable = yes guest ok = yes
```
- Check your current configuration. Your
/etc/samba/smb.confsamba configuration file should at this stage look similar to the one below:
``` [global] workgroup = WORKGROUP server string = %h server (Samba, Ubuntu) log file = /var/log/samba/log.%m max log size = 1000 logging = file panic action = /usr/share/samba/panic-action %d server role = standalone server obey pam restrictions = yes unix password sync = yes passwd program = /usr/bin/passwd %u passwd chat = Enter\snew\s\spassword:* %n\n Retype\snew\s\spassword:* %n\n password\supdated\ssuccessfully . pam password change = yes map to guest = bad user usershare allow guests = yes [printers] comment = All Printers browseable = no path = /var/spool/samba printable = yes guest ok = no read only = yes create mask = 0700 [print$] comment = Printer Drivers path = /var/lib/samba/printers browseable = yes read only = yes guest ok = no [homes] comment = Home Directories browseable = yes read only = no create mask = 0700 directory mask = 0700 valid users = %S [public] comment = public anonymous access path = /var/samba/ browsable =yes create mask = 0660 directory mask = 0771 writable = yes guest ok = yes
```
- Our basic Samba server configuration is done. Remember to always restart your samba server, after any change has been done to
/etc/samba/smb.confconfiguration file:
``` $ sudo systemctl restart smbd
```
- (optional) Let’s create some test files. Once we successfully mount our Samba shares, the below files should be available to our disposal:
``` $ touch /var/samba/public-share $ touch /home/linuxconfig/home-share
```
Access Ubuntu 22.04 Samba share from MS Windows -----------------------------------------------
-
At this stage we are ready to turn our attention to MS Windows. Mounting network drive directories might be slightly different for each MS Windows version. This guide uses MS Windows 10 in a role of a Samba client. To start, open up your
Windows Explorerthen right click onNetworkand click onMap network drive...tab.!Map network drive option on MS Windows
Map network drive option on MS Windows
-
Next, select the drive letter and type Samba share location which is your Samba server IP address or hostname followed by the name of the user’s home directory. Make sure you tick
Connect using different credentialsif your username and password is different from Samba one created with thesmbpasswdcommand on Ubuntu 22.04.[!Select network folder configuration options and click Next](https://linuxconfig.org/wp-content/uploads/2022/03/02-how-to-configure-samba-server-share-on-ubuntu-22-04-jammy-jellyfish-linux.png)
Select network folder configuration options and click Next
-
Enter Samba user’s password as created earlier on Ubuntu 22.04.
Enter Samba password
-
-
Browse user’s home directory. You should be able to see the previously created test file. As well as you should be able to create new directories and files.
!The home directory is browsable, with read and write permissions
The home directory is browsable, with read and write permissions
-
Repeat the mounting steps also for the publicly anonymous samba directory share.
!Mount the public Samba directory to a different drive letter in Windows
Mount the public Samba directory to a different drive letter in Windows
-
Confirm that you can access the Public samba share directory.
!Connected to the public Samba share and the test file is viewable
Connected to the public Samba share and the test file is viewable
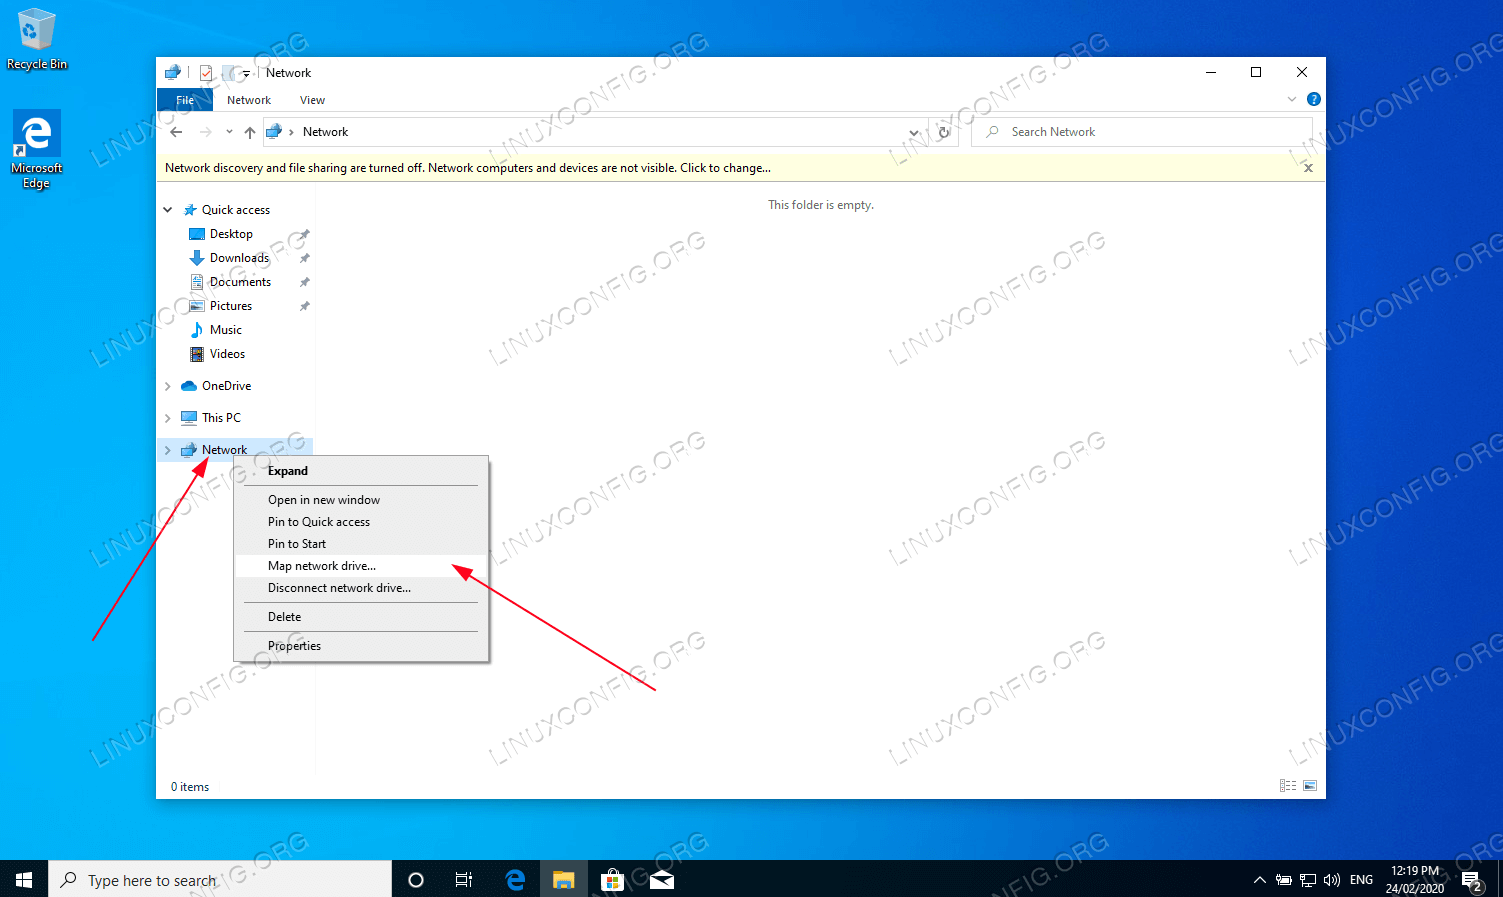
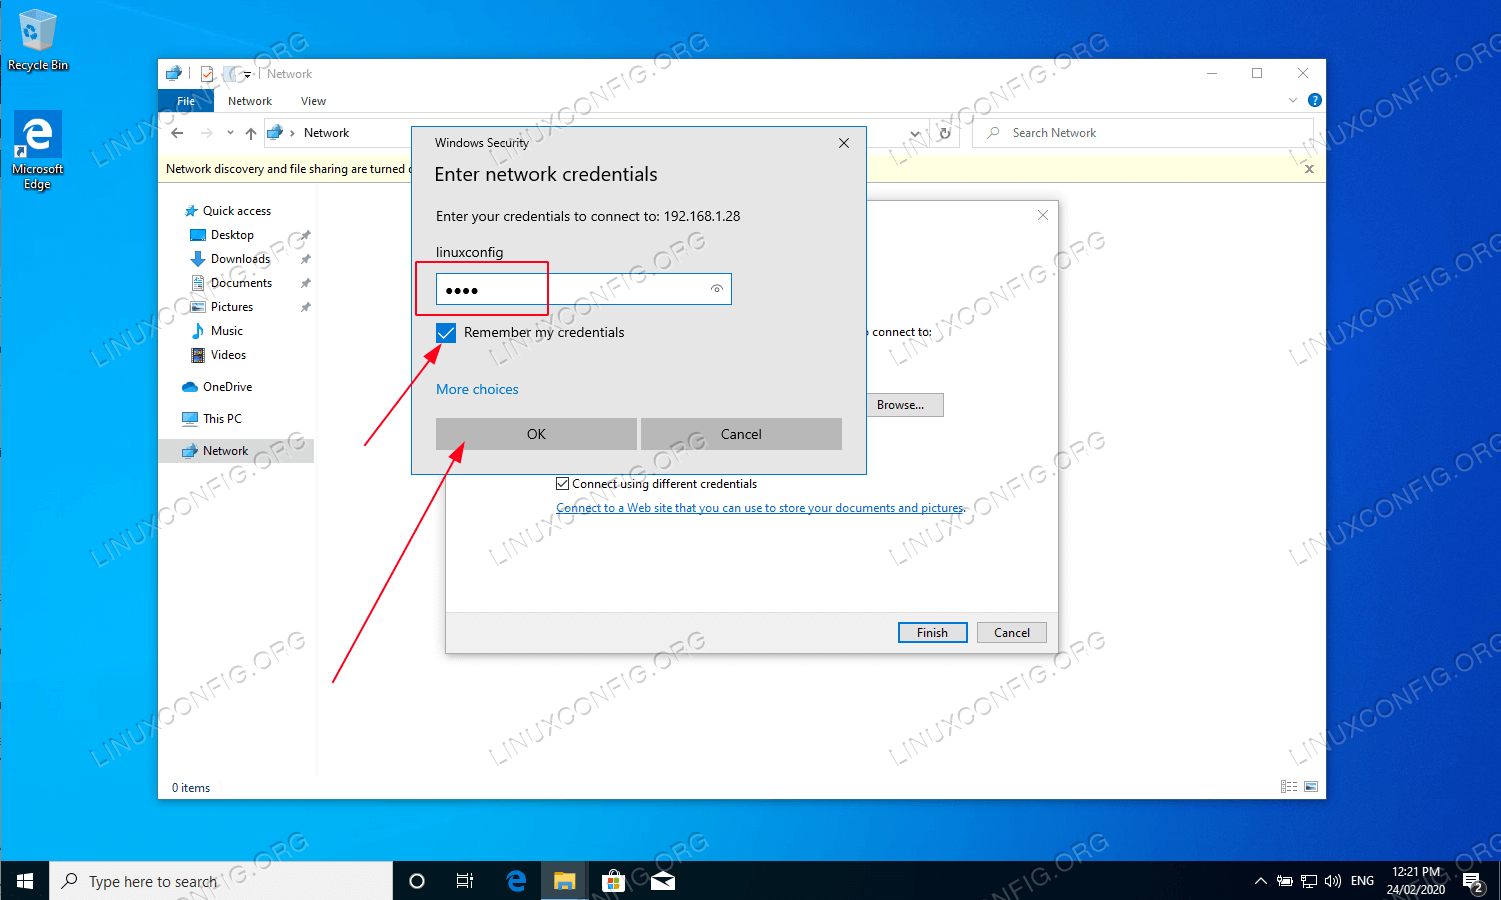
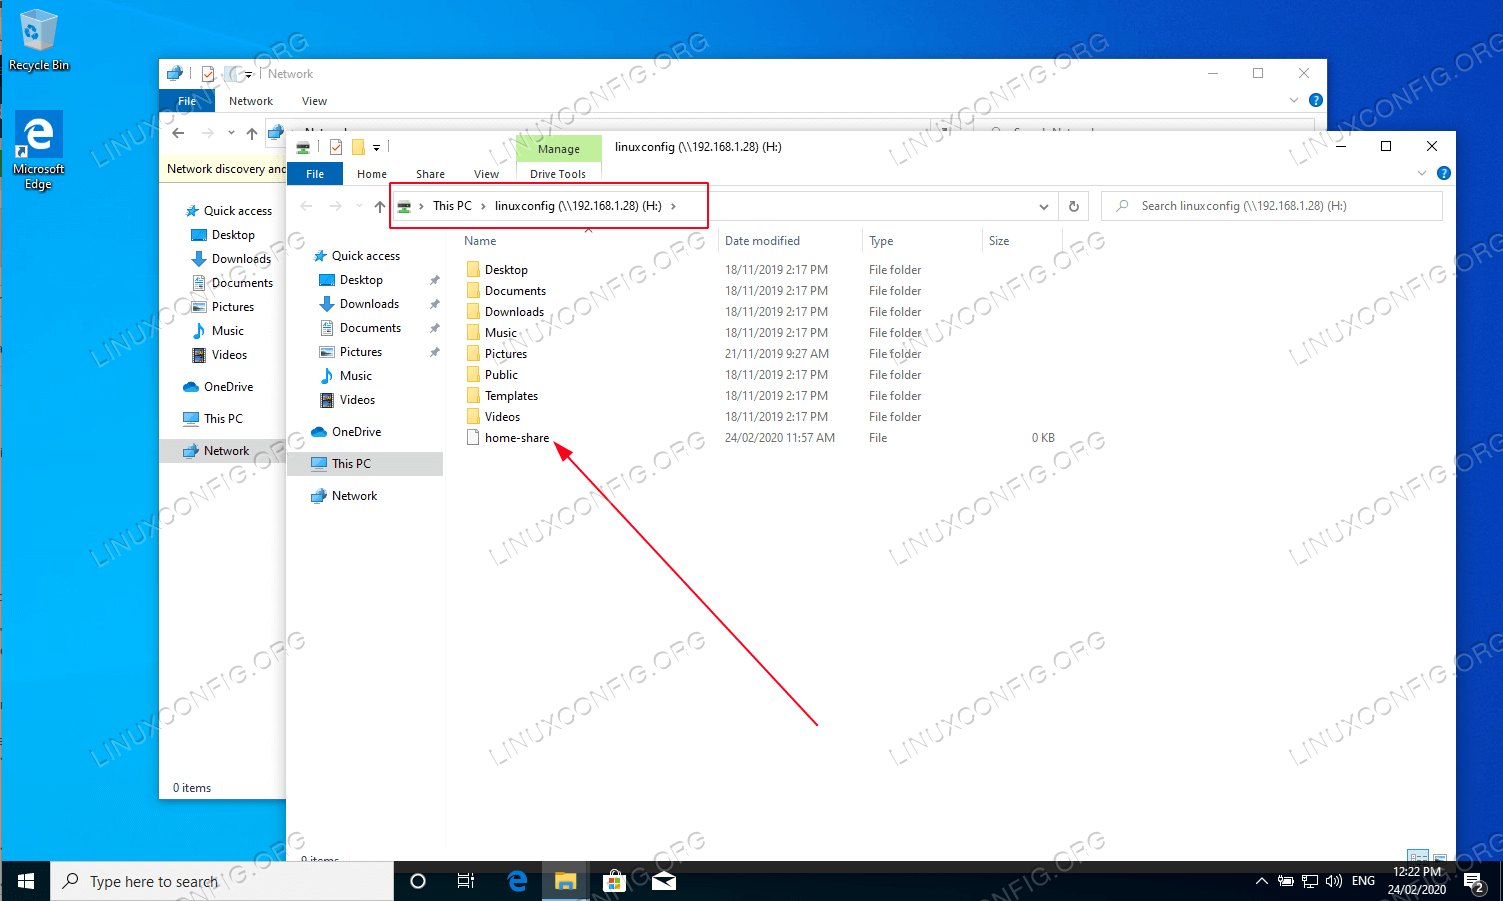
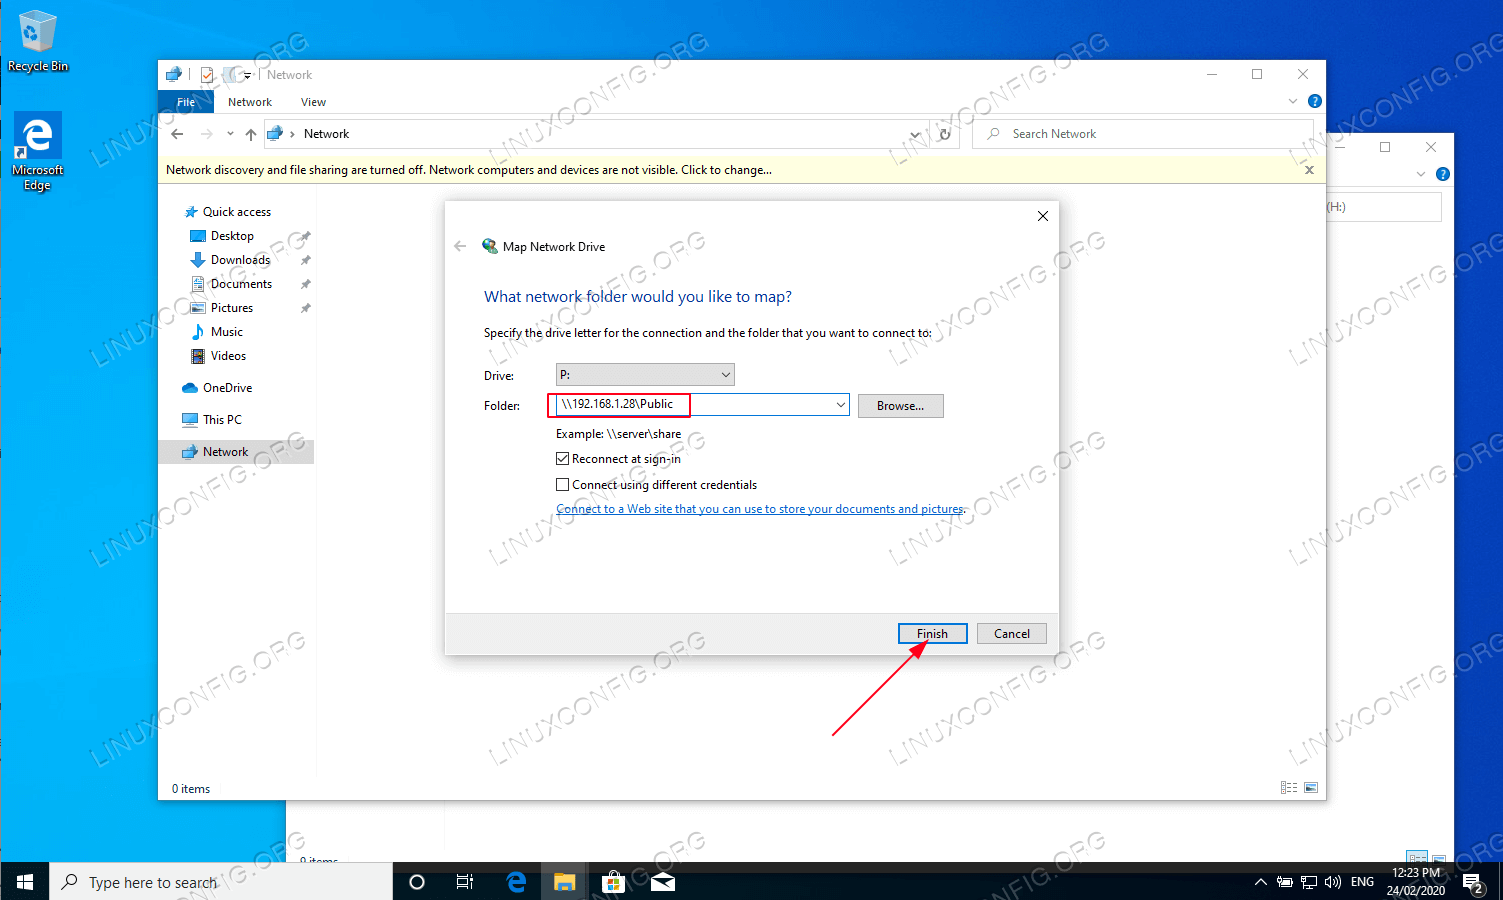
All done. Now feel free to add more features to your Samba share server configuration.
Closing Thoughts ----------------
In this tutorial, we learned how to install Samba on Ubuntu 22.04 Jammy Jellyfish Linux. We also saw how to create a Samba share, a Samba user, and configure read and write access. Then, we went over the steps to connect to our Samba server from a client machine running MS Windows. Using this guide should allow you to create a file server that can host connections from various operating systems.
```
How to Partition and Format Disk Drives on Linux
This article will walk you through how you can partition and format disks to complete common Linux administration tasks.

How to Partition and Format Disk Drives on Linux - Cherry Servers
Formatting and partitioning disks is a key aspect of Linux administration. You can use formatting and partitioning to address use cases like prepping storage media for use, addressing space issues with existing disks, or wiping a filesystem.
This article will walk you through how you can partition and format disks to complete common Linux administration tasks.
What is disk formatting in Linux? ---------------------------------
Disk formatting is the process that prepares a storage partition for use. Formatting deletes the existing data on the partition and sets up a filesystem.
Some of the most popular filesystems for Linux include:
- Ext4 - Ext4 is a common default filesystem on many modern Linux distributions. It supports file sizes up to 16TB and volumes up to 1EB. It is not supported on Windows by default.
- NTFS - NTFS is a popular filesystem developed by Microsoft. It supports 8PB max volume and file sizes. The Linux kernel added full support for NTFS in version 5.15.
- FAT32 - Is an older filesystem, but you may still see it used in the wild. It supports a 4GB max file size and a 2TB max volume size. Many \*nix and Windows operating systems support FAT32.
What is partitioning in Linux? ------------------------------
Partitioning is the process of creating logical boundaries on a storage device. Common examples of storage devices include hard disk drives (HDDs), solid-state drives (SSDs), USB flash drives, and SD cards. Creating a partition on a drive logically separates it from other partitions. This logical separation can be useful for a variety of scenarios, including limiting the growth of a filesystem and installing multiple operating systems on a single drive.
How to Partition and Format Disk Drives on Linux ------------------------------------------------
Now let's dive into partitioning and formatting disks on a Linux system.
Prerequisites
Before we begin, you'll need:
- Access to the terminal of a Linux system. We'll use Ubuntu 22.04 LTS.
- sudo/root privileges
- An available disk you want to format and partition. We are going to use a server with custom partitioning layout from Cherry Servers.
- Backups of any data you don't want to lose (optional)
How to view disks in Linux
To view available disks in Linux, run this command:
``` fdisk -l | grep "Disk /"
```
Output should look similar to:
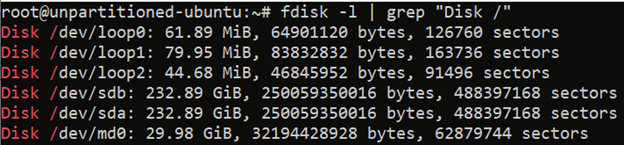
The fsdisk output above included loop devices which are logical pseudo-devices, but not real disks. If you need a more refined view of your disks, use the lsblk -I 8 -d command. "-I 8" specifies a the kernel device number for block devices and the -d excludes partitions.
The output should look similar to:
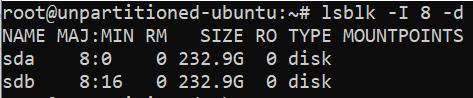
If you need more information to properly identify your drives, use lshw -class disk. The output will include additional identifying information such as the product, size, vendor, bus, and logical name (the device’s path), similar to this:
!list more information about disk devices
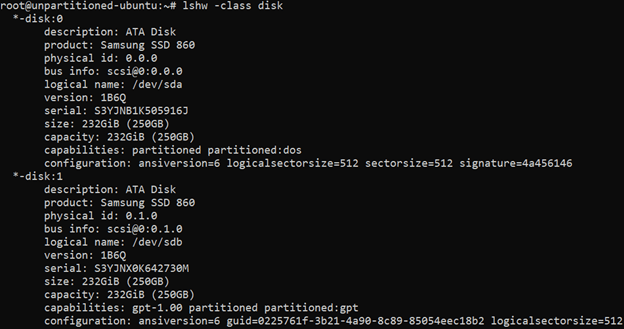
How to view existing partitions in Linux
Before you create a new partition, you may want to view your existing partitions. To view existing partitions in Linux, use the lsblk command. The output should look similar to:
!list existing disk partitions
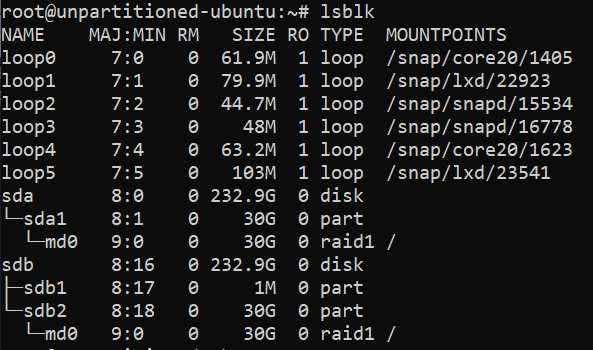
Partitions have a TYPE of part and are nested under their disks in the output like sda1 in our example.
If you want to see information like file system types, disk labels and UUIDs, use the command lsblk -f. The output should look similar to:
!list full information about existing disk partitions
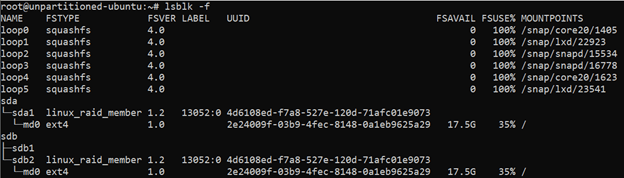
How to Partition a Disk in Linux
There are several ways to partition disks in Linux, including parted and gparted, but we'll focus on the popular fdisk utility here. For our case, we'll assume our disk is mounted on /dev/sda. We will create a primary partition and use the default partition number, first sector, and last sector that fdisk selects. You can modify these options based on your requirements.
Note: If you're partitioning a disk that is currently mounted, first unmount it with the command \`umount </path/to/disk>.
To begin, we'll open our drive in fdisk with this command:
``` fdisk /dev/sda
```
That will launch the interactive fdisk utility and you should see output similar to:
At the Command (m for help): prompt, type n to create a new partition. The output should look similar to:
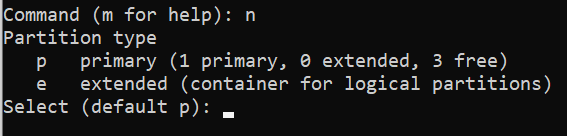
It shows that the disk that is mounted on /dev/sda directory has one primary partition that is formatted and being used at the moment.
We'll press enter to select the default and create a new primary partition. Then, we'll be prompted to give a partition number.
We'll use the default of 2 and then get prompted for a sector number.
We'll press enter to accept the default first sector, and then get prompted for a last sector.
Again, we'll press enter to accept the default and fdisk will create the partition. Note that if we wanted to create a smaller partition, we could use a smaller gap between our first and last block. This would enable us to create multiple partitions on the drive.
The full output looks like this:
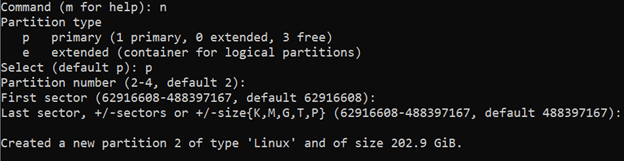
You may enter p to see a partition table and make sure your changes are correct:
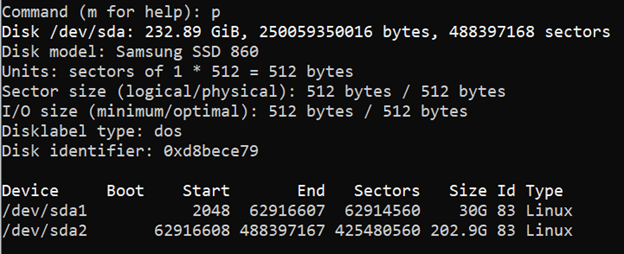
As you can see, we now have two partitions on the /dev/sda disk. At the Command (m for help): prompt, input a w to write the changes to the Linux system. The output should look similar to:
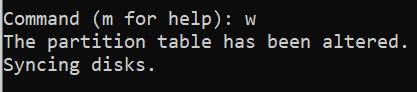
fdisk will then exit and you'll be back at Linux shell. We can see our newly created partition sda by running the command lsblk /dev/sda. The output should look similar to:
How to format a disk in Linux
Now that our disk is fully partitioned, we can format the newly created sda2 partition. The general syntax for formatting a disk partition in Linux is:
``` mkfs.<filesystem> </path/to/disk/partition>
```
For example, to format our newly created /dev/sda2 partition, we can use this command:
``` mkfs.ext4 /dev/sda2
```
The output should look similar to:
!format new partition to ext4 file system
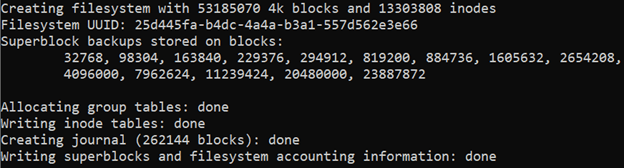
To use an NTFS filesystem instead, the command is:
``` mkfs.ntfs /dev/sda2
```
To use a FAT32 filesystem instead, the command is:
``` mkfs.fat -F 32 /dev/sda2
```
The -F parameter specifies the FAT-TYPE, which determines if the file allocation tables are 12, 16, or 32-bit.
How to mount a disk in Linux
Once a disk is partitioned and formatted, we can mount the filesystem in Linux.
First, if your mount point doesn't already exist, created it with the mkdir command. The general command syntax is:
``` mkdir </path/for/your/mount/point>
```
For example, to make our mount point /var/cherry, use this command:
``` mkdir /var/cherry
```
Next, we mount our partition using the mount command. The general command structure to mount a disk partition in Linux is:
``` mount -t <filesystem_type> -o <options> </path/to/disk/partition> </path/for/your/mount/point>
```
Note: If you omit the -t option, the mount command will default to auto and attempt to guess the correct filesystem type.
For example, to mount our /dev/sda2 (which has an Ext4 filesystem) to /var/cherry in read/write mode, we can use this command"
``` mount -t ext4 -o rw /dev/sda2 /var/cherry
```
If there are no errors, the command will not return any output.
You can confirm your partitions mount point is correct with the lsblk /dev/sda command. The output should include a new mountpoint /var/cherry for your newly formatted /dev/sda2 device:
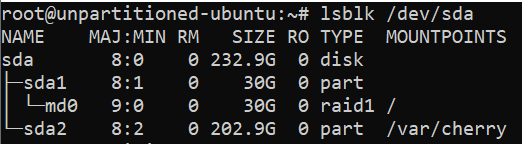
Finally, to ensure the disk automatically mounts when your Linux system boots, you need to add it to /etc/fstab.
⚠️ Warning: Be careful! Errors in /etc/fstab can cause your system not to boot!
The general format for an /etc/fstab partition entry is
``` </path/to/disk/partition> </path/for/your/mount/point> <filesystem_type> <options_from_mount> <dump> <pass_number>
```
Paraphrasing Ubuntu's Fstab File Configuration,<dump> enables or disables backups using the command dump. It can be set to 1 (enabled) or 0 (disabled) and is generally disabled. <pass_number> determines the order fsck checks the partition for errors when the system boots. Generally, a system's root device is 1 and other partitions are 2. 0 disables the fsck check on boot.
To edit /etc/fstab, open it in a text editor like nano or vim and make the changes. For our /dev/sda2 partition mounted at /var/cherry, we'll use this configuration:
``` /dev/sda2 /var/cherry ext4 rw 0 0
```
Save the changes and close your text editor when you're done.
Conclusion ----------
That's it! Now you know the basics of how to partition and format disks on Linux. For a deeper dive on the topic of partitioning, formatting, and mounting drives, we recommend reading the man pages for the specific tools we used here like the mkfs.<type> utilities (e.g. mkfs.ext4), fdisk, mount, and fstab.
HOWTO: Resize a Linux VM's LLVM Virtual Disk on a ZVOL
source ***
HOWTO: Resize a Linux VM's LLVM Virtual Disk on a ZVOL | TrueNAS Community
If you have a Linux VM, which uses the LLVM filesystem, you can easily increase the disk space available to the VM.
Linux Logical Volume Manager allows you to have logical volumes (LV) on top of logical volume groups (VG) on top of physical volumes (PV) (ie partitions).
This is conceptually similar to zvols on pools on vdevs in zfs.
This was tested with TrueNAS-CORE 12 and Ubuntu 20.04.
Firstly, there are some useful commands:
pvs - list physical volumes
lvs - list logical volumes
lvdisplay - logical volume display
pvdisplay - physical volume display
df - disk free space
So, to start
df -h - show disk free space, human readable
and you should see something like this
Code:
``` Filesystem Size Used Avail Use% Mounted on dev 2.9G 0 2.9G 0% /dev tmpfs 595M 61M 535M 11% /run /dev/mapper/ubuntu--vg-ubuntu--lv 8.4G 8.1G 0 100% / tmpfs 3.0G 0 3.0G 0% /dev/shm tmpfs 5.0M 0 5.0M 0% /run/lock
```
This is the interesting line:
Code:
``` /dev/mapper/ubuntu--vg-ubuntu--lv 8.4G 8.1G 0 100% /
```
it gives you the hint of which LV and VG the root drive is using.
you can list the logical volumes lvs
Code:
``` root@ubuntu:/# lvs LV VG Attr LSize Pool Origin Data% Meta% Move Log Cpy%Sync Convert ubuntu-lv ubuntu-vg -wi-ao---- <8.50g
```
and physical volumes pvs
Code:
``` root@ubuntu:/# pvs PV VG Fmt Attr PSize PFree /dev/vda3 ubuntu-vg lvm2 a-- <8.50g 0
```
Now you can see that the ubuntu-lv LV is on the ubuntu-vg VG is on the PV /dev/vda3
(that's partition 3 of device vda)
Shutdown the VM. Edit the ZVOL to change the size. Restart the VM.
Once you get back, run parted with the device id, repair the GPT information and resize the partition, as per below.
launch parted on the disk parted /dev/vda
Code:
``` root@ubuntu:~# parted /dev/vda GNU Parted 3.3 Using /dev/vda Welcome to GNU Parted! Type 'help' to view a list of commands.
```
view the partitions
print
Code:
``` (parted) print Warning: Not all of the space available to /dev/vda appears to be used, you can fix the GPT to use all of the space (an extra 188743680 blocks) or continue with the current setting?
```
Parted will offer to fix the GPT. Fix it. f
Code:
``` Fix/Ignore? f Model: Virtio Block Device (virtblk) Disk /dev/vda: 107GB Sector size (logical/physical): 512B/16384B Partition Table: gpt Disk Flags:
Number Start End Size File system Name Flags 1 1049kB 538MB 537MB fat32 boot, esp 2 538MB 1612MB 1074MB ext4 3 1612MB 10.7GB 9125MB
```
The disk is resized, but the partition is not.
Resize partition 3 to 100%, resizepart 3 100%
Code:
``` (parted) resizepart 3 100% (parted) print Model: Virtio Block Device (virtblk) Disk /dev/vda: 107GB Sector size (logical/physical): 512B/16384B Partition Table: gpt Disk Flags:
Number Start End Size File system Name Flags 1 1049kB 538MB 537MB fat32 boot, esp 2 538MB 1612MB 1074MB ext4 3 1612MB 107GB 106GB
(parted)
```
And the partition is resized. You can exit parted with quit
now we need to resize the physical volume
pvresize /dev/vda3
Code:
``` root@ubuntu:~# pvresize /dev/vda3 Physical volume "/dev/vda3" changed 1 physical volume(s) resized or updated / 0 physical volume(s) not resized
```
You can check the result with pvdisplay
Code:
``` root@ubuntu:~# pvdisplay --- Physical volume --- PV Name /dev/vda3 VG Name ubuntu-vg PV Size <98.50 GiB / not usable 1.98 MiB Allocatable yes PE Size 4.00 MiB Total PE 25215 Free PE 23040 Allocated PE 2175 PV UUID IGdmTf-7Iql-V9UK-q3aD-BdNP-VfBo-VPx1Hs
```
Then you can use lvextend to resize the LV and resize the the filesystem, over the resized pv.
lvextend --resizefs ubuntu-vg/ubuntu-lv /dev/vda3
Code:
``` root@ubuntu:~# lvextend --resizefs ubuntu-vg/ubuntu-lv /dev/vda3 Size of logical volume ubuntu-vg/ubuntu-lv changed from <8.50 GiB (2175 extents) to <98.50 GiB (25215 extents). Logical volume ubuntu-vg/ubuntu-lv successfully resized. resize2fs 1.45.5 (07-Jan-2020) Filesystem at /dev/mapper/ubuntu--vg-ubuntu--lv is mounted on /; on-line resizing required old_desc_blocks = 2, new_desc_blocks = 13 The filesystem on /dev/mapper/ubuntu--vg-ubuntu--lv is now 25820160 (4k) blocks long.
root@ubuntu:~#
```
and finally... you can check the freespace again.
df -h
Code:
``` root@ubuntu:~# df -h Filesystem Size Used Avail Use% Mounted on udev 2.9G 0 2.9G 0% /dev tmpfs 595M 1.1M 594M 1% /run /dev/mapper/ubuntu--vg-ubuntu--lv 97G 8.2G 85G 9% /
```
85G free instead of 0 much better.
CIDR to IPv4 Conversion
Free IP address tool to translate IPv4 address range into CIDR (Classless Inter-Domain Routing) format and vice-versa.

CIDR to IPv4 Address Range Utility Tool | IPAddressGuide
CIDR is the short for Classless Inter-Domain Routing, an IP addressing scheme that replaces the older system based on classes A, B, and C. A single IP address can be used to designate many unique IP addresses with CIDR. A CIDR IP address looks like a normal IP address except that it ends with a slash followed by a number, called the IP network prefix. CIDR addresses reduce the size of routing tables and make more IP addresses available within organizations. Please try out our CIDR calculator below.
Add CIDR Widget To Your Website
You can easily add the CIDR widget on your website by copying the following HTML code and place it on your web page
<div style="text-align:center"> <form action="https://www.ipaddressguide.com/cidr" method="post"> <p style="background:#fff;border:1px solid #99A8AE;width:180px;padding:5px 5px 5px 5px;font-size:11px;font-family:'Trebuchet MS',Arial,Sans-serif;"> <a href="https://www.ipaddressguide.com" target="_blank"><img src="https://www.ipaddressguide.com/images/ipaddressguide.png" alt="CIDR to IPv4 Address Range Utility Tool | IPAddressGuide" border="0" width="120" height="12" /></a><br /> <b>CIDR to IPv4 Conversion</b><br /><br /> <label>CIDR</label><br /> <input type="text" name="cidr" value="" style="border:solid 1px #C0C0C0;font-size:9px;width:110px;" /><br /> <input type="submit" value="Calculate" style="width:100px;font-size:10px;margin-top:3px;padding:2px 3px;color:#FFF;background:#8EB50C;border-width:1px;border-style:solid;"> </p> </form> </div>
Related Articles
What is CIDR
This guide explains about what is CIDR and its benefits.
Convert IP2Location CSV data into IP ranges or CIDR
The article discusses about how to convert IP2Location CSV data into IP ranges or CIDR.
Converting IP address ranges into CIDR format
The article demonstrates how to convert IP addresses ranges into CIDR format.
Converting IP2Proxy data from IP number ranges to CIDR
This guide demonstrates how to convert the IP2Proxy data from IP number ranges to CIDR.
Synchronizing folders with rsync
Synchronizing folders with rsync
In this post I cover the basics of rsync, in preparation for a subsequent post that will cover backups and it's use in conjunction with cronjobs to automatize the backup process. From the copying and synchronization of local files and folders, to it's use for transfer information among computers. Its use as a daemon when SSH is unavailable was moved to it's own section.
Topics The basics of rsync Copying local files and folders Dealing with whitespace and rare characters Update the contents of a folder Synchronizing two folders with rsync Compressing the files while transferring them Transferring files between two remote systems Excluding files and directories Running rsync as a daemon (moved to it's own section) Some additional rsync parameters Footnotes
The basics of rsync
rsync is a very versatile copying and backup tool that is included by default in almost every Linux distribution. It can be used as an advanced copying tool, allowing us to copy files both locally and remotely. It can also be used as a backup tool. It supports the creation of incremental backups.
rsync counts with a famous delta-transfer algorithm that allows us to transfer new files as well as recent changes to existent files, while ignoring unchanged files. Additionally to this, the behavior of rsync can be throughly customized, helping us to automatize backups, it can also be run as a daemon to turn the computer into a host and allow rsync clients connect to it.
Besides the copying of local files and folders, rsync allow us to copy over SSH (Secure Shell), RSH (Remote Shell) and it can be run as a daemon in a computer and allow other computers to connect to it, when rsync is run as a daemon it listens to the port TCP 873.
When we use rsync as a daemon or when we use RSH, the data that is send between computers travels unencrypted, so, if you are transferring files between two computers in the same local network, this is useful, but this shouldn't be used to transfer files over insecure networks, such as the Internet. For this purpose SSH is the way to go.
This is the main reason why I favor the use of SSH for my transfers, besides, since SSH is secure, many servers have the SSH daemon available. But the use of rsync as a daemon for transfers over fast connections, as is usually the case in a local network, is useful. I don't have the RSH daemon running in my computers so you may find me a bit biased about SSH in the examples. The examples covering the transfer of files between two computers use SSH as the medium of transport, but in a separate post I cover the use of rsync as a daemon.
Copying local files and folders
To copy the contents of one local folder into another, replacing the files in the destination folder, we use:
rsync -rtv source_folder/ destination_folder/
In the source\_folder notice that I added a slash at the end, doing this prevents a new folder from being created, if we don't add the slash, a new folder named as the source folder will be created in the destination folder. So, if you want to copy the contents of a folder called Pictures into an existent folder which is also called Pictures but in a different location, you need to add the trailing slash, otherwise, a folder called Pictures is created inside the Pictures folder that we specify as destination.
rsync -rtv source/ destination/
!A graphical representation of the results of rsync with a trailing slash in the source folder.
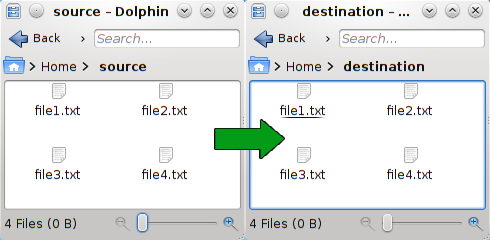
rsync -rtv source destination/
!A graphical representation of the results of rsync without a trailing slash in the source folder.
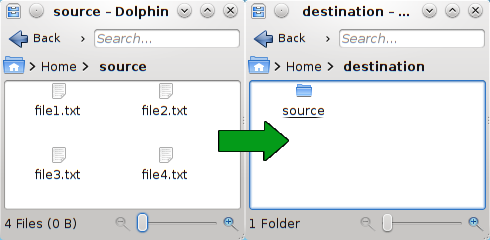
The parameter -r means recursive, this is, it will copy the contents of the source folder, as well as the contents of every folder inside it.
The parameter -t makes rsync preserve the modification times of the files that it copies from the source folder.
The parameter -v means verbose, this parameter will print information about the execution of the command, such as the files that are successfully transferred, so we can use this as a way to keep track of the progress of rsync.
This are the parameters that I frequently use, as I am usually backing up personal files and this doesn't contain things such as symlinks, but another very useful parameter to use rsync with is the parameter -a.
rsync -av source/ destination/
The parameter -a also makes the copy recursive and preserve the modification times, but additionally it copies the symlinks that it encounters as symlinks, preserve the permissions, preserve the owner and group information, and preserve device and special files. This is useful if you are copying the entire home folder of a user, or if you are copying system folders somewhere else.
Dealing with whitespace and rare characters
We can escape spaces and rare characters just as in bash, by the use of \\ before any whitespace and rare character. Additionally, we can use single quotes to enclose the string:
rsync -rtv so\{ur\ ce/ dest\ ina\{tion/ rsync -rtv 'so{ur ce/' 'dest ina{tion/'
Update the contents of a folder
In order to save bandwidth and time, we can avoid copying the files that we already have in the destination folder that have not been modified in the source folder. To do this, we can add the parameter -u to rsync, this will synchronize the destination folder with the source folder, this is where the delta-transfer algorithm enters. To synchronize two folders like this we use:
rsync -rtvu source_folder/ destination_folder/
By default, rsync will take into consideration the date of modification of the file and the size of the file to decide whether the file or part of it needs to be transferred or if the file can be left alone, but we can instead use a hash to decide whether the file is different or not. To do this we need to use the -c parameter, which will perform a checksum in the files to be transferred. This will skip any file where the checksum coincides.
rsync -rtvuc source_folder/ destination_folder/
Synchronizing two folders with rsync
To keep two folders in synchrony, not only do we need to add the new files in the source folder to the destination folder, as in the past topics, we also need to remove the files that are deleted in the source folder from the destination folder. rsync allow us to do this with the parameter --delete, this used in conjunction with the previously explained parameter -u that updates modified files allow us to keep two directories in synchrony while saving bandwidth.
rsync -rtvu --delete source_folder/ destination_folder/
The deletion process can take place in different moments of the transfer by adding some additional parameters:
- rsync can look for missing files and delete them before it does the transfer process, this is the default behavior and can be set with
--delete-before - rsync can look for missing files after the transfer is completed, with the parameter
--delete-after - rsync can delete the files done during the transfer, when a file is found to be missing, it is deleted at that moment, we enable this behavior with
--delete-during - rsync can do the transfer and find the missing files during this process, but instead of delete the files during this process, waits until it is finished and delete the files it found afterwards, this can be accomplished with
--delete-delay
e.g.:
rsync -rtvu --delete-delay source_folder/ destination_folder/
Compressing the files while transferring them
To save some bandwidth, and usually it can save some time as well, we can compress the information being transfer, to accomplish this we need to add the parameter -z to rsync.
rsync -rtvz source_folder/ destination_folder/
Note, however, that if we are transferring a large number of small files over a fast connection, rsync may be slower with the parameter -z than without it, as it will take longer to compress every file before transfer it than just transferring over the files. Use this parameter if you have a a connection with limited speed between two computers, or if you need to save bandwidth.
Transferring files between two remote systems
rsync can copy files and synchronize a local folder with a remote folder in a system running the SSH daemon, the RSH daemon, or the rsync daemon. The examples here use SSH for the file transfers, but the same principles apply if you want to do this with rsync as a daemon in the host computer, read Running rsync as a daemon when ssh is not available further below for more information about this.
To transfer files between the local computer and a remote computer, we need to specify the address of the remote system, it may be a domain name, an IP address, or a the name of a server that we have already saved in our SSH config file (information about how to do this can be found in Defining SSH servers), followed by a colon, and the folder we want to use for the transfer. Note that rsync can not transfer files between two remote systems, only a local folder or a remote folder can be used in conjunction with a local folder. To do this we use:
Local folder to remote folder, using a domain, an IP address and a server defined in the SSH configuration file:
rsync -rtvz source_folder/ user@domain:/path/to/destination_folder/ rsync -rtvz source_folder/ [email protected]:/path/to/destination_folder/ rsync -rtvz source_folder/ server_name:/path/to/destination_folder/
Remote folder to local folder, using a domain, an IP address and a server defined in the SSH configuration file:
rsync -rtvz user@domain:/path/to/source_folder/ destination_folder/ rsync -rtvz [email protected]:/path/to/source_folder/ destination_folder/ rsync -rtvz server_name:/path/to/source_folder/ destination_folder/
Excluding files and directories
There are many cases in which we need to exclude certain files and directories from rsync, a common case is when we synchronize a local project with a remote repository or even with the live site, in this case we may want to exclude some development directories and some hidden files from being transfered over to the live site. Excluding files can be done with --exclude followed by the directory or the file that we want to exclude. The source folder or the destination folder can be a local folder or a remote folder as explained in the previous section.
rsync -rtv --exclude 'directory' source_folder/ destination_folder/ rsync -rtv --exclude 'file.txt' source_folder/ destination_folder/ rsync -rtv --exclude 'path/to/directory' source_folder/ destination_folder/ rsync -rtv --exclude 'path/to/file.txt' source_folder/ destination_folder/
The paths are relative to the folder from which we are calling rsync unless it starts with a slash, in which case the path would be absolute.
Another way to do this is to create a file with the list of both files and directories to exclude from rsync, as well as patterns (all files that would match the pattern would be excluded, \*.txt would exclude any file with that extension), one per line, and call this file with --exclude-from followed by the file that we want to use for the exclusion of files. First, we create and edit this file in our favorite text editor, in this example I use gedit, but you may use kate, Vim, nano, or any other text editor:
touch excluded.txt gedit excluded.txt
In this file we can add the following:
directory relative/path/to/directory file.txt relative/path/to/file.txt /home/juan/directory /home/juan/file.txt *.swp
And then we call rsync:
rsync -rvz --exclude-from 'excluded.txt' source_folder/ destination_folder/
In addition to delete files that have been removed from the source folder, as explained in Synchronizing two folders with rsync, rsync can delete files that are excluded from the transfer, we do this with the parameter --delete-excluded, e.g.:
rsync -rtv --exclude-from 'excluded.txt' --delete-excluded source/ destination/
This command would make rsync recursive, preserve the modification times from the source folder, increase verbosity, exclude all the files that match the patterns in the file excluded.txt, and delete all of this files that match the patternif they exist in the destination folder.
Running rsync as a daemon when ssh is not available
This was moved to it's own section, Running rsync as a daemon.
Some additional rsync parameters
-t Preserves the modification times of the files that are being transferred.
-q Suppress any non-error message, this is the contrary to -v which increases the verbosity.
-d Transfer a directory without recursing, this is, only the files that are in the folder are transferred.
-l Copy the symlinks as symlinks.
-L Copy the file that a symlink is pointing to whenever it finds a symlink.
-W Copy whole files. When we are using the delta-transfer algorithm we only copy the part of the archive that was updated, sometimes this is not desired.
--progress Shows the progress of the files that are being transferred.
-h Shows the information that rsync provides us in a human readable format, the amounts are given in K's, M's, G's and so on.
Footnotes
The amount of options that rsync provide us is immense, we can define exactly which files we want to transfer, what specific files we want to compress, what files we want to delete in the destination folder if this files exists, and we can deal with system files as well, for more information we can use man rsync and man rsyncd.conf
I leave the information concerning backups out of this post, as this will be covered, together with the automation of the backups, in an incoming post.
It is possible to run rsync on Windows with the use of cygwin, however I don't have a Windows box available at the moment (nor do I plan to aquire one in the foreseeable future), so even thought I have done it I can't post about this. If you run rsync as a service in Windows tho, you need to add the line "strict mode = false" in rsyncd.conf under the modules area, this will prevent rsync from checking the permissions in the secrets file and thus failing because they are not properly set (as they don't work the same as in Linux).
This post may be updated if there is something to correct or to add a little more information if I see it necessary.
Understanding the TrueNAS SCALE "hostPathValidation" setting
source ***
Understanding the TrueNAS SCALE "hostPathValidation" setting | TrueNAS Community
What is the “hostPathValidation” setting?
With the recent release of TrueNAS SCALE "Bluefin" 22.12.1, there have been a number of reports of issues with the Kubernetes "hostPathValidation" configuration setting, and requests for clarification regarding this security measure.
The “hostPathValidation” check is designed to prevent the simultaneous sharing of a dataset over a file-level protocol (SMB/NFS) while also being presented as hostPath storage to Kubernetes. This safety check prevents a container application from having the ability to accidentally perform a change in permissions or ownership to existing data in place on a ZFS dataset, or overwrite existing extended attribute (xattr) data, such as photo metadata on MacOS.
What’s the risk?
Disabling the hostPathValidation checkbox under Apps -> Settings -> Advanced Settings allows for this “shared access” to be possible, and opens up a small possibility for data loss or corruption when used incorrectly.
For example, an application that transcodes media files might, through misconfiguration or a bug within the application itself, accidentally delete an “original-quality” copy of a file and retain the lower-resolution transcoded version. Even with snapshots in place for data protection, if the problem is not detected prior to snapshot lifetime expiry, the original file could be lost forever.
Users with complex ACL schemes or who make use of extended attributes should take caution before disabling this functionality. The same risk applies to users running CORE with Jails or Plugins accessing data directly.
A change of this manner could result in data becoming unavailable to connected clients; and unless the permissions were very simplistic (single owner/group, recursive) reverting a large-scale change would require reverting to a previous ZFS snapshot. If no such snapshot exists, recovery would not be possible without manually correcting ownership and permissions.
When was this setting implemented?
In the initial SCALE release, Angelfish 22.02, there was no hostPathValidation check. As of Bluefin 22.12.0, the hostPathValidation setting was added and enabled by default. A bypass was discovered shortly thereafter, which allowed users to present a subdirectory or nested dataset of a shared dataset as a hostPath without needing to uncheck the hostPathValidation setting - thus exposing the potential for data loss. Another bypass was to stop SMB/NFS, start the application, and then start the sharing service again.
Both of these bypass methods were unintended, as they exposed a risk of data loss while the “hostPathValidation” setting was still set. These bugs were corrected in Bluefin 22.12.1, and as such, TrueNAS SCALE Apps that were dependent on these bugs being present in order to function will no longer deploy or start unless the hostPathValidation check is removed.
What’s the future plan for this setting?
We have received significant feedback that these changes and the validation itself have caused challenges. In a future release of TrueNAS SCALE, we will be moving away from a system-wide hostPathValidation checkbox, and instead providing a warning dialog that will appear during the configuration of the hostPath storage for any TrueNAS Apps that conflict with existing SMB/NFS shares.
Users can make the decision to proceed with the hostPath configuration at that time, or cancel the change and set up access to the folder through another method.
If data must be shared between SMB and hostPath, how can these risks be mitigated?
Some applications allow for connections to SMB or NFS resources within the app container itself. This may require additional network configuration, such as a network bridge interface as described in the TrueNAS docs “Accessing NAS from a VM” as well as creating and using a user account specific to the application.
https://www.truenas.com/docs/scale/scaletutorials/virtualization/accessingnasfromvm/
Users who enable third-party catalogs, such as TrueCharts, can additionally use different container path mount methods such as connecting to an NFS export. Filesystem permissions will need to be assigned to the data for the apps user in this case.